FMZ intermediate tutorial
 2
2
 4382
4382
[TOC]
This tutorial will cover more details about FMZ platform,more practical skills about using API. You should read through the beginner tutorial and have a basic understanding of FMZ before learning this intermediate tutorial.
After learning the entire tutorial, you will make full use of FMZ and be able to write more customized, more efficient and more complex strategies.
1.Add multiple exchanges and trade multiple symbols
You can trade on multiple exchanges and multiple symbols within one robot easily. Here is how it works:
Add one exchange or multiple exchanges when start the robot.
The API can be called like
exchange.GetTicker()when one exchange is addedWhen multiple exchanges are added, the API is called like
exchanges[0].GetTicker(),exchanges[1].GetTicker()
You can add the same exchange with different symbols.

You can change the symbol that is bind with
exchangeby usingIOfunctionvar symbols = ["BTC_USDT", "LTC_USDT", "EOS_USDT", "ETH_USDT", "BCC_USDT"] var buyValue = 1000 function main(){ for(var i=0;i<symbols.length;i++){ exchange.IO("currency", symbols[i]) // It is always valid until the next change var ticker = exchange.GetTicker() var amount = _N(buyValue/ticker.Sell, 3) exchange.Buy(ticker.Sell, amount) Sleep(1000) } }2.Trade futures and swap contracts
So far, FMZ supports all major futures exchanges, such as OKEX, HuobiDM, BitMEX, GateIO and Deribit, and their swap contract.
To trade futures on FMZ, you need add a futures exchange first, set the symbol when start the bot and set the contract type in your code.
if an exchange supports both spot and futures, they should be added to FMZ separately.

Image below shows how to set the futures symbol to BTC when start the bot.

Below is how to set a contract type for every exchange.
- OKEX
    exchange.SetContractType("swap")
    exchange.SetContractType("this_week")
    exchange.SetContractType("next_week")
    exchange.SetContractType("quarter")
- HuobiDM
    exchange.SetContractType("this_week")
    exchange.SetContractType("next_week")
    exchange.SetContractType("quarter")
- BitMEX
    exchange.SetContractType("XBTUSD")
    exchange.SetContractType("XBTM19")
- GateIO
exchange.SetContractType("swap")
- Deribit
    exchange.SetContractType("BTC-PERPETUAL")
    exchange.SetContractType("BTC-27APR18")
3.About backtest
Basic introduction
FMZ has two backtesting mode: real tick and simulate tick. The real tick level contains the whole completed historical data (one tick per second), so the backtesting results are more reliable. The simulate level uses the history klines data at the interval used by your strategy. The ticks within one kline are generated by an algorithm which is the same as MT4, you can find more details at https://www.mql5.com/en/articles/75. Meanwhile, A shorter interval can be chosen as base-klines to generate ticks.
Simulate tick mode is much faster but less accurate than real tick mode. A shorter kline-interval in simulate tick mode is a compromise between accuracy and speed of testing.
Backtest configuration
Here is the default settings:
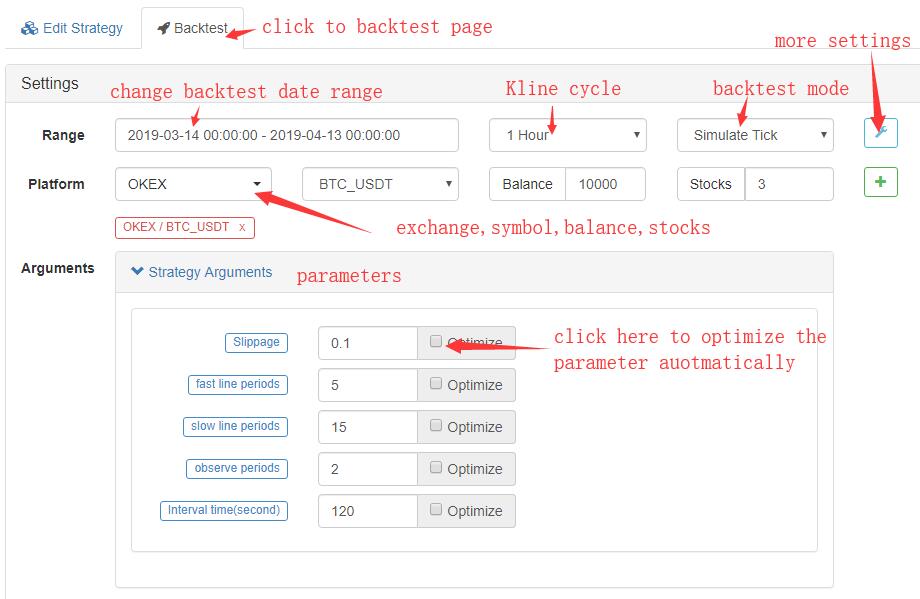 Hidden stittings:

Backtest result
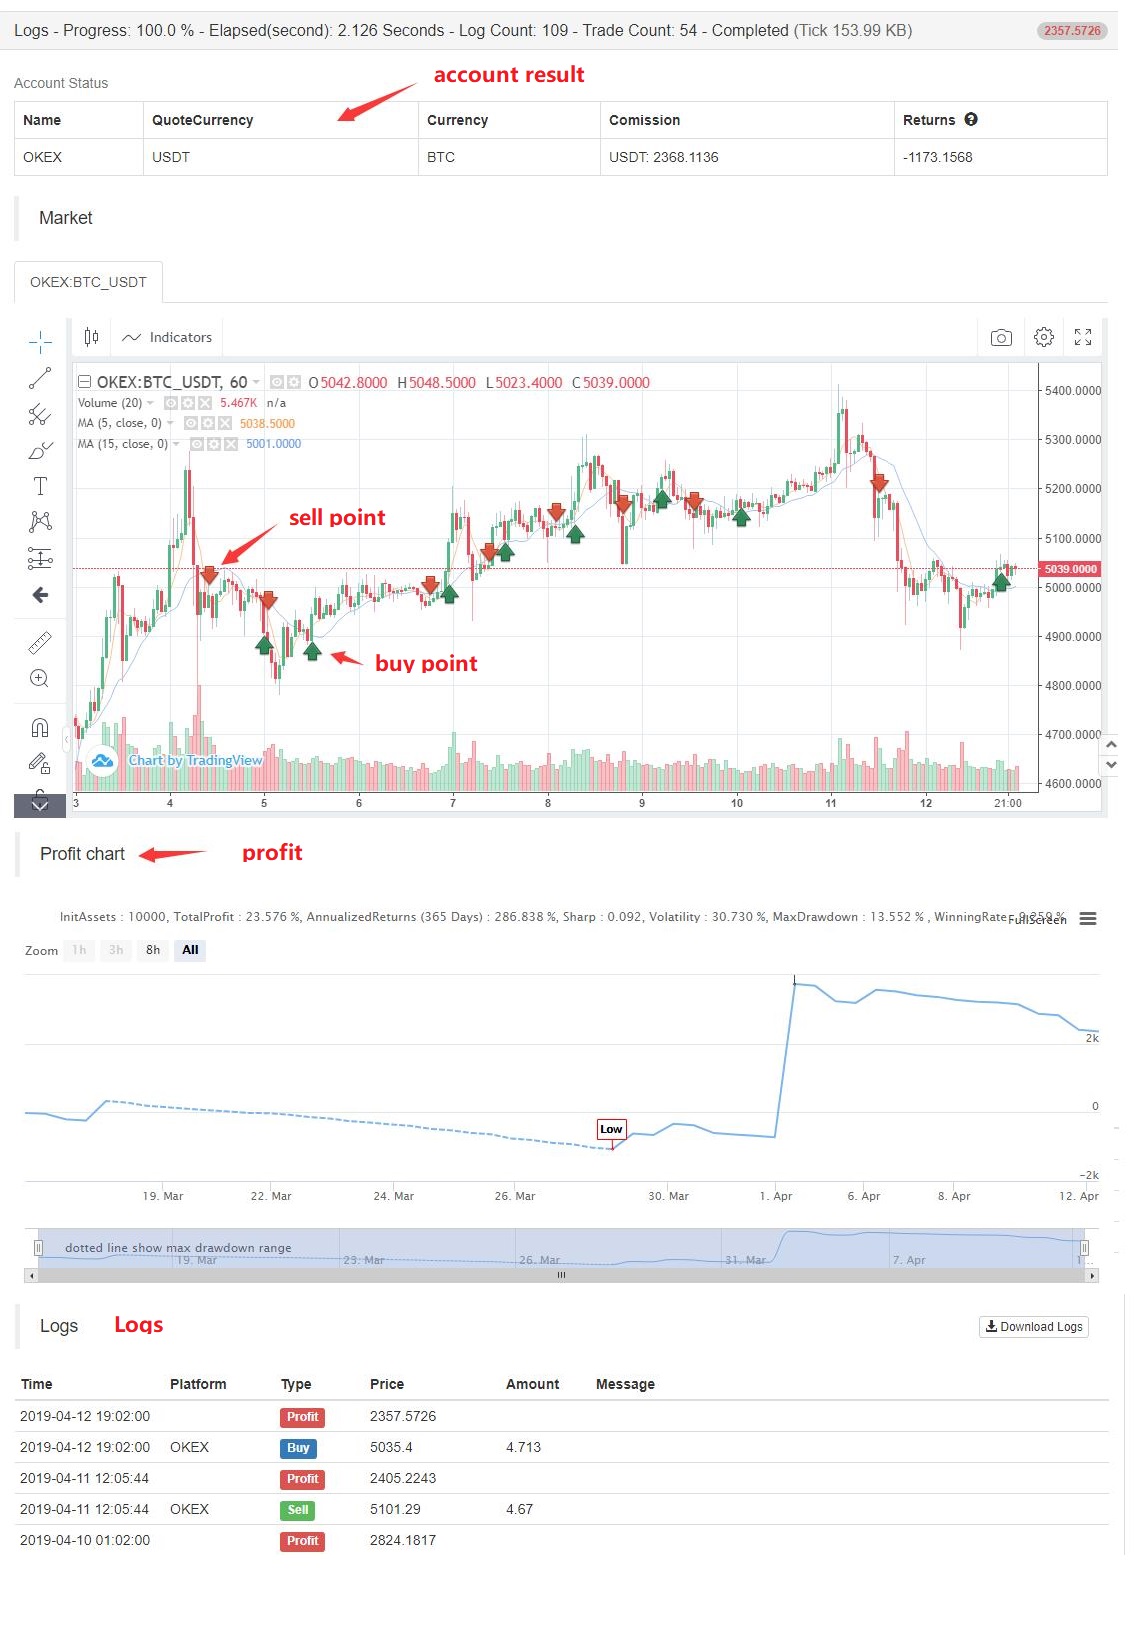
4.Error tolerance
When calling any functions that access to the exchange API (such as GetTicker, Buy, CancelOrder, etc…), you may get access failure due to an exchange server problem, wrong parameters, network transmission problem, and so on. In this case, the function will return null, which may stop the bot. So you need to know how to deal with errors.
What’s the error?
The bot will return an error message when an error happens. Just searching the exchange name + error msg, you can find what the problem is. For example, An error {"result":false,"error_code":20049} is returned when call exchange.GetAccount() on OKEX. Google OKEX 20049, here is the result:
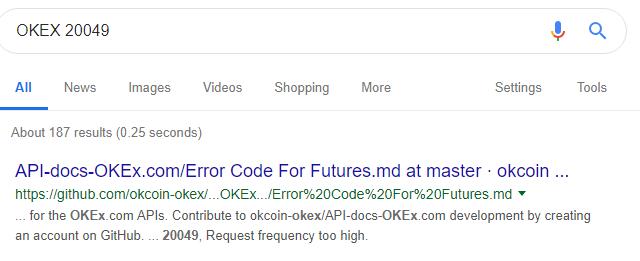 You can also check the error code on exchange API doc, such as OKEX Error Code For Futures
Deal errors
You should consider how to deal errors when write the strategy code. Here are some examples:
 // 1.Deal when the result is null
 var ticker = exchange.GetTicker()
 while(ticker == null){
     Log('GetTicker error')
     Sleep(100)
     ticker = exchange.GetTicker()
 }
 Log(ticker.Last);
 // 2.Refer when the result is not null
 var ticker = exchange.GetTicker()
 if(!ticker){
     Log(ticker.Last)
 }
 // 3._C() fucntion retry
 var ticker = _C(exchange.GetTicker) // can't  apply _C to CancelOrder, Why?
 Log(ticker.Last)
 // 4. try catch
 try{
     var ticker = exchange.GetTicker()
     Log(ticker.Last)
 }
 catch(err){
     Log('GetTicker error: ', err)
     Log(GetLastError()) //literal means, get last error
 }
5.Connect to the exchange directly
FMZ wraps all different exchanges data to the same format, which makes it easier to write a cross-platform strategy. However, you can’t get the specific data of a certain API that provide extra information and can’t access to the API that FMZ doesn’t support. There are two solutions for this trouble.
GetRawJSON
Returne the original content (string) that returned by the last REST API request, which can be used to parse the raw information by yourself.
function main(){
    var account = exchange.GetAccount() //the account doesn't contain all data returned by the request
    var raw = JSON.parse(exchange.GetRawJSON())//raw data returned by GetAccount()
    Log(raw)
}
HttpQuery
Find all the details about HttpQuery on https://fmz-docs.readthedocs.io/en/latest/code_Instruction/Global%20Function.html#httpquery
HttpQuery returns the raw data of this request which should be parsed first. Blow is the example:
//FMZ doesn't have a standard function for exchangeInfo that return the trading-information about all symbols.
var exchangeInfo = JSON.parse(HttpQuery('https://api.binance.com/api/v1/exchangeInfo'))
Log(exchangeInfo) // FMZ doesn't have a standard function for this API
var ticker = JSON.parse(HttpQuery('https://api.binance.com/api/v1/ticker/24hr'))
Log(ticker)
For those public APIs, HttpQuery is really useful function. Note that HttpQuery only supports JavaScript, for Python, using the urlib2 or request library to send http requests directly.
IO
For those private APIs, Using HttpQuery will be very complicated because you need to deal with API-key, sign, hash, etc. IO is a handy function for this condition, check it on https://fmz-docs.readthedocs.io/en/latest/code_Instruction/Extent%20API.html#io. IO has different uses depends on parameters. At this part, We only focus on access to private APIs.
Using this function requires the understanding of the exchange’s original API first. Below are the steps to make a stop order that isn’t supported by FMZ on BitMEX.
- First, find BitMEX API doc page: https://www.bitmex.com/api/explorer/
- The url to make a stop order is https://www.bitmex.com/api/v1/order. The method is
POST, The parameters includes symbol,side, orderQty,stopPx,ordType,which should be arranged like “symbol=XBTUSD&side=Buy&orderQty=1&stopPx=4000&ordType=Stop
The final JavaScript code:
var id = exchange.IO("api", "POST", "/api/v1/order", "symbol=XBTUSD&side=Buy&orderQty=1&stopPx=4000&ordType=Stop")
6.Use websocket
Basically all digital currency exchanges support sending market data via websocket, and some exchanges even support updating account information. Compared with the rest API, websocket generally has the advantages of low latency, high frequency, and is not limited by the platform rest API request frequency. The disadvantage is that it may be interrupted and the processing is not intuitive.
For JavaScript, you can use Dial function to connecnt to websocket, For Python, you can use Dial or websocket_client libray.
This tutorial will focus on connecting websockets using the JavaScript and Dial function on the FMZ Quantization Platform. In order to extend the various uses, the Dial function has been updated several times. This tutorial will demonstrate the websocket-based event-driven strategy and how to connect to multiple exchanges.
Connecnt to websocket
- 1.Most of the case, you can connect directly. Below is a example of connecnting to Binance all ticker.
var client = Dial("wss://stream.binance.com:9443/ws/!ticker@arr") - 2.For the return data of the compressed format, it needs to be specified at the time of connection. The parameter
compressmeans that the data is in a compressed format, and the parametermoderepresents whether the sending or receving is compressed. An example of connecting to OKEXvar client = Dial("wss://real.okex.com:10441/websocket?compress=true|compress=gzip_raw&mode=recv") - 3.The Dial function supports automatic reconnection, which is done by the underlying Go language. For the request data content is already in the url, such as the example of Biannce, it is convenient and recommended. For those that need to send a subscription message, you can maintain the reconnection by yourself.
var client = Dial("wss://stream.binance.com:9443/ws/!ticker@arr?reconnect=true") - 4.Some exchanges’ subscription channels are included in the url, such as Binance, but some require users to send subscribed channels, such as coinbase:
>Receive datavar client = Dial("wss://ws-feed.pro.coinbase.com", 60) client.write('{"type": "subscribe","product_ids": ["BTC-USD"],"channels": ["ticker","heartbeat"]}')
Generally, the data from websocket can be read continuously without sleep in an infinite loop. The code is as follows:
function main() {
    var client = Dial("wss://stream.binance.com:9443/ws/!ticker@arr")
    while (true) {
        var msg = client.read() //receve data from client
        var data = JSON.parse(msg) //change raw string to js object
        // do something, don't need sleep.
    }
}
Websocket pushes data very quickly. The underlying of the docker caches all the data in the queue, and then returns the first when the program calls read. The robot’s network operations such as Buy,GetAccount,CancelOrder will cause delays, which may result in the accumulation of data. For information such as transaction push, account push, subset deep push, etc, we need historical data. For market data, we usually only care about the latest.
The read() function returns the oldest data in the queue if there are no arguments, and blocks when there is no data (the program is paused here). If you want the latest data, you can use read(-2) to immediately return the latest data, and return null if there is no data in the queue(the program will not pause).
Connect to multiple websockets
In this case, it is obvious that the program cannot use simple read() because an exchange will block and wait for new data, and another exchange will not receive it’s own new data immediately. The general treatment is:
function main() {
    var binance = Dial("wss://stream.binance.com:9443/ws/!ticker@arr")
    var coinbase = Dial("wss://ws-feed.pro.coinbase.com")
    coinbase.write('{"type": "subscribe","product_ids": ["BTC-USD"],"channels": ["ticker","heartbeat"]}')
    while (true) {
        var msgBinance = binance.read(-1)
        var msgCoinbase = coinbase.read(-1)
        if(msgBinance){
            // Binance has new data
        }
        if(msgCoinbase){
            // coinbase has new data
        }
        Sleep(1) // just sleep 1ms
    }
}
General framework for using websocket
Since the push data has already been used, the program is naturally written as an event-driven type, paying attention to the API request frequency.
var tradeTime = Date.now()
var accountTime = Date.now()
function trade(data){
    if(Date.now() - tradeTime > 2000){//only trade once within 2s
        tradeTime = Date.now()
        //trading code
    }
}
function GetAccount(){
    if(Date.now() - accountTime > 5000){//only get account once within 5s
        accountTime = Date.now()
        return exchange.GetAccount()
    }
}
function main() {
    var client = Dial("wss://stream.binance.com:9443/ws/!ticker@arr|reconnect=true")
    while (true) {
        var msg = client.read()
        var data = JSON.parse(msg)
        var account = GetAccount()
        trade(data)
    }
}
All prameters
The parameters of Dial(Address, Timeout):
Timeout: timeout of connection
Address can be follwed by other parameters which are connected with &. Address and parameters are separated by |,
| Parameter | description |
|---|---|
| compress | Compression method, can be gzip_raw, gzip. OKEX uses gzip_raw |
| mode | can be dual means both send and receive need to be compressed, sendmeans send need to be compressed and recv means receive. |
| proxy | proxy settings for ss5.socks5://name:[email protected]:1080 |
| reconnect | Reconnect=true to enable reconnection |
| interval | interval is the retry interval, default is 1000ms |
| payload | The subscription message that needs to be sent when wss reconnects |
The parameters of read():
When the websocket disconencted, read() will return empty string.
| Parameter | None | -1 | -2 | 2000 |
|---|---|---|---|---|
| queue isn’t empty | return oldest data immediately | return oldest data immediately | return lastest data immediately | return oldest data immediately |
| queue is empty | block untill new data back | return null immediately |
return null immediately |
wait less than 2000ms until new data back, otherwise, return null |
The use of close():
Close the websocket connection.
function main() {
    var client = Dial("wss://stream.binance.com:9443/ws/!ticker@arr|reconnect=true")
    client.close()
}
7.Asynchronous or Multithreading
You may have noticed all the codes we have now are single thread, sequential execution. The raw JavaScript doesn’t support asynchronous, however, FMZ provide a function GO to do that, which is very limited.Use Go when you really care about delay and the time consumption of every API request.
exchange.Go(Method, Args)
Method : a function name. Args : the args of method.
Supported functions list: GetTicker, GetDepth, GetTrades, GetRecords, GetAccount, GetOrders, GetOrder, CancelOrder, Buy, Sell, GetPosition.
A JavaScript example:
function main(){
    var a = exchange.Go("GetTicker"); //GetTicker Asynchronous multithreaded execution
    var b = exchange.Go("GetDepth");
    var c = exchange.Go("Buy", 1000, 0.1);
    var d = exchange.Go("GetRecords", PERIOD_H1);
    // The above four operations are concurrent multi-threaded asynchronous execution, will not block and immediately return
    var ticker = a.wait(); // Call wait method wait for return to asynchronous get ticker result
    var depth = b.wait(); // Return depth, it is also possible to return null if it fails
    var orderId = c.wait(1000); // Return the order number, 1 second timeout, timeout returns undefined, this object can continue to call wait until the last wait timeout
    var records = d.wait(); // Wait for K-line result
    var ret = d.wait();  // Here waits for an asynchronous operation that has waited and ended, returns null, and logs an error message.
}
wait() function must be called after Go function, otherwise,the thread resource will accumulate till 2000 and return an error.
8.Tables and charts
LogStatusand Tables
LogStatus will Log a message or tables on bot’s status bar, will refresh every time.
//Normal uses of LogStatus
LogStatus(" This is a normal status prompt")
LogStatus(" This is a red font status prompt #ff0000")
LogStatus(" This is a multi-line status message\n I'm the second line")
LogStatus can Log tables on your robot page. Add ` characters to both sides and treat it as a complex message format (currently supported table).
var table = {type: 'table', title: ' Account information support color #ff0000', cols: ['BTC', 'ETH', 'USDT'], rows: [ ['free', 1, 2000], ['frozen', 0, 3000]]}
LogStatus('`' + JSON.stringify(table)+'`')
//Another example, information can also appear in multiple lines:
LogStatus("First line message\n" + JSON.stringify(table)+"`\n third line message")
//Log multiple tables in a group, switching by TAB:
var table1 = {type: 'table', title: ' Account information 1', cols: ['BTC', 'ETH', 'USDT'], rows: [ ['free', 1, 2000], ['frozen', 0, 3000]]}
var table2 = {type: 'table', title: ' Account information 2', cols: ['BTC', 'ETH', 'USDT'], rows: [ ['free', 1, 2000], ['frozen', 0, 3000]]}
LogStatus('`' + JSON.stringify([table1, table2])+'`')
Chart
Draw figures on robot management page.
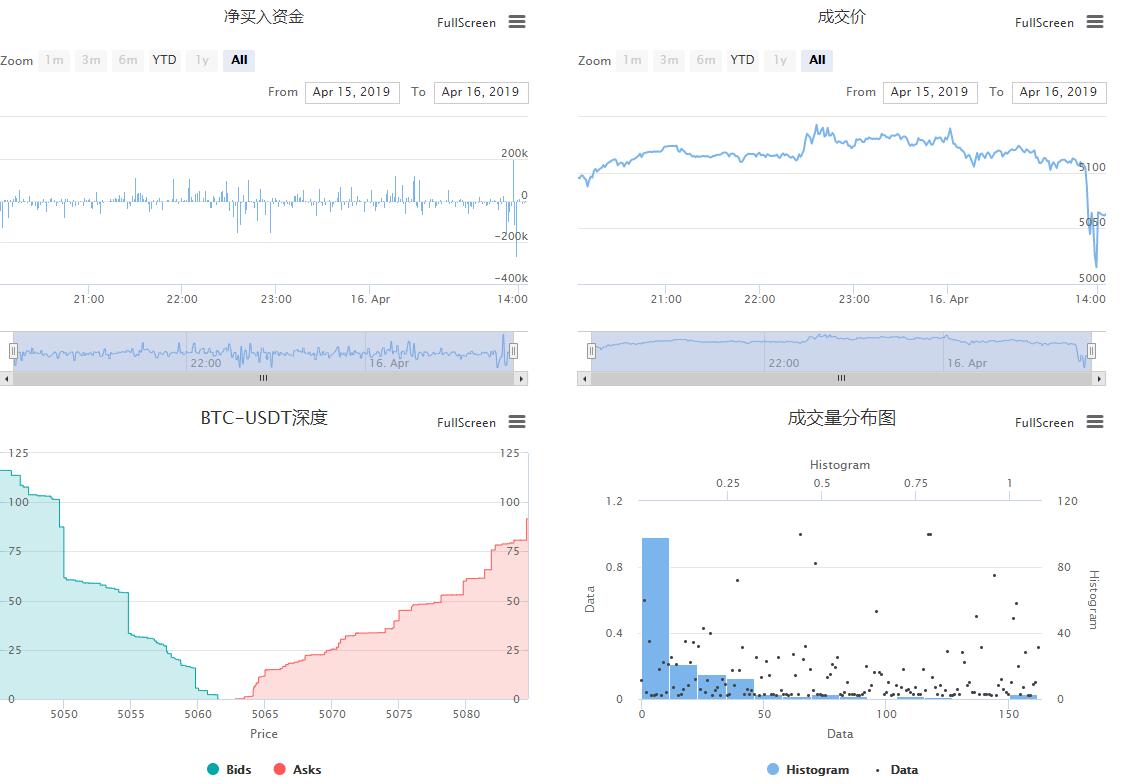
Chart support HighStocks and HighCharts, check https://www.highcharts.com/demo and https://www.highcharts.com/stock/demo for more examples.
The Chart object has a __isStock attribute that is not exist in the original one. If __isStock is false, chart will displayed as HighCharts. If __isStock is true, chart will displayed as HighStocks. Call reset() to clear the chart data.
A JavaScript example of using Chart to draw the prices of two symbols:
// This chart is an object in the JS language. Before using the Chart function, we need to declare an object variable chart that configures the chart.
var chart = {
    // Whether the mark is a general chart, if you are interested, you can change it to false and run it.
    __isStock: true,
    tooltip: {xDateFormat: '%Y-%m-%d %H:%M:%S, %A'},    // Zoom tool
    title : { text : 'Spread Analysis Chart'},          // title
    rangeSelector: {                                    // Selection range
        buttons:  [{type: 'hour',count: 1, text: '1h'}, {type: 'hour',count: 3, text: '3h'}, {type: 'hour', count: 8, text: '8h'}, {type: 'all',text: 'All'}],
        selected: 0,
        inputEnabled: false
    },
    xAxis: { type: 'datetime'},                         // The horizontal axis of the coordinate axis is the x axis and the current setting type is :time
    yAxis : {                                           // The vertical axis of the axis is the y axis, and the default value is adjusted with the data size.
        title: {text: 'Spread'},                        // title
        opposite: false,                                // Whether to enable the right vertical axis
    },
    series : [                                          // Data series, this attribute is saved for each data series (line, K-line graph, label, etc...)
        {name : "line1", id : "Line 1,buy1Price", data : []},  // The index is 0, the data array is stored in the index series of data
        {name : "line2", id : "Line 2,lastPrice", dashStyle : 'shortdash', data : []},
        // The index is 1, dashStyle is set: 'shortdash' ie: Set the dotted line.
    ]
};
function main(){
    var ObjChart = Chart(chart);                      // Call the Chart function to initialize the chart.
    ObjChart.reset();                                 // Empty the chart
    while(true){
        var nowTime = new Date().getTime();           // Get the timestamp of this poll, which is a millisecond timestamp. Used to determine the position of the X axis written to the chart.
        var tickerOne = _C(exchanges[0].GetTicker);   // Get market data
        var tickerTwo = _C(exchanges[1].GetTicker);
        ObjChart.add([0, [nowTime, tickerOne.Last]]); // Use the timestamp as the X value and buy the price as the Y value to pass the index 0 data sequence.
        ObjChart.add([1, [nowTime, tickerTwo.Last]]); // Same as above
        ObjChart.update(chart);                       // Update the chart to show it.
        Sleep(2000);
    }
}
Supports the display of multiple figures, a full example: https://www.fmz.com/strategy/136056
9.Strategy template
Template is a libray that encapsulates many advanced features, which make it easier to write your strategy. To use a template, you should copy the template you need first. Take JavaScript Plot library as example, copy it from https://www.fmz.com/strategy/27293 and save. Then select it on strategy edit page.  The functions is called after
 $. in JavaScript template and after ext. in Python template.
function main() {
    var isFirst = true
    while (true) {
        var records = exchange.GetRecords();
        if (records && records.length > 0) {
            $.PlotRecords(records, 'BTC')
            if (isFirst) {
                $.PlotFlag(records[records.length - 1].Time, 'Start', 'S')
                isFirst = false
                $.PlotHLine(records[records.length - 1].Close, 'Close')
            }
        }
        var ticker = exchange.GetTicker()
        if (ticker) {
            $.PlotLine('Last', ticker.Last)
            $.PlotTitle('Last ' + ticker.Last)
        }
        Sleep(60000)
    }
}
Here is another simple example that uses plot template: https://www.fmz.com/strategy/121917
- Make Post-Only order and bulk orders on BitMEX through IO
- 请问可视化策略能用ok的永续合约吗?
- 请问能否实现一个策略不同周期K线条件的回测?
- 关于如何在BitMEX挂仅被动成交做市单和批量下单(IO范例)
- 2.4 How to write a trading strategy on FMZ Quant platform
- 2.3 Common API explanations
- 2.2 How to configure the FMZ Quant trading system
- 谁有 gateio的 合约 python示例代码?
- 2.1 Introduction to the quantitative trading tool
- 调用带参数重启接口,一直返回code5, 参数不正确,求教(PHP)
- 1.4 What are the elements of a complete strategy?
- HttpQuery 返回如果失败,会是什么类型?
- 1.3 What are needed for quantitative trading?
- Linux托管者最佳升级实践
- 1.2 Why choose quantitative trading
- 1.1 What is quantitative trading?
- Quantitative trading quick start
- FMZ beginer tutorial
- 请求交易所API,偶尔出现 Timeout
- Implementing MACD in Python