A estratégia é um sistema de negociação inteligente que combina volume de transação, movimento de preços e múltiplos stop-loss. Identifica potenciais oportunidades de negociação monitorando a variação anormal do volume de transação, aumento de preços e uma combinação de indicadores de movimento, e usa gerenciamento de stop-loss em camadas para otimizar a relação de risco-benefício.
Princípio da estratégia
A estratégia baseia-se em três sinais de negociação principais: 1) ruptura de volume de transação - o volume de transação atual é superior ao dobro da média de transação dos últimos 20 ciclos; 2) aumento de preço - o aumento de preço recente excede o limiar definido; 3) confirmação de dinâmica - o RSI é maior que 55 e o preço está acima da média de 50 ciclos. Quando essas três condições são simultaneamente satisfeitas, o sistema emite mais.
Vantagens estratégicas
- A confirmação de múltiplos sinais aumenta a precisão das transações
- O plano de stop-loss em camadas bloqueia os lucros e controla os riscos
- Parâmetros ajustáveis para diferentes cenários de mercado
- Combinação de indicadores técnicos e análise de volume de transações, sinal mais confiável
- Função de alerta em tempo real para aproveitar oportunidades em tempo real
Risco estratégico
- Parâmetros mal definidos podem levar a transações excessivas
- O mercado pode ser muito volátil, o que pode desencadear uma perda frequente.
- Perda de liquidez em mercados de baixa liquidez e de parada temporária
- Os fatores fundamentais podem ser ignorados e consequências importantes podem ser perdidas.
- O excesso de dependência de indicadores tecnológicos pode falhar no mercado horizontal
Direção de otimização da estratégia
- Introduzir juízos de mercado, usando diferentes parâmetros em diferentes situações
- Aumentar a análise da qualidade do volume de transação, filtrando os falsos sinais de emissão
- Adição de indicadores de intensidade de tendências para melhorar a capacidade de rastreamento de tendências
- Optimizar o intervalo de stop loss para que seja mais adequado às características de flutuação do mercado
- Considere a inclusão de controles de retirada para aumentar a estabilidade da curva de fundos
Resumir
Trata-se de uma estratégia de negociação madura que integra vários elementos de análise técnica. Com uma seleção rigorosa de sinais e gerenciamento flexível de posições, o risco é bem controlado, enquanto se aproveita a oportunidade de tendência. Embora ainda haja espaço para otimização, o design geral é razoável e vale a pena ser verificado e usado no mercado real.
/*backtest
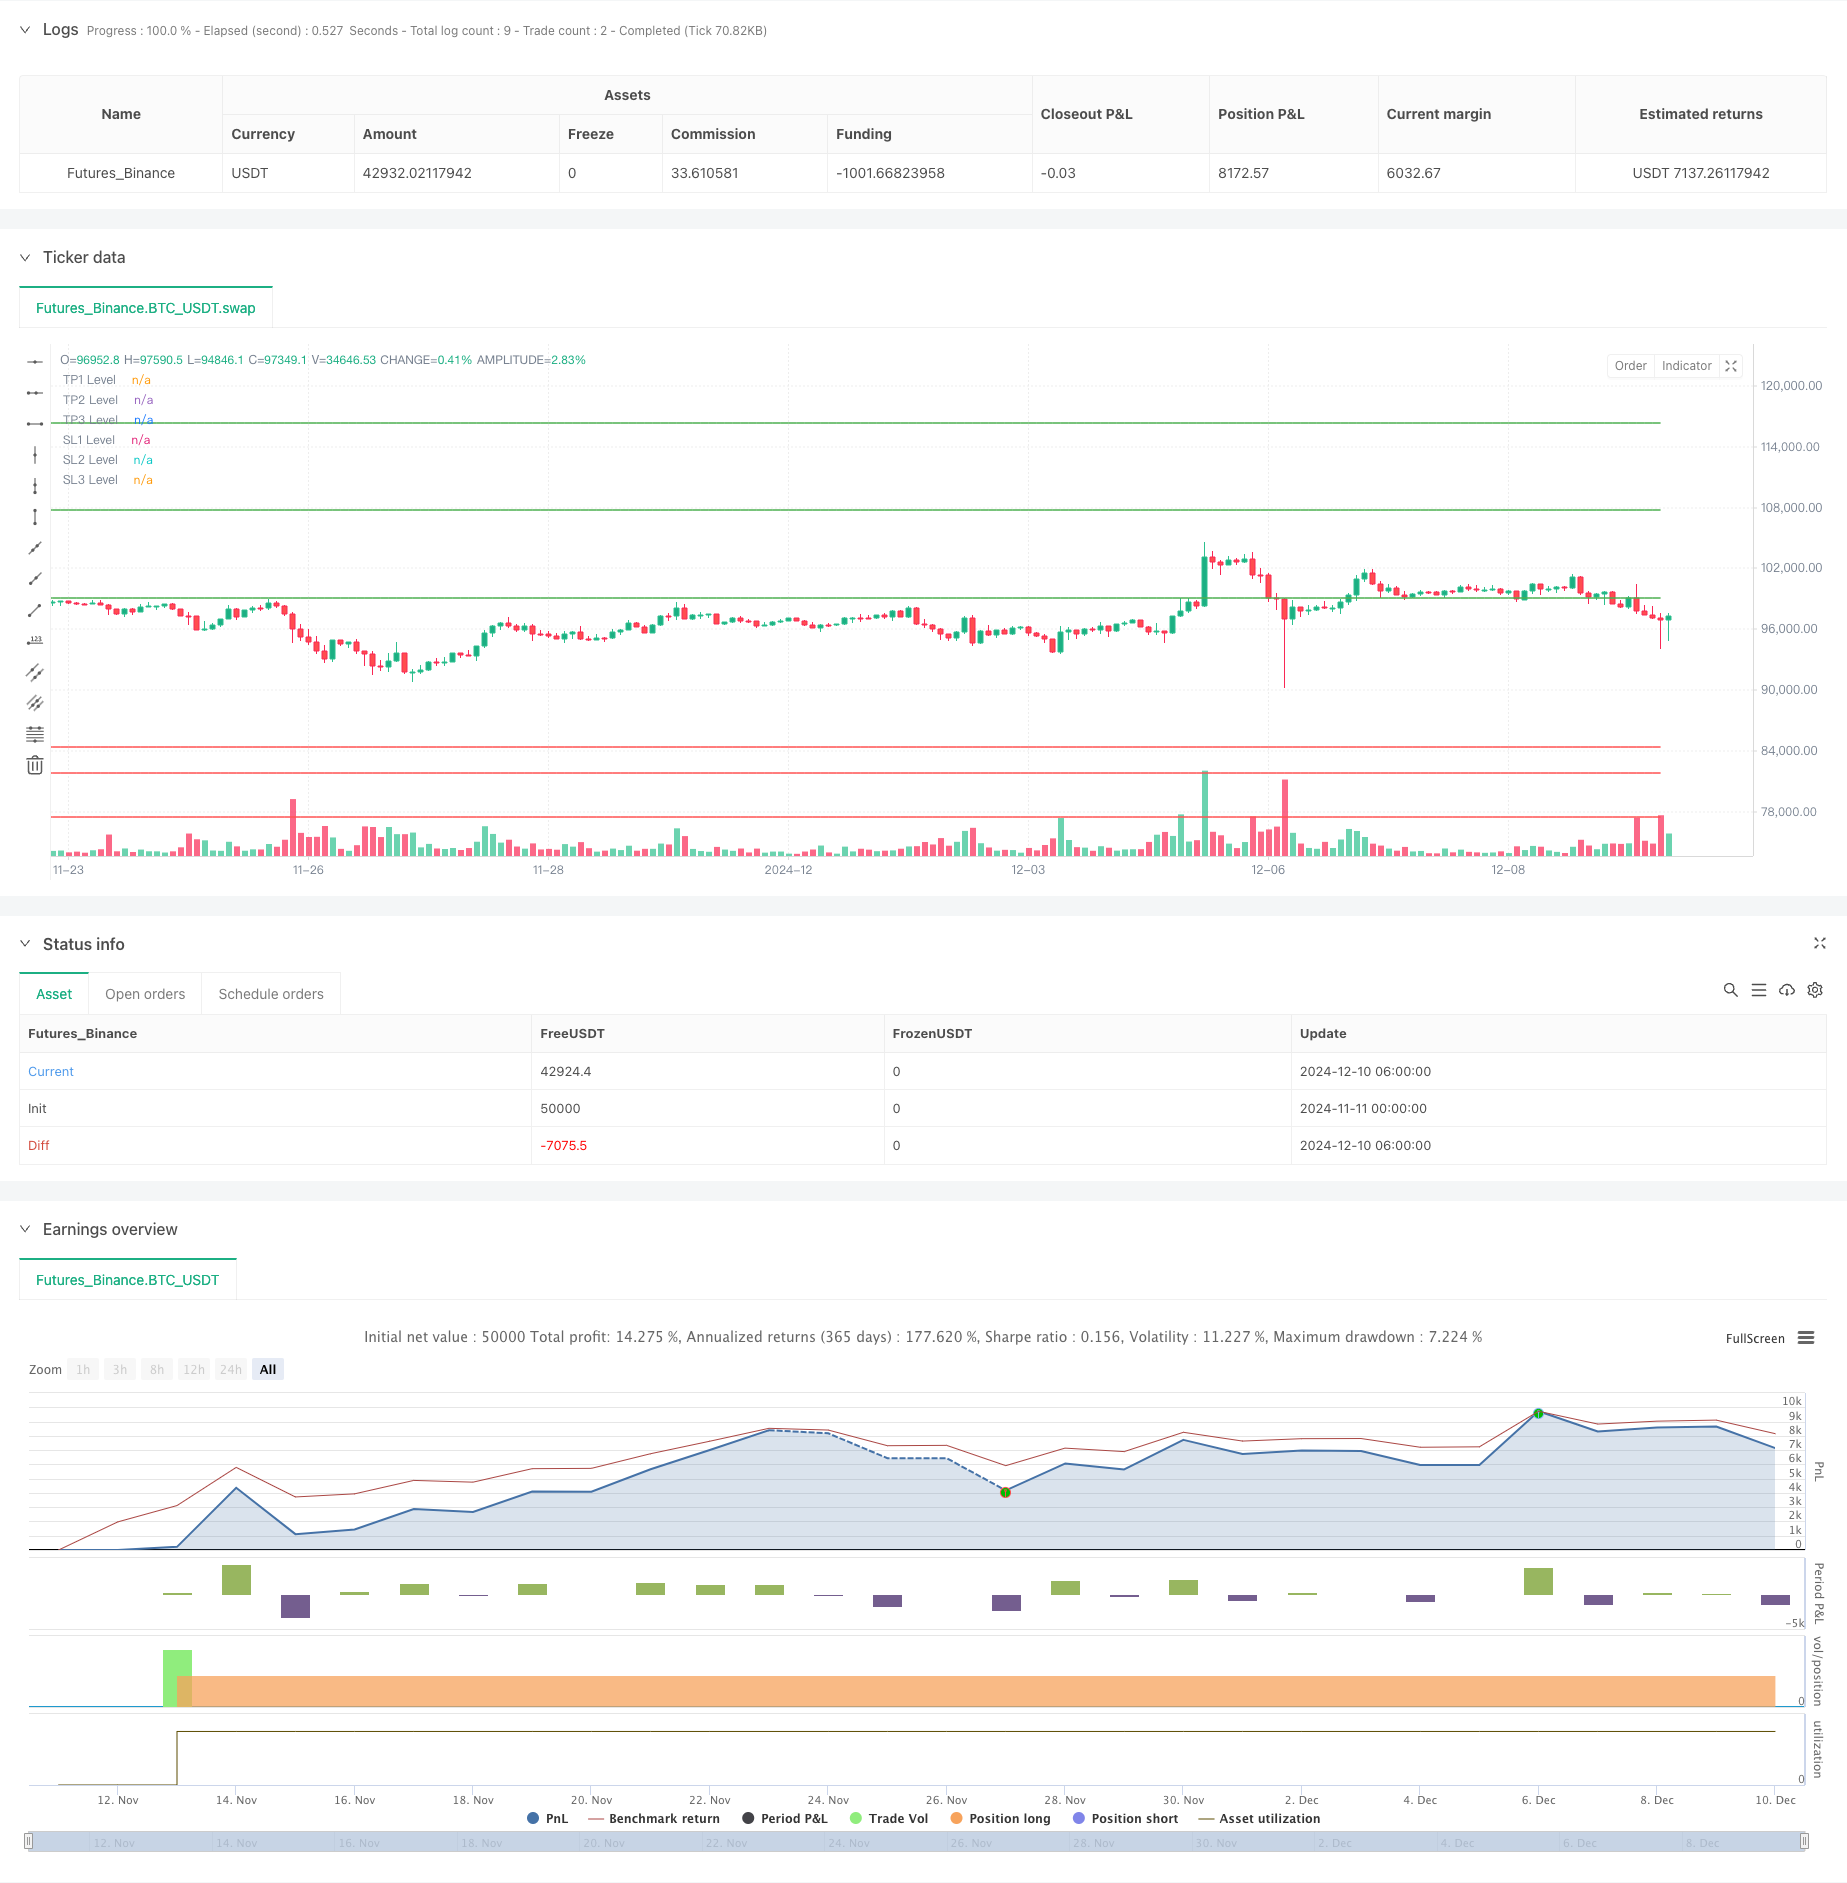
start: 2024-11-11 00:00:00
end: 2024-12-10 08:00:00
period: 2h
basePeriod: 2h
exchanges: [{"eid":"Futures_Binance","currency":"BTC_USDT"}]
*/
//@version=5
strategy("Volume Spike & Momentum Strategy with Alerts", overlay=true)
// Inputs for customization
priceGainPercent = input.float(5, title="Minimum Price Gain (%)", minval=1)
volumeLookback = input.int(20, title="Volume Lookback Period (Bars)", minval=1)
momentumSmaLength = input.int(50, title="SMA Length for Momentum (Bars)", minval=1)
rsiThreshold = input.float(55, title="RSI Threshold for Momentum", minval=1)
// Take Profit percentages
tp1Percent = input.float(15, title="Take Profit 1 (%)", minval=1)
tp2Percent = input.float(25, title="Take Profit 2 (%)", minval=1)
tp3Percent = input.float(35, title="Take Profit 3 (%)", minval=1)
// Percentage of position to close at each take-profit
tp1ClosePercent = input.float(30, title="Close % at TP1", minval=1, maxval=100)
tp2ClosePercent = input.float(40, title="Close % at TP2", minval=1, maxval=100)
tp3ClosePercent = input.float(30, title="Close % at TP3", minval=1, maxval=100)
// Stop-loss percentages
sl1Percent = input.float(2, title="Stop Loss 1 (%)", minval=0.1)
sl2Percent = input.float(5, title="Stop Loss 2 (%)", minval=0.1)
sl3Percent = input.float(10, title="Stop Loss 3 (%)", minval=0.1)
// Percentage of position to close at each stop-loss
sl1ClosePercent = input.float(30, title="Close % at SL1", minval=1, maxval=100)
sl2ClosePercent = input.float(40, title="Close % at SL2", minval=1, maxval=100)
sl3ClosePercent = input.float(30, title="Close % at SL3", minval=1, maxval=100)
// Detect volume spikes
avgVolume = ta.sma(volume, volumeLookback) // Average volume over the last X bars (customizable)
volumeSpike = volume > avgVolume * 2 // Spike in volume if current volume is 2x the average
// Detect price gain over the recent period (e.g., 5-10% gain over the last X bars)
priceChangePercent = (close - ta.lowest(close, 5)) / ta.lowest(close, 5) * 100
priceGainCondition = priceChangePercent >= priceGainPercent
// Check for overall momentum using an SMA and RSI
longTermSma = ta.sma(close, momentumSmaLength)
rsi = ta.rsi(close, 14)
momentumCondition = close > longTermSma and rsi >= rsiThreshold
// Store the entry price on a new trade
var float entryPrice = na
if (strategy.opentrades == 0 and (volumeSpike and priceGainCondition and momentumCondition))
entryPrice := close // Capture the entry price on a new trade
// Calculate take-profit levels based on the entry price
tp1Price = entryPrice * (1 + tp1Percent / 100)
tp2Price = entryPrice * (1 + tp2Percent / 100)
tp3Price = entryPrice * (1 + tp3Percent / 100)
// Calculate stop-loss levels based on the entry price
sl1Price = entryPrice * (1 - sl1Percent / 100)
sl2Price = entryPrice * (1 - sl2Percent / 100)
sl3Price = entryPrice * (1 - sl3Percent / 100)
// Exit conditions for multiple take-profits
tp1Condition = high >= tp1Price // Exit partial if price hits take-profit 1
tp2Condition = high >= tp2Price // Exit partial if price hits take-profit 2
tp3Condition = high >= tp3Price // Exit full if price hits take-profit 3
// Exit conditions for multiple stop-losses
sl1Condition = low <= sl1Price // Exit partial if price hits stop-loss 1
sl2Condition = low <= sl2Price // Exit partial if price hits stop-loss 2
sl3Condition = low <= sl3Price // Exit full if price hits stop-loss 3
// Buy Condition: When volume spike, price gain, and momentum conditions are met
if (volumeSpike and priceGainCondition and momentumCondition)
strategy.entry("Buy", strategy.long)
// Alerts for conditions
alertcondition(volumeSpike and priceGainCondition and momentumCondition, title="Entry Alert", message="Entry conditions met: Volume spike, price gain, and momentum detected!")
alertcondition(tp1Condition, title="Take Profit 1", message="Take Profit 1 hit!")
alertcondition(tp2Condition, title="Take Profit 2", message="Take Profit 2 hit!")
alertcondition(tp3Condition, title="Take Profit 3", message="Take Profit 3 hit!")
alertcondition(sl1Condition, title="Stop Loss 1", message="Stop Loss 1 hit!")
alertcondition(sl2Condition, title="Stop Loss 2", message="Stop Loss 2 hit!")
alertcondition(sl3Condition, title="Stop Loss 3", message="Stop Loss 3 hit!")
// Exit conditions: Multiple take-profits and stop-losses
if (tp1Condition)
strategy.exit("Take Profit 1", "Buy", limit=tp1Price, qty_percent=tp1ClosePercent)
if (tp2Condition)
strategy.exit("Take Profit 2", "Buy", limit=tp2Price, qty_percent=tp2ClosePercent)
if (tp3Condition)
strategy.exit("Take Profit 3", "Buy", limit=tp3Price, qty_percent=tp3ClosePercent)
// Stop-loss exits
if (sl1Condition)
strategy.exit("Stop Loss 1", "Buy", stop=sl1Price, qty_percent=sl1ClosePercent)
if (sl2Condition)
strategy.exit("Stop Loss 2", "Buy", stop=sl2Price, qty_percent=sl2ClosePercent)
if (sl3Condition)
strategy.exit("Stop Loss 3", "Buy", stop=sl3Price, qty_percent=sl3ClosePercent)
// Plotting take-profit and stop-loss levels on the chart
plot(tp1Price, color=color.green, style=plot.style_linebr, title="TP1 Level")
plot(tp2Price, color=color.green, style=plot.style_linebr, title="TP2 Level")
plot(tp3Price, color=color.green, style=plot.style_linebr, title="TP3 Level")
plot(sl1Price, color=color.red, style=plot.style_linebr, title="SL1 Level")
plot(sl2Price, color=color.red, style=plot.style_linebr, title="SL2 Level")
plot(sl3Price, color=color.red, style=plot.style_linebr, title="SL3 Level")