시장 수집자를 업그레이드하는 법을 가르쳐 사용자 지정 데이터 소스를 백테스트
저자:선함, 2020-06-06 08:53:02, 업데이트: 2023-11-01 20:28:58
이전 기사시장 코트 수집기를 구현하는 법을 가르쳐시장 수집기를 구현하는 방법을 가르쳐주었습니다. 우리는 시장 코트를 함께 수집하는 로봇 프로그램을 구현했습니다.
우리가 수집 한 후 시장 데이터를 어떻게 사용할 수 있습니까? 그것은 백테스트 시스템에 사용 될 것입니다. FMZ 플랫폼 백테스트 시스템의 사용자 지정 데이터 소스 기능에 의존하여 수집 된 데이터를 백테스트 시스템의 데이터 소스로 직접 사용할 수 있습니다. 따라서 우리는 백테스트 시스템이 역사적 데이터를 백테스트하려는 모든 시장에서 사용할 수 있습니다.
따라서, 우리는
준비 해
이것은 지난 기사에서 준비 작업과 다릅니다. 마지막 번에 내 로컬 MAC 컴퓨터에서 실행되는 도커 프로그램이 데이터베이스 서비스를 시작하기 위해 mongodb 데이터베이스를 설치했습니다. 이번에는 운영 환경을 VPS로 변경하고 알리바바 클라우드 리눅스 서버를 사용하여 프로그램 세트를 실행했습니다.
- Mongodb 데이터베이스
이전 기사에서와 마찬가지로, 우리는 마켓 컬렉터 프로그램이 실행되는 장치에 mongodb 데이터베이스를 설치하고 서비스를 시작해야합니다. 그것은 기본적으로 MAC 컴퓨터에 mongodb를 설치하는 것과 같습니다. 인터넷에 많은 자습서가 있습니다, 당신은 그것을 구글 할 수 있습니다, 그것은 매우 간단합니다.
- 파이썬 3 설치
이 프로그램은 파이썬3을 사용 합니다. 일부 파이썬 라이브러리를 사용함에 주의를 기울여 주시기 바랍니다. 설치가 안되면 먼저 설치해야 합니다.
피몬고 (pymongo) http urllib
- 도커
FMZ 도커가 작동하면 충분해요
시장 코트 수집기를 변환
시장 코트 수집자는 다음과 같습니다:https://www.fmz.com/strategy/199120(기록 수집가) 전략.
몇 가지 수정사항을 해보겠습니다.
프로그램이 데이터를 수집하기 위해 while 루프에 들어가기 전에, 멀티 스레드 라이브러리가 사용되며, 동시 실행은 FMZ 플랫폼 백테스트 시스템의 데이터 요청을 모니터링하는 서비스를 시작합니다. (다른 세부 사항은 무시 될 수 있습니다.)
레코드 수집기 (특별 데이터 소스 기능을 제공하기 위해 업그레이드)
import _thread
import pymongo
import json
import math
from http.server import HTTPServer, BaseHTTPRequestHandler
from urllib.parse import parse_qs, urlparse

def url2Dict(url):
    query = urlparse(url).query
    params = parse_qs(query)
    result = {key: params[key][0] for key in params}
    return result

class Provider(BaseHTTPRequestHandler):
    def do_GET(self):
        try:
            self.send_response(200)
            self.send_header("Content-type", "application/json")
            self.end_headers()

            dictParam = url2Dict(self.path)
            Log("The custom data source service receives the request, self.path:", self.path, "query parameter:", dictParam)

            # At present, the backtesting system can only select the exchange name from the list. When adding a custom data source, set it to Binance, that is: Binance
            exName = exchange.GetName()
            # Note that period is the bottom K-line period
            tabName = "%s_%s" % ("records", int(int(dictParam["period"]) / 1000))
            priceRatio = math.pow(10, int(dictParam["round"]))
            amountRatio = math.pow(10, int(dictParam["vround"]))
            fromTS = int(dictParam["from"]) * int(1000)
            toTS = int(dictParam["to"]) * int(1000)


            # Connect to the database
            Log("Connect to the database service to obtain data, the database:", exName, "table:", tabName)
            myDBClient = pymongo.MongoClient("mongodb://localhost:27017")
            ex_DB = myDBClient[exName]
            exRecords = ex_DB[tabName]


            # Request data
            data = {
                "schema" : ["time", "open", "high", "low", "close", "vol"],
                "data" : []
            }

            # Construct query condition: greater than a certain value{'age': {'$gt': 20}} Less than a certain value{'age': {'$lt': 20}}
            dbQuery = {"$and":[{'Time': {'$gt': fromTS}}, {'Time': {'$lt': toTS}}]}
            Log("Query conditions:", dbQuery, "Number of inquiries:", exRecords.find(dbQuery).count(), "Total number of databases:", exRecords.find().count())

            for x in exRecords.find(dbQuery).sort("Time"):
                # Need to process data accuracy according to request parameters round and vround
                bar = [x["Time"], int(x["Open"] * priceRatio), int(x["High"] * priceRatio), int(x["Low"] * priceRatio), int(x["Close"] * priceRatio), int(x["Volume"] * amountRatio)]
                data["data"].append(bar)

            Log("data:", data, "Respond to backtest system requests.")
            # Write data reply
            self.wfile.write(json.dumps(data).encode())
        except BaseException as e:
            Log("Provider do_GET error, e:", e)


def createServer(host):
    try:
        server = HTTPServer(host, Provider)
        Log("Starting server, listen at: %s:%s" % host)
        server.serve_forever()
    except BaseException as e:
        Log("createServer error, e:", e)
        raise Exception("stop")

def main():
    LogReset(1)
    exName = exchange.GetName()
    period = exchange.GetPeriod()
    Log("collect", exName, "Exchange K-line data,", "K line cycle:", period, "second")

    # Connect to the database service, service address mongodb://127.0.0.1:27017 See the settings of mongodb installed on the server
    Log("Connect to the mongodb service of the hosting device, mongodb://localhost:27017")
    myDBClient = pymongo.MongoClient("mongodb://localhost:27017")
    # Create a database
    ex_DB = myDBClient[exName]

    # Print the current database table
    collist = ex_DB.list_collection_names()
    Log("mongodb ", exName, " collist:", collist)

    # Check if the table is deleted
    arrDropNames = json.loads(dropNames)
    if isinstance(arrDropNames, list):
        for i in range(len(arrDropNames)):
            dropName = arrDropNames[i]
            if isinstance(dropName, str):
                if not dropName in collist:
                    continue
                tab = ex_DB[dropName]
                Log("dropName:", dropName, "delete:", dropName)
                ret = tab.drop()
                collist = ex_DB.list_collection_names()
                if dropName in collist:
                    Log(dropName, "failed to delete")
                else :
                    Log(dropName, "successfully deleted")

    # Start a thread to provide a custom data source service
    try:
        # _thread.start_new_thread(createServer, (("localhost", 9090), ))     # local computer test
        _thread.start_new_thread(createServer, (("0.0.0.0", 9090), ))         # Test on VPS server
        Log("Open the custom data source service thread", "#FF0000")
    except BaseException as e:
        Log("Failed to start the custom data source service!")
        Log("Error message:", e)
        raise Exception("stop")

    # Create the records table
    ex_DB_Records = ex_DB["%s_%d" % ("records", period)]
    Log("Start collecting", exName, "K-line data", "cycle:", period, "Open (create) the database table:", "%s_%d" % ("records", period), "#FF0000")
    preBarTime = 0
    index = 1
    while True:
        r = _C(exchange.GetRecords)
        if len(r) < 2:
            Sleep(1000)
            continue
        if preBarTime == 0:
            # Write all BAR data for the first time
            for i in range(len(r) - 1):
                bar = r[i]
                # Write line by line, you need to determine whether the data already exists in the current database table, based on timestamp detection, if there is the data, then skip, if not write in
                retQuery = ex_DB_Records.find({"Time": bar["Time"]})
                if retQuery.count() > 0:
                    continue

                # Write bar to the database table
                ex_DB_Records.insert_one({"High": bar["High"], "Low": bar["Low"], "Open": bar["Open"], "Close": bar["Close"], "Time": bar["Time"], "Volume": bar["Volume"]})
                index += 1
            preBarTime = r[-1]["Time"]
        elif preBarTime != r[-1]["Time"]:
            bar = r[-2]
            # Check before writing data, whether the data already exists, based on time stamp detection
            retQuery = ex_DB_Records.find({"Time": bar["Time"]})
            if retQuery.count() > 0:
                continue

            ex_DB_Records.insert_one({"High": bar["High"], "Low": bar["Low"], "Open": bar["Open"], "Close": bar["Close"], "Time": bar["Time"], "Volume": bar["Volume"]})
            index += 1
            preBarTime = r[-1]["Time"]
        LogStatus(_D(), "preBarTime:", preBarTime, "_D(preBarTime):", _D(preBarTime/1000), "index:", index)
        # adding drawing display
        ext.PlotRecords(r, "%s_%d" % ("records", period))
        Sleep(10000)
테스트
로봇을 구성합니다
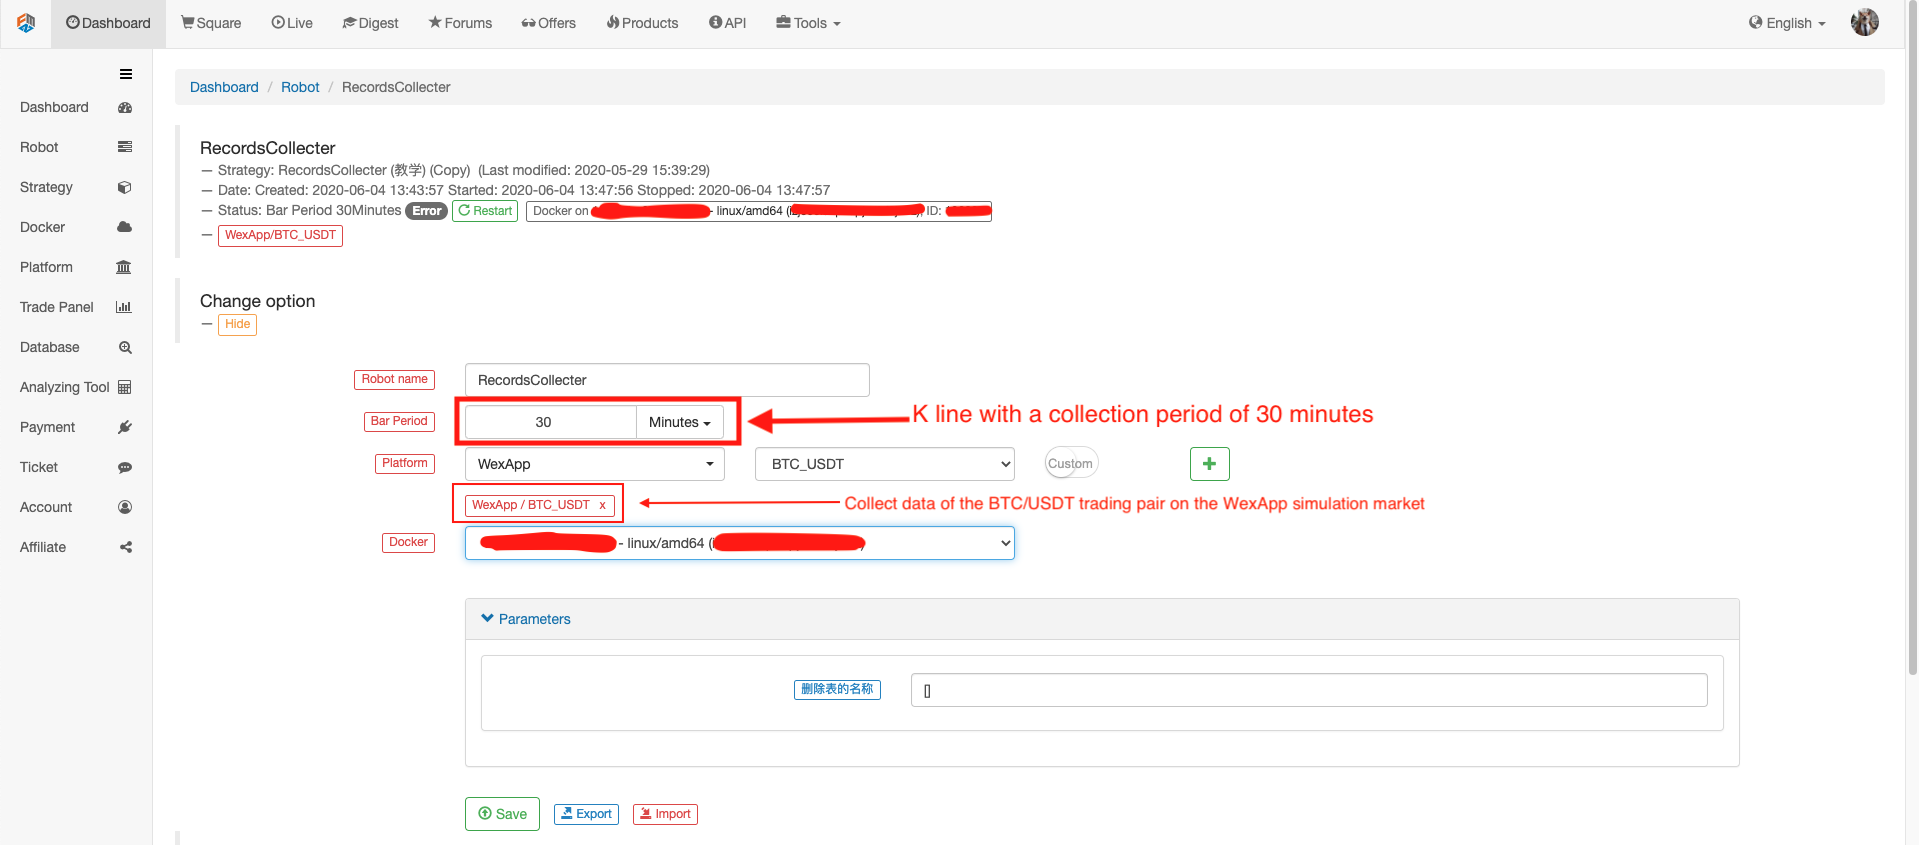
로봇을 실행하고 시장 코팅 수집기를 실행합니다.
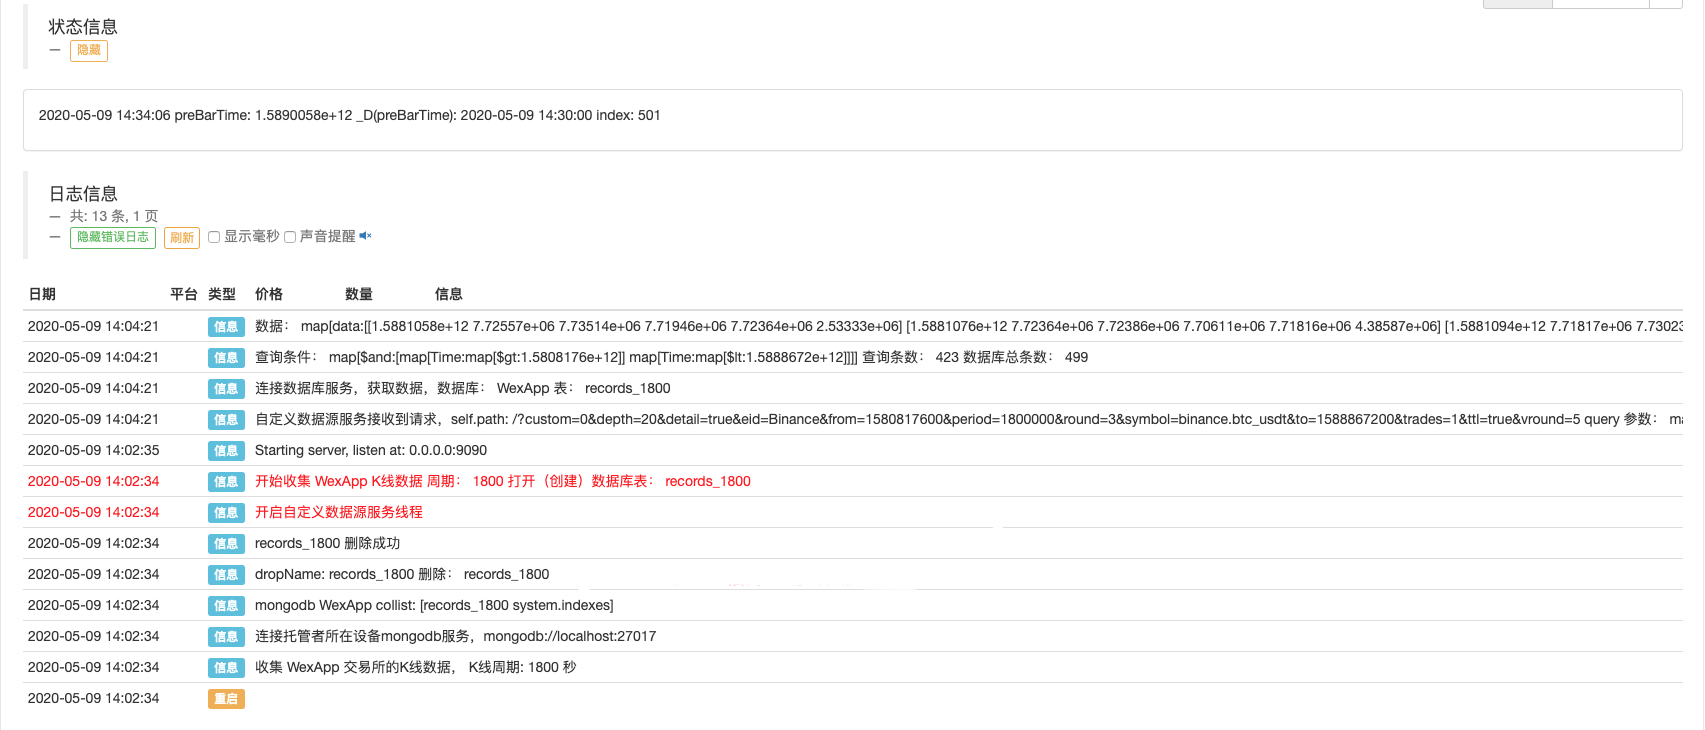
백테스트를 위한 테스트 전략을 열어요. 예를 들어:
function main() {
    Log(exchange.GetRecords())
    Log(exchange.GetRecords())
    Log(exchange.GetRecords())
    Log(exchange.GetRecords())
    Log(exchange.GetRecords())
    Log(exchange.GetRecords())
    Log(exchange.GetRecords().length)
}
백테스트 옵션을 구성하고, 일시적인 사용자 지정 데이터 소스가 아직 자체적으로 교환 이름을 구상할 수 없기 때문에 바이낸스에 교환을 설정하십시오. 목록의 교환 구성 중 하나를만 빌릴 수 있습니다. 백테스트는 바이낸스, 실제 WexApp의 시뮬레이션 시장 데이터입니다.

사용자 지정 데이터 소스로 시장 코팅 수집기를 기반으로 백테스트 시스템에서 생성된 차트가 wexApp 교환 페이지의 1시간 K-라인 차트와 동일하는지 비교하십시오.
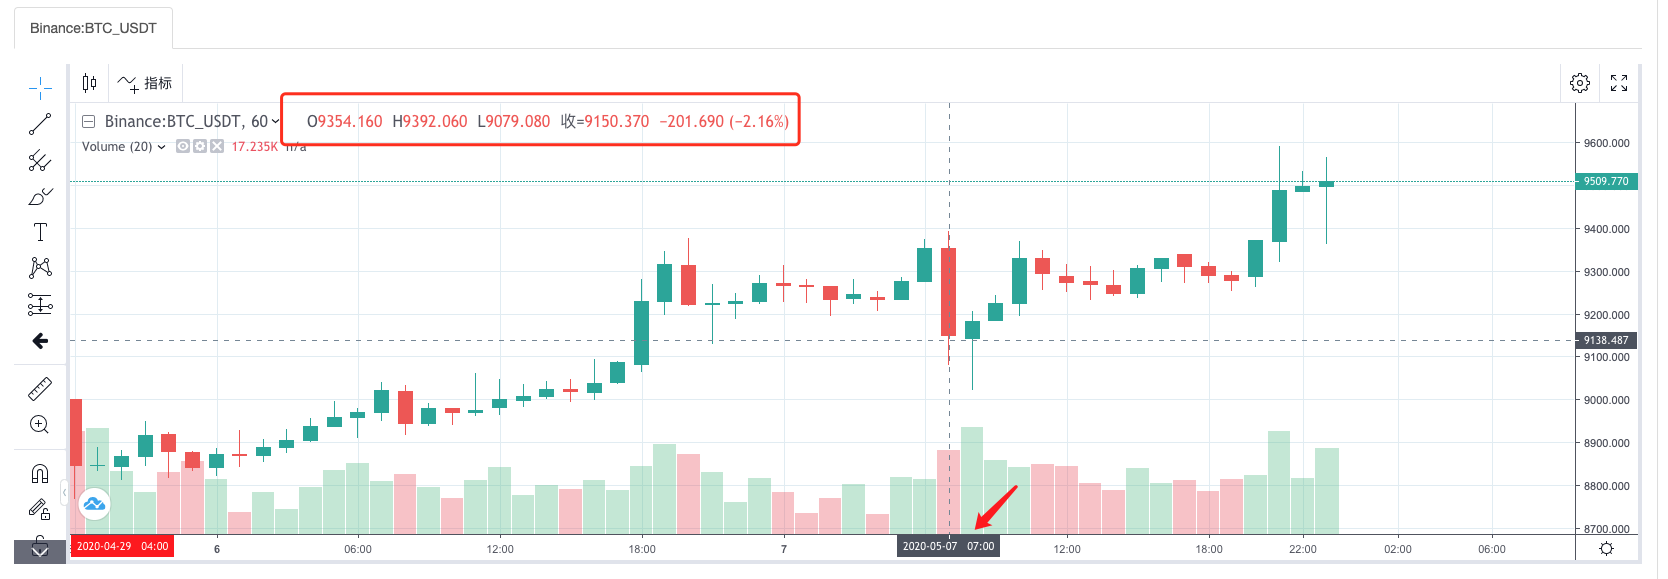
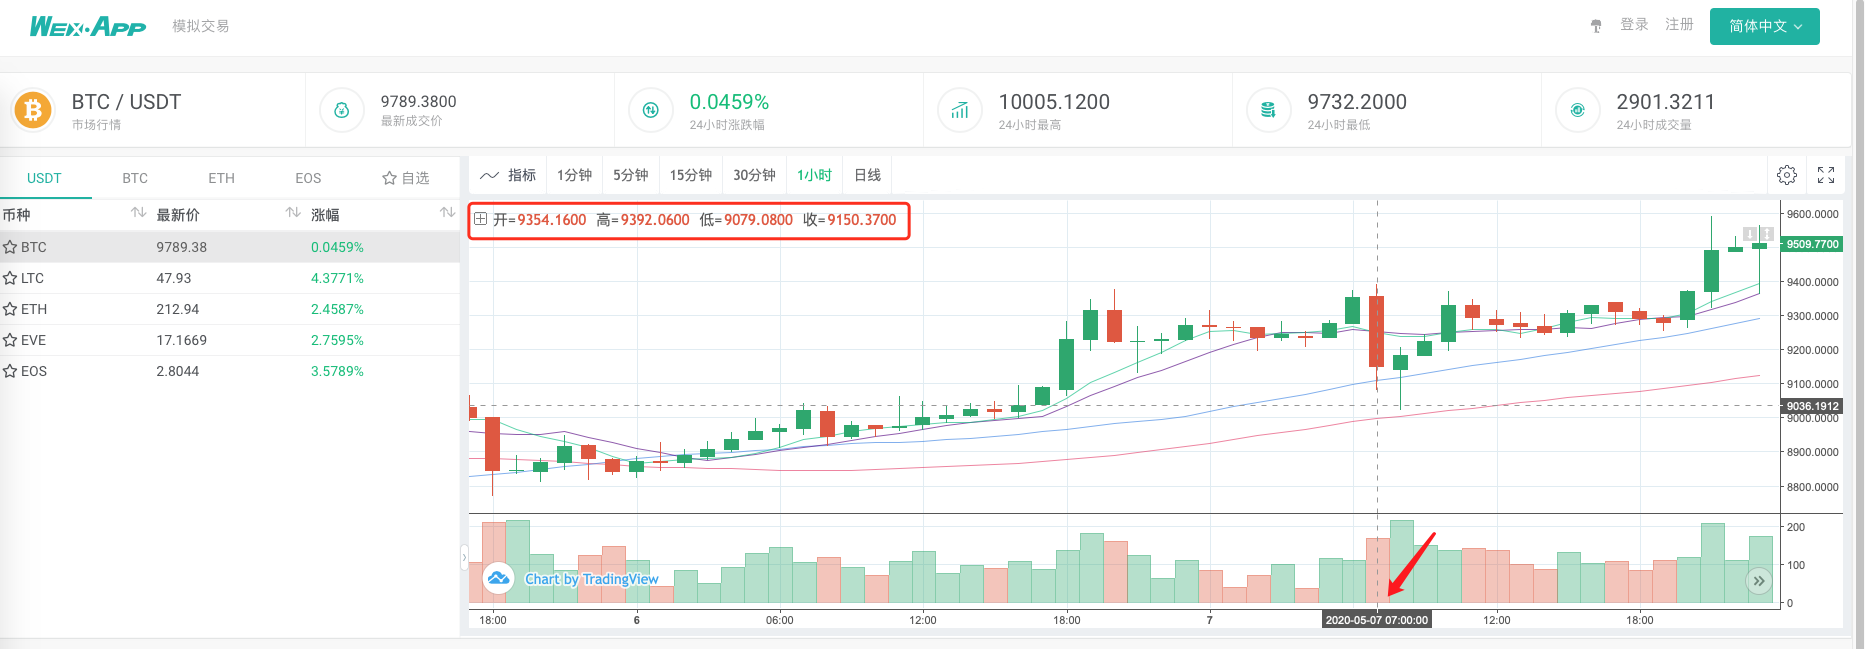
이렇게 하면 VPS에 있는 로봇이 스스로 K-라인 데이터를 수집할 수 있고, 우리는 수집된 데이터를 언제든지 얻을 수 있고, 백테스트 시스템에서 직접 백테스트할 수 있습니다.
예를 들어, 실제 수준의 백테스트 사용자 지정 데이터 소스, 그리고 다중 다양성, 다중 시장 데이터 수집 및 기타 기능을 계속 확장할 수 있습니다.
- FMZ Quant의 새로운 기능: _Serve 기능을 사용하여 HTTP 서비스를 쉽게 만들 수 있습니다
- 발명가들의 새로운 기능: _Serve 기능을 사용하여 쉽게 HTTP 서비스를 만들 수 있습니다.
- FMZ 양자 거래 플랫폼 사용자 지정 프로토콜 액세스 가이드
- FMZ 펀딩 비율 획득 및 모니터링 전략
- FMZ 자금률 확보 및 모니터링 전략 전략
- 전략 템플릿은 웹소켓 마켓을 원활하게 사용할 수 있습니다
- 웹소켓을 원활하게 사용할 수 있는 정책 템플릿
- 발명가 양적 거래 플랫폼 일반 프로토콜 접근 지침
- FMZ 업그레이드 후 어떻게 하면 유니버설 멀티 화폐 거래 전략을 빠르게 구축 할 수 있습니까?
- FMZ 업그레이드 후 어떻게 더 빠르게 통용형 다화 거래 전략을 구축할 수 있습니까?
- DCA 거래: 널리 사용되는 양적 전략