오크는 당신이 FMZ 확장 API와 인터페이스를 위해 JS를 사용하는 것을 가르칩니다
저자:FMZ~리디아, 창작: 2022-12-20 13:27:24, 업데이트: 2023-09-20 11:12:14
오크는 당신이 FMZ 확장 API와 인터페이스를 위해 JS를 사용하는 것을 가르칩니다
소개
안녕하세요, 저는 오크 퀀트입니다.시장을 감시합니다, 인기가 있으며, 같은 이름의 서비스 번호의 동기적 인 상기이 있으며, 새롭고 오래된 사용자에게 시장 트렌드를 판단하는 새로운 참조를 제공합니다. 이 열을 활용하기 위해, 우리는 FMZ
이 기사 는 주로 다음 과 같은 내용 을 소개 합니다.
- 개발자는 어떻게 JS 언어를 통해 FMZ 확장 API와 인터페이스를합니까? (이 기사에서는 GetNodeList 방법을 예로 들 수 있습니다.)
- 사례 1: 확장된 API의 CommandRobot 방법을 사용하여 모니터링 로봇과 다른 로봇 사이의 메시지 통신을 실현하십시오.
- 사례 2: 확장된 API의 GetRobotDetail 방법을 사용하여 여러 로봇 데이터의 통합 모니터링 및 표시를 실현하십시오.
1. JS를 FMZ의 확장 API와 인터페이스를 사용
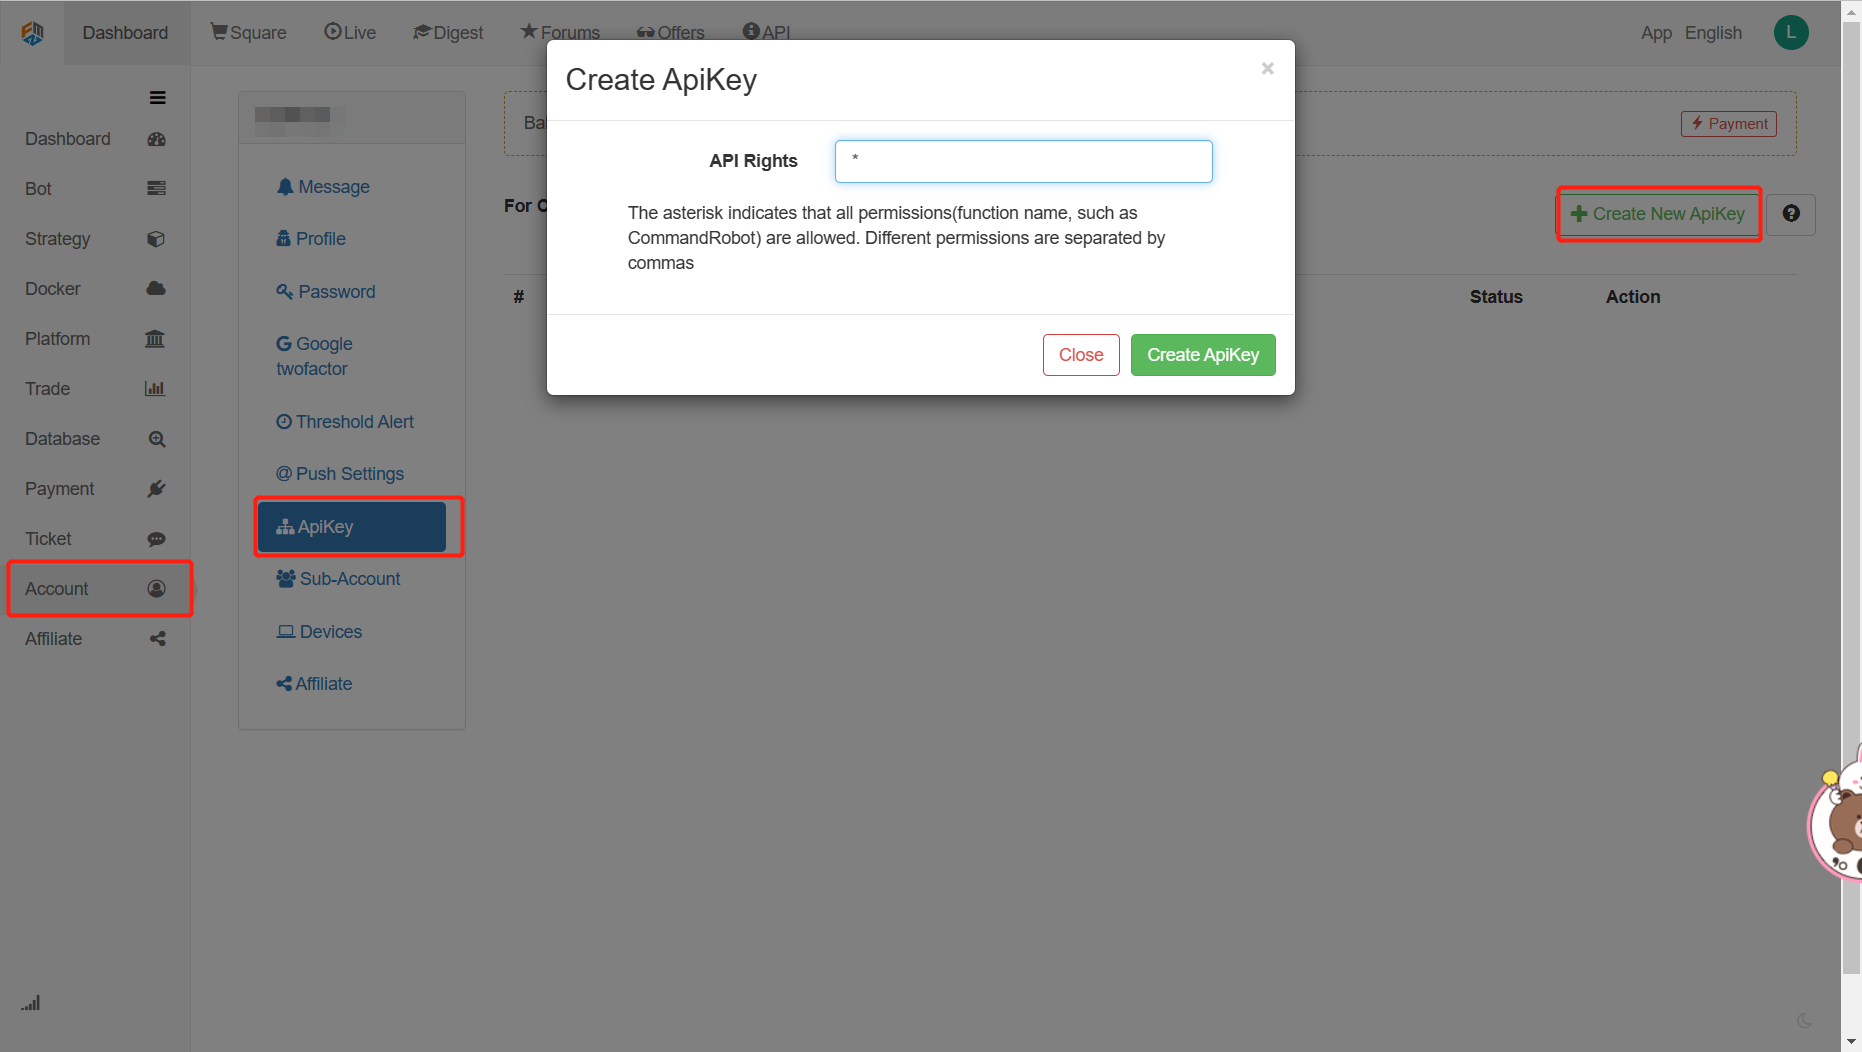
1) AccessKey 및 SecretKey (이하 AK 및 SK) 를 신청합니다. 우리는 FMZ 공식 웹 사이트에서 [계정] -> [ApiKey] -> [새로운 ApiKey를 생성]의 메뉴에서 적용하고 AK와 SK의 그룹을 얻고 기록합니다. (FMZ의 AK와 SK는 가시적입니다. 우리는 [API 인터페이스] 메뉴에서 AK와 SK의 전체 데이터를 언제든지 볼 수 있습니다.)

2) 확장 된 API 문서에 따라 개발 먼저, 요청 API의 주요 단계를 살펴보자.
- FMZ API 인터페이스:
https://www.fmz.com/api/v1
- 요청의 기본 매개 변수
{
    'version'   : '1.0',                                //Custom version number
    'access_key': '8a148320e0bxxxxxxxxxxxxxx19js99f',   //AK
    'method'    : 'GetNodeList',                        //The specific method to call
    'args'      : [],                                   //List of parameters for the specific method algorithm
    'nonce'     : 1516292399361,                        //Timestamp, in milliseconds
    'sign'      : '085b63456c93hfb243a757366600f9c2'    //Signature (need to be encrypted according to the above 5 parameters to obtain, as discussed below)
}
- 전체 요청 URL은 질문 표시 및 매개 변수 전달 형태로 스플라이스됩니다
Take the GetNodeList method as an example:
https://www.fmz.com/api/v1?
access_key=8a148320e0bxxxxxxxxxxxxxx19js99f&
nonce=1516292399361&
args=%5B%5D&
sign=085b63456c93hfb243a757366600f9c2&
version=1.0&
method=GetNodeList
- 서명 방법
After the parameters are spliced in the following order, the MD5 encryption algorithm is used to encrypt the string and convert it to a hexadecimal data string value, which is used as the value of the parameter sign.
version + "|" + method + "|" + args + "|" + nonce + "|" + secretKey
- 요약하면 다음 코드가 있습니다. 소스 코드 주소:[오크 퀀트] - JS 도킹 FMZ 확장 API 데모
var URL = "https://www.fmz.com/api/v1?";
var AK = "b3a53d3XXXXXXXXXXXXXXXXXXX866fe5";//Replace here with your own AccessKey
var SK = "1d9ddd7XXXXXXXXXXXXXXXXXXX85be17";//Replace here with your own SecretKey

function main() {
    //Get 5 basic parameter objects
    var param = getParam("1.0.0",AK,getArgs());
    Log("param:",param);
    //Get the result after md5 encryption of splicing parameters
    var md5Result = md5(param);
    //Assign the encryption result to the basic parameter object
    param.sign = md5Result;
    //Get the URL of the request api
    var finalUrl = getFinalUrl(param);
    Log("finalUrl:",finalUrl);
    //Execute the request and print the results
    var info = HttpQuery(finalUrl);
    Log("info:",info);
}

//Get 5 basic parameter objects
function getParam(version,ak,args){
    return {
        'version': version,
        'access_key': ak,
        'method': 'GetNodeList',
        'args': JSON.stringify(args),
        'nonce': new Date().getTime()
    }
}

//Execute md5 encryption
function md5(param){
    var paramUrl = param.version+"|"+param.method+"|"+param.args+"|"+param.nonce+"|"+SK
    Log("paramUrl:",paramUrl);
    return Hash("md5", "hex", paramUrl)
}

//Get the final request URL
function getFinalUrl(param){
    return URL+"access_key="+AK+"&nonce="+param.nonce+"&args="+param.args+"&sign="+param.sign+"&version="+param.version+"&method="+param.method;
}

//The naming method of... args is not supported in js, so the arguments keyword is used instead to obtain the parameter array
function getArgs(){
    return [].slice.call(arguments);
}
사례 2: 확장된 API의 CommandRobot 방법을 사용하여 로봇 간의 메시지 통신을 달성합니다.
위의 코드를 바탕으로, 우리는 로봇 간의 메시지 통신을 달성하기 위해 명령 로봇 방법을 사용할 것입니다.
먼저, 명령 로봇 (RobotId, Cmd) 메소드가 요구하는 두 가지 매개 변수를 살펴보자:
| 매개 변수 이름 | 종류 | 의미 |
|---|---|---|
| 로봇Id | int | 로봇 ID는 GetRobotList (...) 또는 로봇 세부 페이지에서 얻을 수 있습니다. |
| Cmd | 문자열 | 로봇에 메시지가 전송되었습니다. |
이제 우리는 매개 변수의 의미를 알고, 호출 방법을 구현하자.
-
로봇 세부 페이지에서 로봇 ID를 얻으십시오.
-
Cmd 메시지를 얻는 방법을 구현
//Get message header information
function getMessageBody(toUserName,msgType,content){
    return ({
        "toUserName":toUserName,//Who to send to
        "fromUserName":AOKE_INFO,//Source
        "createTime": new Date().getTime(),//Current timestamp
        "msgType":msgType,//Message Type
        "content":content,//Message content
        "msgId":Math.random().toString(36).slice(-8)//Message ID
    })
}

//Get message body trend information (data of message header content field)
function getCtaDate(symbol,timeCycle,direction,nowCycleTime){
    return {
        "symbol":symbol,//Trading currency
        "timeCycle":timeCycle,//Trend cycle
        "direction":direction,//Current entry direction, 0: berish, 1: bullish
        "createTime":new Date().getTime(),//Current timestamp
        "nowCycleTime":nowCycleTime//Start time of current cycle
    }
}
- 메시지 전송 코드를 수정
//Get messages before sending them
var sendMessage = getMessageBody("Test object",'CTARemind',getCtaDate('BTC_USDT','120','0','2020-05-1620:00:00'));

//Get the robot ID and message body through the getArgs() method, and pass in the basic parameters.
var param = getParam("1.0.0",AK,getArgs(17777,sendMessage));
- 메인 메소드를 실행합니다. 메시지를 보낸 후 메세지를 얻기 위해 GetCommand() 메소드를 사용하세요
function main(){
    while(true) {
        var cmd = GetCommand()
        if (cmd) {
            Log(cmd)
        }
        Sleep(1000)
    }
}
메시지가 성공적으로 전송되었습니다:

메시지가 성공적으로 수신되었습니다.

사례 3: 확장 된 API의 GetRobotList 및 GetRobotDetail 방법을 사용하여 로봇의 데이터 모니터링 및 표시를 실현하십시오.
마찬가지로, 먼저 다음 두 가지 방법의 매개 변수 설명을 살펴보자 GetRobotList ((오프셋, 길, 로봇상황, 라벨):
| 매개 변수 이름 | 종류 | 의미 |
|---|---|---|
| 오프셋 | int | 질의 페이지 번호 |
| 길이가 | int | 쿼리 페이지의 데이터 길이는 |
| 로봇상황 | int | 1를 넘기면 모든 것을 얻습니다. |
| 라벨 | 문자열 | 사용자 지정 태그는 이 태그를 가진 모든 로봇을 필터링할 수 있습니다 |
GetRobotDetail (로봇번호)
| 매개 변수 이름 | 종류 | 의미 |
|---|---|---|
| 로봇Id | int | 로봇 ID |
- GetRobotList 메소드를 통해 로봇 목록을 얻으십시오.
//Get robot list information
var robotListJson = getAPIInfo('GetRobotList',getArgs(OFF_SET,PAGE_LENGTH,-1));
var robotList = robotListJson.data.result.robots;
- 로봇 세부 정보를 얻으십시오.
//Get robot detail information
var robotDetailJson = getAPIInfo('GetRobotDetail',getArgs(robotId));
var robotDetail = robotDetailJson.data.result.robot;
- 콘솔 출력 테이블 데이터
function getLogPrient(infoArr){
    return table = {
            type: 'table',
            title: 'Oak Quant robot display',
            cols: [''Robot ID', 'Robot name', 'Strategy name', 'Next deduction time', 'Consumed time ms', 'Consumed amount CNY', 'Latest active time', 'Publish or not'],
            rows: infoArr
        };
}
- 요약하면 다음 코드가 있습니다. 소스 코드 주소:[오크 퀀트] - 로봇에 대한 정보를 얻고 그것을 표시하기 위해 확장 API를 사용
var URL = "https://www.fmz.com/api/v1?";
var AK = "b3a53d3XXXXXXXXXXXXXXXXXXX866fe5";//Replace here with your own AccessKey
var SK = "1d9ddd7XXXXXXXXXXXXXXXXXXX85be17";//Replace here with your own SecretKey
var OFF_SET = 0;//Page number subscript of query
var PAGE_LENGTH = 5;//Data length of the query page

function main() {
    LogReset();
    while(true){
        //Get robot list information
        var robotListJson = getAPIInfo('GetRobotList',getArgs(OFF_SET,PAGE_LENGTH,-1));
        //Get the robot list information
        var robotList = robotListJson.data.result.robots;
        //Create an array to display robot information
        var infoArr = new Array();
        var infoArr_index = 0;
        for (index = 0; index < robotList.length; index++) {
            var robot = robotList[index];
            //Get the robot ID of the current loop
            var robotId = robot.id;
            //Get robot detail information
            var robotDetailJson = getAPIInfo('GetRobotDetail',getArgs(robotId));
            var robotDetail = robotDetailJson.data.result.robot;
            //Convert details to array objects
            var arr = getLogPrientItem(robotDetail);
            infoArr[infoArr_index] = arr;
            infoArr_index++;
        }
        Log("infoArr:",infoArr);
        LogStatus('`' + JSON.stringify(getLogPrient(infoArr)) + '`');
        Sleep(30000);
    }
}

function getLogPrient(infoArr){
    return table = {
            type: 'table',
            title: 'Oak Quant robot display',
            cols: [''Robot ID', 'Robot name', 'Strategy name', 'Next deduction time', 'Consumed time ms', 'Consumed amount CNY', 'Latest active time', 'Publish or not'],
            rows: infoArr
        };
}

//Get API information by parameters
function getAPIInfo(method,dateInfo){
    //Get 5 basic parameter objects
    var param = getParam("1.0.0",AK,method,dateInfo);
    //Log("param:",param);
    //Get the result after md5 encryption of splicing parameters
    var md5Result = md5(param);
    //Assign the encryption result to the basic parameter object
    param.sign = md5Result;
    //Get the URL of the request api
    var finalUrl = getFinalUrl(param);
    //Log("finalUrl:",finalUrl);
    //Execute the request and print the results
    var info = HttpQuery(finalUrl);
    //Log("info:",info);
    return JSON.parse(info);
}

//Get the object of the basic 5 parameters
function getParam(version,ak,method,args){
    return {
        'version': version,
        'access_key': ak,
        'method': method,
        'args': JSON.stringify(args),
        'nonce': new Date().getTime()
    }
}

//Execute md5 encryption
function md5(param){
    var paramUrl = param.version+"|"+param.method+"|"+param.args+"|"+param.nonce+"|"+SK
    //Log("paramUrl:",paramUrl);
    return Hash("md5", "hex", paramUrl)
}

//Get the final request URL
function getFinalUrl(param){
    return URL+"access_key="+AK+"&nonce="+param.nonce+"&args="+param.args+"&sign="+param.sign+"&version="+param.version+"&method="+param.method;
}

//The naming method of... args is not supported in js, so the arguments keyword is used instead to obtain the parameter array
function getArgs(){
    return [].slice.call(arguments);
}

//Get the display details object: ['Robot ID', 'Robot Name', 'Strategy Name', 'Next Deduction Time', 'Time Consumed ms', 'Amount Consumed CNY', 'Latest Active Time', 'Whether to Publish'],
function getLogPrientItem(robotDetail){
    var itemArr = new Array();
    var iteArr_index = 0;
    itemArr[iteArr_index++] = robotDetail.id;
    itemArr[iteArr_index++] = robotDetail.name;
    itemArr[iteArr_index++] = robotDetail.strategy_name;
    itemArr[iteArr_index++] = robotDetail.charge_time;
    itemArr[iteArr_index++] = robotDetail.charged;
    itemArr[iteArr_index++] = robotDetail.consumed/1e8;
    itemArr[iteArr_index++] = robotDetail.refresh;
    itemArr[iteArr_index++] = robotDetail.public == 0?"Published":"Unpublished";
    return itemArr;
}
결론
실제 확장에서는 점점 더 흥미로운 기능을 구현할 수 있다. 예를 들어, CommandRobot 방법을 사용하여 각 로봇은 심장 박동 검사를 로봇 A에게 전송한다. 로봇 A가 기계가 심장 박동이 없다는 것을 발견하지만 로봇이 여전히 실행 중인 경우 FMZ 서비스를 통해 경보를 내릴 수 있다. 이렇게하면 가짜 사망 시나리오를 프로그래밍하는 _C() 죽은 루프와 같은 경보를 피할 수 있다. 이번의 소개를 통해 FMZ 플랫폼이 더 많은 흥미로운 기능을 개발하고 개방할 수 있기를 바랍니다. 마지막으로 FMZ 플랫폼과 샤오시아오멘, 장 씨, 지 씨와 같은 위대한 인물들에게
- FMZ Quant의 새로운 기능: _Serve 기능을 사용하여 HTTP 서비스를 쉽게 만들 수 있습니다
- 발명가들의 새로운 기능: _Serve 기능을 사용하여 쉽게 HTTP 서비스를 만들 수 있습니다.
- FMZ 양자 거래 플랫폼 사용자 지정 프로토콜 액세스 가이드
- FMZ 펀딩 비율 획득 및 모니터링 전략
- FMZ 자금률 확보 및 모니터링 전략 전략
- 전략 템플릿은 웹소켓 마켓을 원활하게 사용할 수 있습니다
- 웹소켓을 원활하게 사용할 수 있는 정책 템플릿
- 발명가 양적 거래 플랫폼 일반 프로토콜 접근 지침
- FMZ 업그레이드 후 어떻게 하면 유니버설 멀티 화폐 거래 전략을 빠르게 구축 할 수 있습니까?
- FMZ 업그레이드 후 어떻게 더 빠르게 통용형 다화 거래 전략을 구축할 수 있습니까?
- DCA 거래: 널리 사용되는 양적 전략