Exploring FMZ: Practice of Communication Protocol Between Live Trading Strategies
 0
0
 624
624
[TOC]

With the rapid development of financial markets and the popularity of quantitative trading, more and more traders begin to rely on automated strategies for trading. In this process, communication and coordination between strategies are particularly important. FMZ Quant Trading Platform helps traders achieve seamless strategy docking and real-time data sharing by providing an efficient communication protocol between trading strategies.
This article will explore the live trading communication protocol of trading strategies in the FMZ platform, introduce its design concept, functional features and advantages in practical applications. Through detailed case analysis, we will show how to use this protocol to achieve efficient and stable strategy communication and improve the execution and profit performance of trading strategies.
Whether you are a quantitative trading enthusiast who is just getting started with FMZ or an experienced professional programmer, this article will provide you with valuable insights and practical operation guides. Let us explore the powerful functions of FMZ platform and learn how to achieve collaboration between strategies through efficient communication protocols, improve trading efficiency, and capture market opportunities.
Demand Scenario
- 1. Multi-strategy collaborative trading Demand scenario: In a complex market environment, a single strategy may not be able to cope with various emergencies and market changes. Traders want to run multiple strategies at the same time, such as trend tracking strategies, mean reversion strategies, and arbitrage strategies, and let these strategies communicate in real time to share market information and trading signals, thereby improving overall trading efficiency and stability.
- 2. Cross-market arbitrage Demand scenario: Traders want to conduct arbitrage transactions between different trading markets. For example, arbitrage using the price difference between the A-share market and the Hong Kong stock market. When a price anomaly occurs in a certain market, the strategy needs to promptly notify the strategies in other markets to perform corresponding buying and selling operations in order to capture arbitrage opportunities.
- 3. Risk management and hedging Demand scenario: One strategy is responsible for finding and executing high-risk, high-return transactions in the market, while another strategy focuses on monitoring overall risk and performing hedging operations. In order to ensure that there is no excessive loss during high-risk transactions, these two strategies need to communicate and share data in real time to adjust positions and hedge risks in a timely manner.
- 4. Distributed trading system Demand scenario: Large trading institutions want to run distributed trading systems on multiple physical servers to improve the fault tolerance and performance of the trading system. The strategies on these servers need to synchronize data and coordinate operations through communication protocols to ensure the stability and efficient operation of the overall trading system.
- 5. Market monitoring and early warning Demand scenario: A strategy is responsible for real-time monitoring of market dynamics. When there are major changes in the market (such as a sudden price plunge or surge), the strategy needs to quickly notify other strategies to take corresponding response actions, such as closing positions, adjusting positions, or adding positions, in order to reduce risks or seize trading opportunities.
- 6. Portfolio strategy management Demand scenario: Traders use a portfolio of strategies to manage investments in different asset classes, with each strategy focusing on a specific asset class (such as stocks, bonds, futures, etc.). These strategies need to communicate and coordinate to achieve overall optimization of portfolio investments and maximize returns.
These demand scenarios demonstrate the various possibilities and advantages of the FMZ trading strategy live trading communication protocol in practical applications. Through effective inter-strategy communication, traders can better cope with complex market environments, optimize trading strategies, and improve trading efficiency and profits.
FMZ Encapsulated Communication Protocol and Dial Function
After understanding the communication requirements between live tradings, we need to consider how to implement these requirements. It is nothing more than live trading A hoping to exchange information with live trading B. Although the requirements seem simple, there are various details that need to be agreed upon using a set of communication protocols. FMZ has encapsulated several popular communication protocols.
mqtt / nats / amqp / kafka
Communication Architecture
The communication architecture is:
Server (Proxy). A server that runs a communication protocol is needed to relay messages between subscribers and publishers. This server can be deployed locally on the docker’s system (for local live trading communication) or as a remote service (for cross-server live trading communication).
Client (subscriber, publisher). The strategy live trading program on FMZ can be understood as a client of a communication protocol. The strategy real-time program can be a publisher (pub) or a subscriber (sub).
Dial Function
When applying these protocols on the FMZ platform, it can be simply understood that mqtt / nats / amqp / kafkaprotocols are integrated into the
Dial()function, and theDial()function is used to publish and subscribe messages. These published messages are proxied (relayed) to the subscribed live trading through the protocol server, so a protocol server must be run first. For the sake of demonstration, we use various protocol server image deployments in the following examples.
Dial function in the API documentation section: https://www.fmz.com/syntax-guide#fun_dial
Before deploying the docker image, remember to install the docker software first.

Next, let us explore and practice the communication protocol applications supported by FMZ.
FMZ Platform Live Trading Communication Protocol Practice
mqtt protocol
MQTT (Message Queuing Telemetry Transport) is a lightweight message transmission protocol that is particularly suitable for low-bandwidth, high-latency or unreliable network environments. It was proposed by Andy Stanford-Clark and Arlen Nipper of IBM in 1999 and later became an ISO standard (ISO/IEC PRF 20922).
The main features of the MQTT protocol: publish/subscribe mode
Publishing: The message producer sends the message to the topic.
Subscription: A message consumer subscribes to a topic of interest, thereby receiving messages published to that topic.
Broker: MQTT uses a message broker as an intermediary to forward messages, ensuring decoupling between publishers and subscribers.
Message Publishing and Subscription
Because we use the docker image (eclipse-mosquitto image) of software that supports the MQTT protocol to deploy the MQTT proxy server, we have installed docker in advance and will not go into details later.
Before running the command to deploy the image, we need to write a proxy server configuration file mosquitto.conf.
# Configure port number and remote access IP
listener 1883 0.0.0.0
# Setting up anonymous access
allow_anonymous true
Then execute the deployment command:
docker run --rm -p 1883:1883 -v ./mosquitto.conf:/mosquitto/config/mosquitto.conf eclipse-mosquitto
After the proxy server image is running, the following is displayed:
1723012640: mosquitto version 2.0.18 starting
1723012640: Config loaded from /mosquitto/config/mosquitto.conf.
1723012640: Opening ipv4 listen socket on port 1883.
1723012640: mosquitto version 2.0.18 running
Then we can test the strategy to put it into practice.
var conn = null

function main() {
    LogReset(1)
    var robotId = _G()
    Log("Current live trading robotId:", robotId)

    conn = Dial("mqtt://127.0.0.1:1883?topic=test_topic")
    if (!conn) {
        Log("Communication failure!")
        return
    }

    for (var i = 0; i < 10; i++) {
        // Write
        var msg = "i: " + i + ", testQueue, robotA, robotId: " + robotId + ", time:" + _D()
        conn.write(msg)
        Log("Write a message to testQueue:", msg)

        // Read
        Log("read:", conn.read(1000), "#FF0000")

        Sleep(1000)
    }
}

function onexit() {
    conn.close()
    Log("close conn")
}
The main use of the Dial function in the strategy code is:
Dial("mqtt://127.0.0.1:1883?topic=test_topic")
The string parameter of the Dial function begins with mqtt://, which is the protocol name, followed by the listening address and port. The symbol “?” is followed by the subscription/publishing topic name. The topic name tested here is: test_topic.
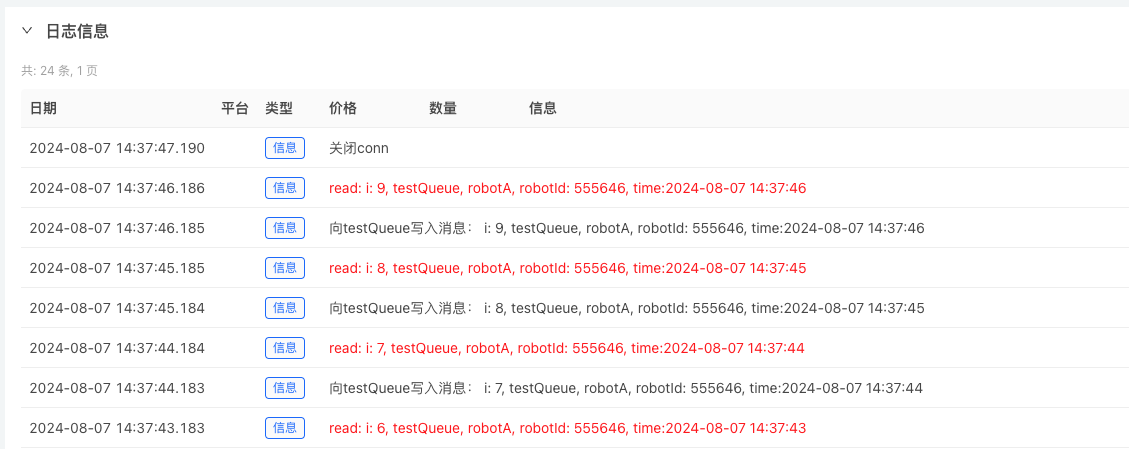
The above strategy publishes and subscribes to a topic at the same time. The running test is as shown in the figure:

We can also use two live tradings to subscribe to each other and publish topic information. We use such an example in the nats protocol practice section, and will not repeat this method in other protocols.
nats Protocol
The NATS protocol is a simple, text-based publish/subscribe style protocol. The client connects to gnatsd (NATS server) and communicates with gnatsd. The communication is based on ordinary TCP/IP sockets and defines a very small set of operations. Newline indicates termination. Unlike traditional message communication systems that use binary message formats, the text-based NATS protocol makes the client implementation very simple and can be easily implemented in a variety of programming languages or scripting languages.
Each protocol has its own characteristics. You can refer to the specific documents and materials, which will not be elaborated here.
Deploy the NATS protocol server:
docker run –name nats –rm -p 4222:4222 -p 8222:8222 nats –http_port 8222 –auth admin
This docker command will automatically download and run the nats image, and port 4222 is the port that the client needs to access. After the image is deployed, an http monitor will also be opened on port 8222.
Listening for client connections on 0.0.0.0:4222
Server is ready
The nats server image starts running, listening on port 4222.
Communication Between Local Device Live Trading Strategies
We need to create two strategies (live trading), let’s name them Strategy A and Strategy B. The codes of these two strategies are basically the same. They are written in Javascript, which is the easiest language to use on the FMZ platform.
- Strategy A
var connPub = null
var connSub = null

function main() {
    var robotId = _G()
    Log("Current live trading robotId:", robotId)

    connPub = Dial("nats://[email protected]:4222?topic=pubRobotA")
    if (!connPub) {
        Log("Communication failure!")
        return
    }

    connSub = Dial("nats://[email protected]:4222?topic=pubRobotB")
    if (!connSub) {
        Log("Communication failure!")
        return
    }

    while (true) {
        connPub.write("Message posted by robotA, robotId: " + robotId + ", time:" + _D())
        var msgRead = connSub.read(10000)
        if (msgRead) {
            Log("msgRead:", msgRead)
        }

        LogStatus(_D())
        Sleep(10000)
    }
}

function onexit() {
    connPub.close()
    connSub.close()
}
- Strategy B
var connPub = null
var connSub = null

function main() {
    var robotId = _G()
    Log("Current live trading robotId:", robotId)

    connPub = Dial("nats://[email protected]:4222?topic=pubRobotB")
    if (!connPub) {
        Log("Communication failure!")
        return
    }

    connSub = Dial("nats://[email protected]:4222?topic=pubRobotA")
    if (!connSub) {
        Log("Communication failure!")
        return
    }

    while (true) {
        connPub.write("Message posted by robotB, robotId: " + robotId + ", time:" + _D())
        var msgRead = connSub.read(10000)
        if (msgRead) {
            Log("msgRead:", msgRead)
        }

        LogStatus(_D())
        Sleep(10000)
    }
}

function onexit() {
    connPub.close()
    connSub.close()
}
These two strategies are almost the same, except that they publish and subscribe to each other, and the subscribed topics, published topics, and published information are different.
Take Strategy B as an example:
- 1. Use the
Dial()function to create a client connection server objectconnPubfor topic message publishing:
var connPub = Dial(“nats://[email protected]:4222?topic=pubRobotB”)
The parameter string of the Dial function starts with nats:// indicating that the NATS protocol is used for communication. Then admin is the simple verification information auth admin set when deploying the Docker image. The character “@” is used to separate the following content. Then there is the service address and port 127.0.0.1:4222. Finally, there is the publish/subscribe topic: topic=pubRobotB Note that the “?” symbol is used to separate it from the previous address.
- 2. Use the
Dial()function to create a client connection server objectconnSubfor topic message subscription:
var connSub = Dial(“nats://[email protected]:4222?topic=pubRobotA”)
The only difference is topic=pubRobotA, because we need to subscribe to the topic pubRobotA where strategy A sends information.
The creation and use of subscription and publishing connection objects in strategy A are the same as described above.
- Strategy A runs

- Strategy B runs

In this way, a simple example of NATS protocol application is implemented in which live trading A and live trading B subscribe to and publish messages to communicate with each other.
amqp Protocol
amqp Protocol Queue
In asynchronous communication, the message will not reach the receiver immediately, but it will be stored in a container. When certain conditions are met, the message will be sent to the receiver by the container. This container is the message queue. To complete this function, both parties and the container and its components must comply with unified agreements and rules. AMQP is such a protocol. Both the sender and the receiver of the message can implement asynchronous communication by complying with this protocol. This protocol stipulates the format and working method of the message.
Each protocol has its own characteristics. You can refer to the specific documents and materials, which will not be elaborated here.
Deploy the amqp protocol server:
docker run –rm –hostname my-rabbit –name rabbit -p 5672:5672 -p 15672:15672 -e RABBITMQ_DEFAULT_USER=q -e RABBITMQ_DEFAULT_PASS=admin rabbitmq:3-management
When deploying a docker image, it will download and deploy automatically, and when it is completed it will display:
2024-08-06 09:02:46.248936+00:00 [info] <0.9.0> Time to start RabbitMQ: 15569 ms
After the server image is deployed, write a test example:
var conn = null

function main() {
    LogReset(1)
    var robotId = _G()
    Log("Current live trading robotId:", robotId)

    conn = Dial("amqp://q:[email protected]:5672/?queue=robotA_Queue")
    if (!conn) {
        Log("Communication failure!")
        return
    }

    for (var i = 0; i < 10; i++) {
        // Read
        Log("read:", conn.read(1000), "#FF0000")

        // Write
        var msg = "i: " + i + ", testQueue, robotA, robotId: " + robotId + ", time:" + _D()
        conn.write(msg)
        Log("Write a message to testQueue:", msg)

        Sleep(1000)
    }
}

function onexit() {
    conn.close()
    Log("close conn")
}
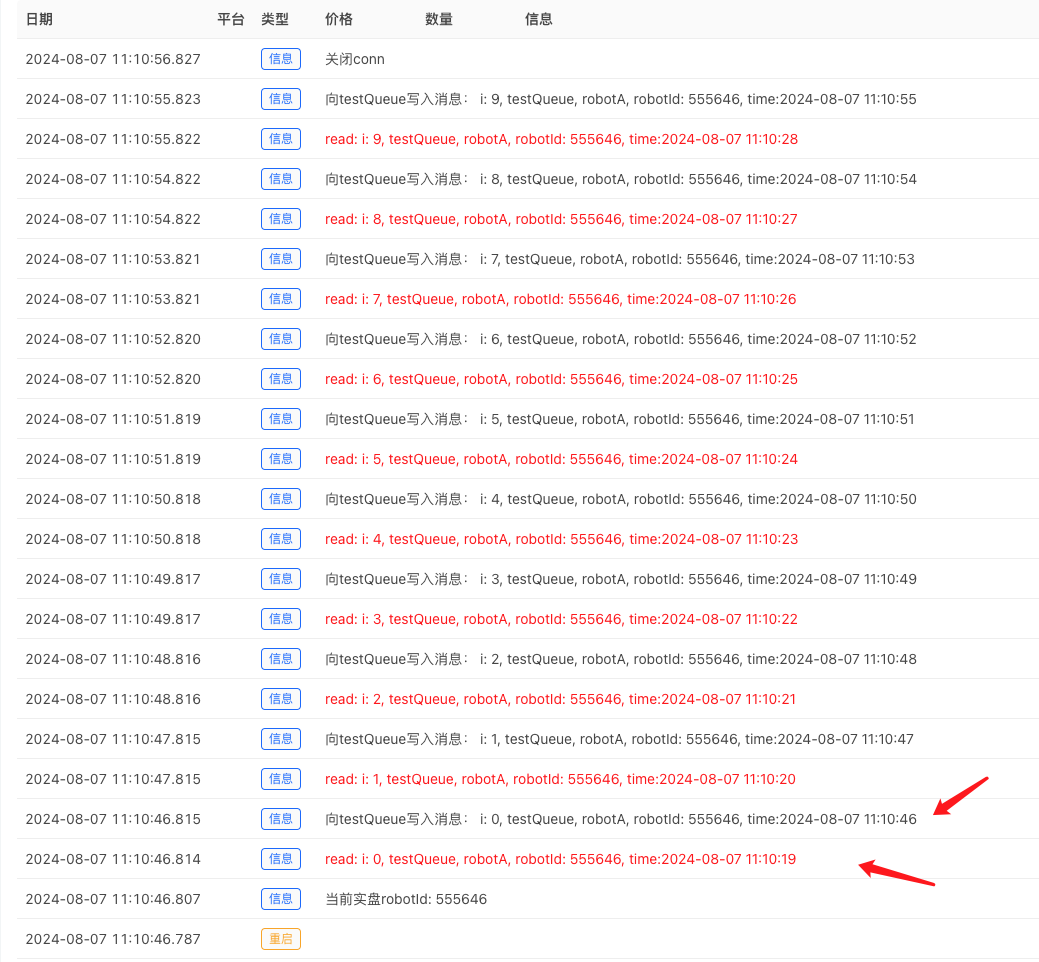
When using the AMQP protocol queue, please note that the published messages will persist in the queue. For example, if we run the above example code, 10 messages will be written to the queue. Then when we run it a second time, we can find that the first written message will be read again when reading. As shown in the figure:

We can see that the two log messages pointed by the red arrows in the screenshot have inconsistent times. The reason is that the red message is the one that was read and written to the queue when the strategy code was first run.
Based on this feature, some requirements can be met. For example, after the strategy is restarted, the recorded market data can still be obtained from the queue for initialization calculation and other operations.
kafka Protocol
Apache Kafka is a distributed data store optimized to ingest and process streaming data in real time. Streaming data is data that is continuously generated by thousands of data sources, often sending data records simultaneously. A streaming platform needs to handle this continuous influx of data, processing it sequentially and incrementally.
Kafka provides three main functions to its users:
- Publishing and subscribing to streams of records
- Efficiently store a stream of records in the order they were generated
- Processing record streams in real time
Kafka is mainly used to build real-time streaming data pipelines and applications that adapt to data streams. It combines messaging, storage, and stream processing capabilities, and can store historical and real-time data.
Message Publishing and Subscription
Deploy the docker image of the Kafka proxy:
docker run --rm --name kafka-server --hostname kafka-server -p 9092:9092 -p 9093:9093 \
        -e KAFKA_CFG_NODE_ID=0 \
        -e KAFKA_CFG_PROCESS_ROLES=controller,broker \
        -e KAFKA_CFG_LISTENERS=PLAINTEXT://0.0.0.0:9092,CONTROLLER://0.0.0.0:9093 \
        -e KAFKA_CFG_ADVERTISED_LISTENERS=PLAINTEXT://localhost:9092 \
        -e KAFKA_CFG_LISTENER_SECURITY_PROTOCOL_MAP=CONTROLLER:PLAINTEXT,PLAINTEXT:PLAINTEXT \
        -e KAFKA_CFG_CONTROLLER_QUORUM_VOTERS=0@kafka-server:9093 \
        -e KAFKA_CFG_CONTROLLER_LISTENER_NAMES=CONTROLLER \
        bitnami/kafka:latest
Test using the test code:
var conn = null

function main() {
    LogReset(1)
    var robotId = _G()
    Log("Current live trading robotId:", robotId)

    conn = Dial("kafka://localhost:9092/test_topic")
    if (!conn) {
        Log("Communication failure!")
        return
    }

    for (var i = 0; i < 10; i++) {
        // Write
        var msg = "i: " + i + ", testQueue, robotA, robotId: " + robotId + ", time:" + _D()
        conn.write(msg)
        Log("Write a message to testQueue:", msg)

        // Read
        Log("read:", conn.read(1000), "#FF0000")

        Sleep(1000)
    }
}

function onexit() {
    conn.close()
    Log("close conn")
}
Let’s take a look at how to use the Kafka protocol to publish and subscribe messages in the Dial function.
Dial("kafka://localhost:9092/test_topic")
Like other protocols, the first part is the protocol name. Then it is followed by the listening address: localhost:9092. Then use the symbol “/” as a separator, followed by the subscription/publishing topic. Here, the test topic is set to test_topic.
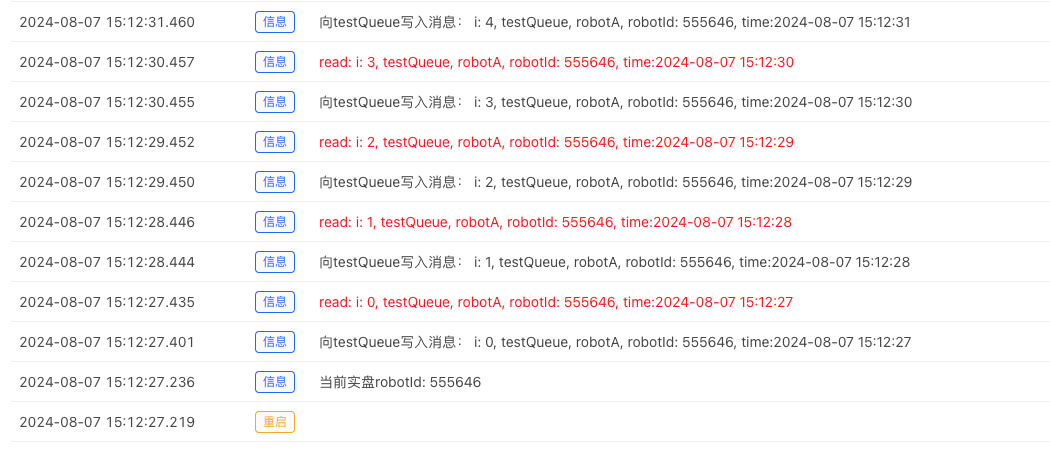
Test Results:

- FMZ Quant Trading Platform Custom Protocol Access Guide
- FMZ Funding Rate Acquisition and Monitoring Strategy
- FMZ资金费率获取与监控策略策略
- A Strategy Template Allows You to Use WebSocket Market Seamlessly
- 一个策略模板让你无缝使用WebSocket行情
- 发明者量化交易平台通用协议接入指南
- How to Build a Universal Multi-Currency Trading Strategy Quickly after FMZ Upgrade
- FMZ升级后,如何快捷构建通用多币种交易策略
- DCA Trading: A Widely Used Quantitative Strategy
- DCA交易:广泛通用的量化策略
- 探索FMZ:交易策略实盘间通信协议实践
- Exploring FMZ: New Application of Status Bar Buttons (Part 1)
- 探索FMZ:状态栏按钮的全新应用(一)
- Introduction to the Source Code of Digital Currency Pair Trading Strategy and the Latest API of FMZ Platform
- 数字货币配对交易策略源码和FMZ平台最新API介绍
- Detailed Explanation of Digital Currency Pair Trading Strategy
- FMZ Quant & OKX: How Do Ordinary People Master Quantitative Trading? The Answers Are All Here!
- 数字货币配对交易策略详解
- Detailed Explanation of FMZ Quant API Upgrade: Improving the Strategy Design Experience
- Detailed Explanation of New Features of Strategy Interface Parameters and Interactive Controls