Visualization Module to Build Trading Strategy - Advanced Understanding
 0
0
 766
766

Visualization Module to Build Trading Strategy - Advanced Understanding
We have learned the Visualization Module to Build Trading Strategy - First Acquaintance, and we have a conceptual understanding of visual module building and splicing, Next, it is easy to learn to use other modules. It is possible to combine some more complex functions.
Trading category module
In the previous learning and testing, we have been exposed to several “trading category” modules. For example: “Exchange Get Ticker” module “Exchange Get OHLC” module …
These have been used will not be repeated here.
1. Obtain the number of exchanges

When writing strategies to use robot trading, you can add more than one exchange object, such as hedging strategies. Or you need to traverse (traversing means visiting the exchange objects one by one) the exchange objects to access the market. This is where the module to get the number of exchanges comes into play.
We can print the number of currently configured exchanges in a simple structure:

In fact, it is like calling such JavaScript strategy code:
function main () {
    Log(exchanges.length)
}
Let’s take a look at the running results of this combined module:


We can see that we have added three exchange objects, representing three different exchange accounts, and the output result of the backtest log is 3.
2. Get the exchange names
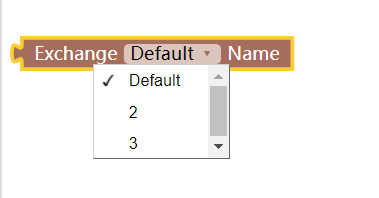
When adding three exchange objects, the drop-down box will display three options. Learn a loop module in the loop type in advance.

Learn a condition judgment module in advance:
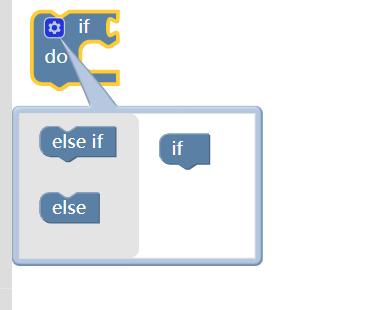
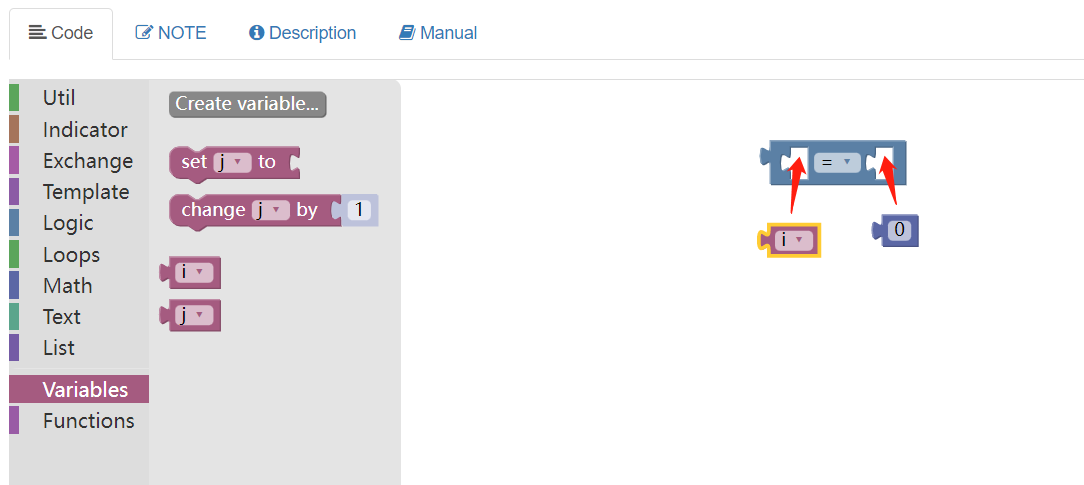
Judgment conditions can be written as follows:
We use the loop module to traverse the added exchange names. We use the condition judgment module to judge whether the current loop count corresponds to the name of the exchange to be printed.
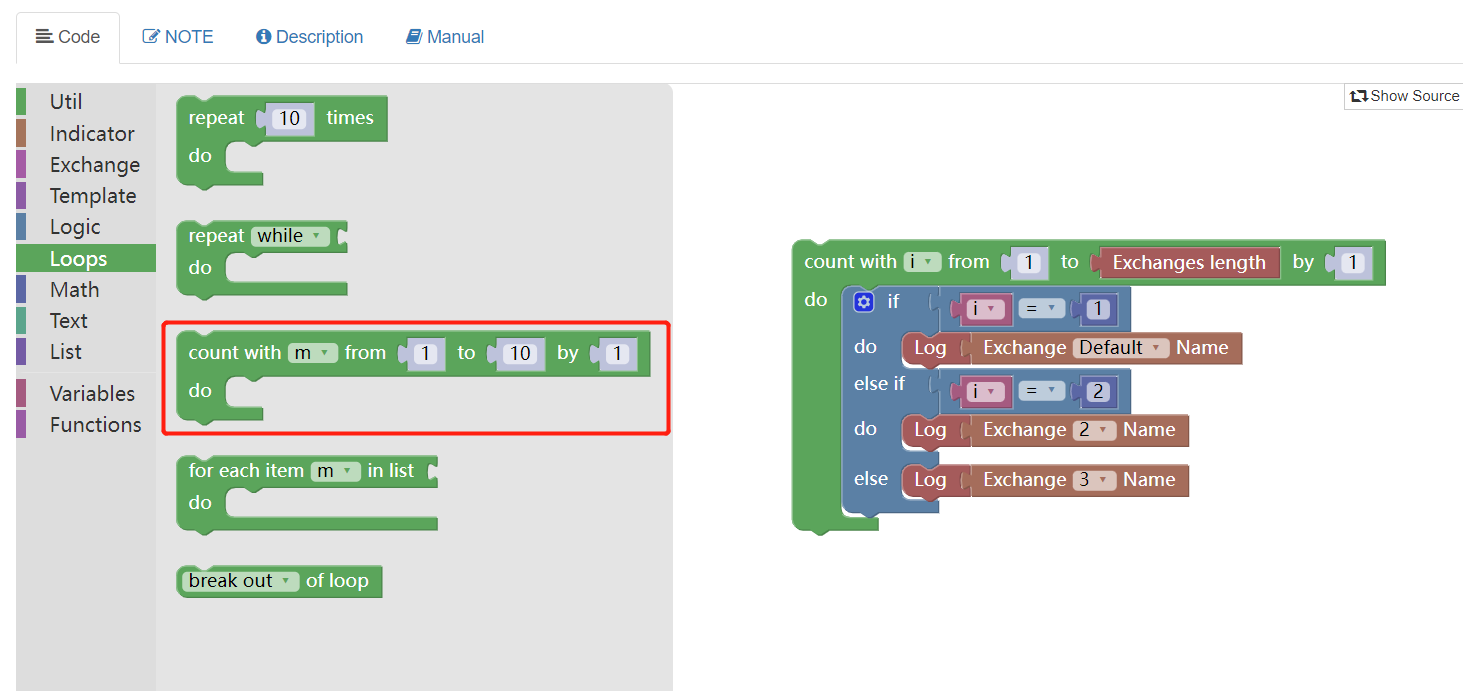
Backtest operation results:

Like JavaScript strategy code:
function main () {
    for (var i = 1 ; i <= exchanges.length ; i++) {
        if (i == 1) {
            Log(exchanges[0].GetName())
        } else if (i == 2) {
            Log(exchanges[1].GetName())
        } else {
            Log(exchanges[2].GetName())
        }
    }
}
3. Get the current trading pair of the exchange

A simple example is to obtain the trading pair of the first exchange object currently set and assign it to the text variable (created in the variable category in advance).

Backtesting results:


If you call JavaScript strategy code:
function main () {
    var text = exchange.GetCurrency()
    Log(text)
}
4. Order module

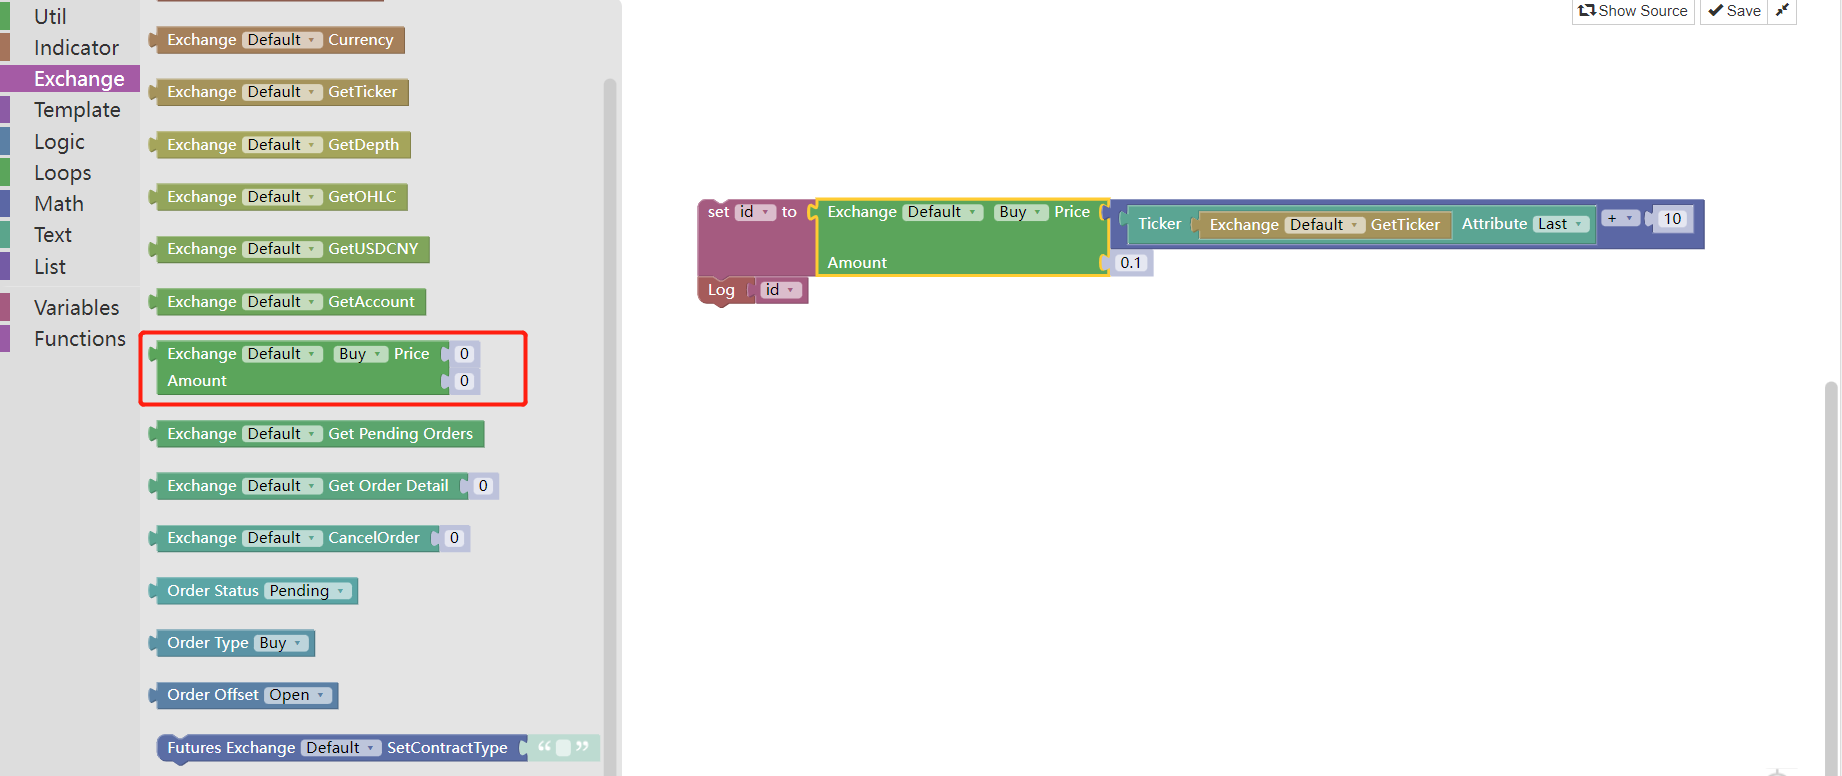
This module is very important for order operation. The first tenon (concave) position is embedded with a price variable, which is used to specify the order price. You can also enter a fixed value directly. The second tenon (concave) position is embedded with the order quantity variable, which is used to specify the order quantity.
For example, we splice an example of placing a buy order at adding a sliding price of 10 yuan based on the latest price of the current tick market data, with the order quantity set to 0.1 coins, and print the order ID.
Backtest operation results:

Like the following JavaScript strategy code:
function main () {
    var id = exchange.Buy(_C(exchange.GetTicker).Last + 10, 0.1)
    Log(id)
}
5. Get pending orders of the current trading pair module

This module will return all pending orders in the unfinished status of the current trading pair. It returns a list structure (array), which can be processed by the list type module (traversal operation, etc.). For example, we modified the above example order module[4] slightly, and change the price of 10 yuan added when placing an order to minus 10 yuan. The order will not be closed immediately, but it will be placed in the depth of the transaction (that is, buy one, buy two, buy a certain level in N), in this way, the order will be in the state of pending orders waiting to be filled. Then we use the module of “Get pending orders of the current trading pair” to get the list of orders in PENDING status (waiting to be filled). In order to avoid the impact on the final observation of the backtest due to the orders being filled in the subsequent market, after the module “Get pending orders of the current trading pair” executes, we print out the order list, and use the module “Throw exception” immediately to stop the program.

Backtesting shows that:

The price of the buy order was 10 yuan lower than the latest price at that time, so it will not be filled immediately. Then obtain the order in the status of pending transaction, and print it out. Finally, an exception is thrown to stop the program.
The whole assembled module is like a call to the JavaScript strategy:
function main () {
    var id = exchange.Buy(_C(exchange.GetTicker).Last - 10, 0.1)
    Log(id)
    Log(exchange.GetOrders())
    throw "stop"
}
6. Cancel order module
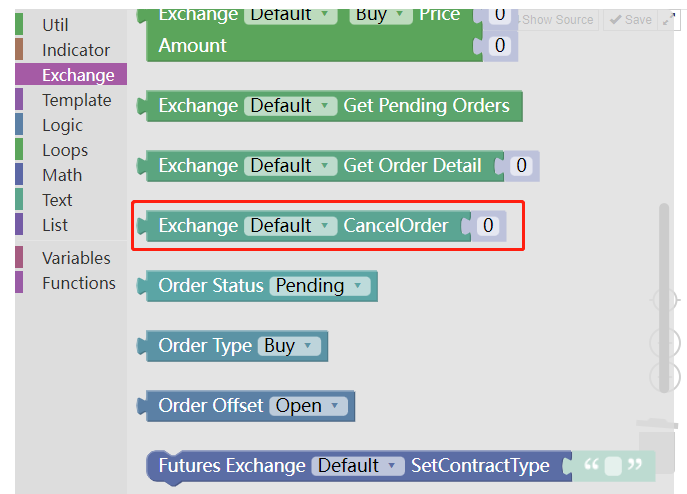
This module is used to cancel the order.
There are many scenarios that require such operations when writing strategies:
Cancel all current pending orders.
There is no doubt that the “Cancel order module” must be used. While learning the cancel order module, we can use [5] to get pending orders of the current trading pair module, and combine to achieve this function.
First of all, in order to test the cancellation of all orders, it is not obvious to place an order. We start to place 2 orders, their prices and quantities are different to distinguish the two orders.

Use the “Traverse every element in the list” module in the “Loop” module to traverse the orders in the current list of pending orders.

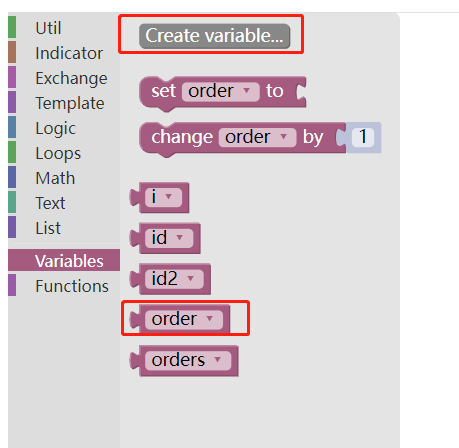
During traversal, each order retrieved is assigned a value to the variable module order (created in the variable module type, as shown below:)
Use the “Util” module:

Take out the order ID, pass it to the tenon (concave) position of the “Cancel order” module, and the “Cancel order” module executes the order cancellation.
Backtest operation:

Use the JavaScript strategy description:
function main () {
    var id = exchange.Buy(_C(exchange.GetTicker).Last - 10, 0.1)
    Log(id)
    var id2 = exchange.Buy(_C(exchange.GetTicker).Last - 12, 0.2)
    Log(id2)
    var orders = exchange.GetOrders()
    Log(orders)
    for (var i in orders) {
        var order = orders[i]
        Log(exchange.CancelOrder(order.Id))
    }
}
7. Module to get the details of an order based on its order ID

The tenon (concave) position of the module is connected with an order ID variable module, and the order details can be returned.

Note the order returned after running:

Compared with the running results in the example [5], it can be found that the printed order is a separate order information without [] brackets. Because the example [5] returns a list, but this example returns a separate order information (obtained based on the ID variable module on the tenon position passed in by the module).
The above example is similar to executing JavaScript strategy:
function main () {
    var id = exchange.Buy(_C(exchange.GetTicker).Last - 10, 0.1)
    Log(exchange.GetOrder(id))
}
8. Futures trading module
We will learn the above modules one by one and we set the test exchange as commodity futures.
Backtesting settings:
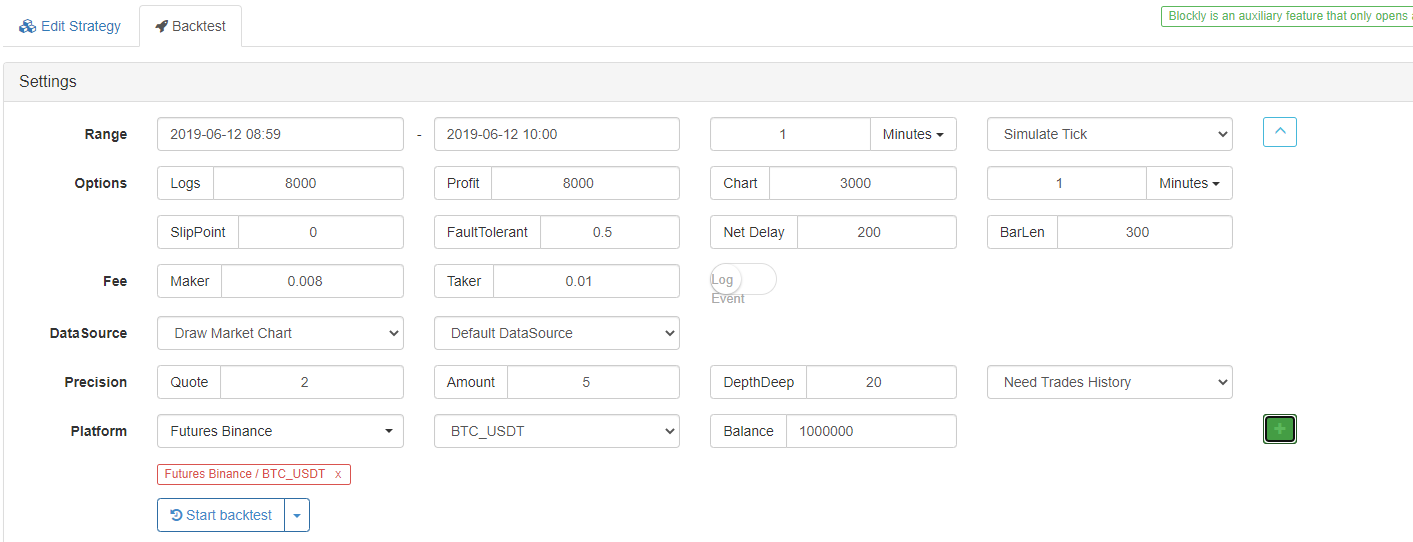
The following example performs backtest based on the settings.
- Judge the connection status module between CTP commodity futures and futures company server
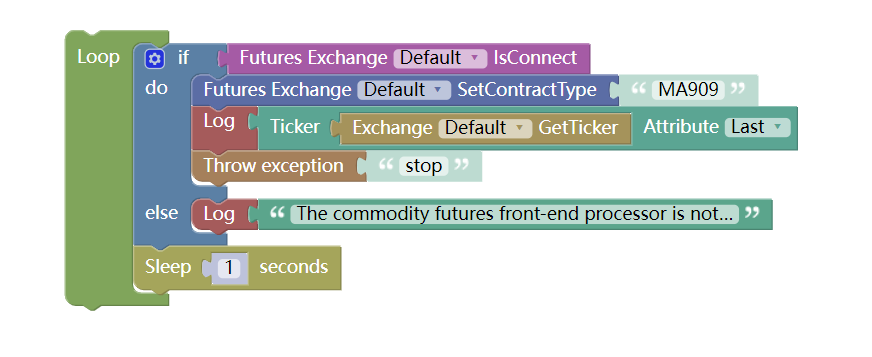
Commodity futures have opening time and closing time. When the market is closed, it cannot be connected.
- Set contract module
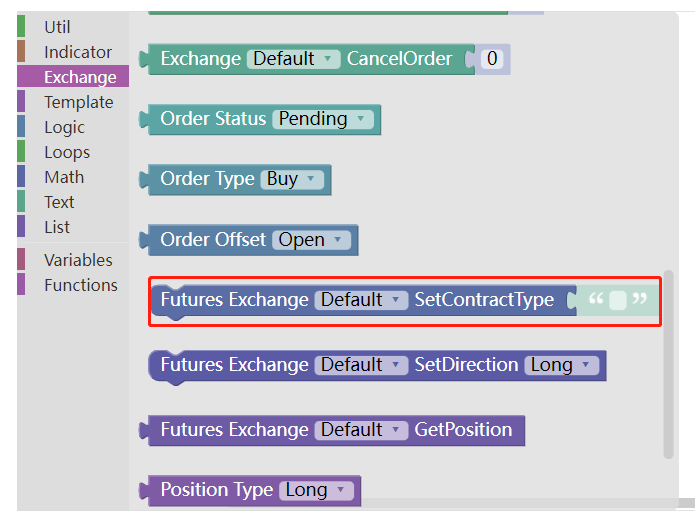
When the object of the exchange is configured as a futures exchange, if the exchange does not set up a contract and obtains the market information directly, an error will be reported.
We set the contract as MA909, the main contract of methanol at present.
In this way, the latest price value in the current tick market of the MA909 contract is obtained.
- Set the order direction module for futures trading
In the execute orders module

The order direction needs to be specified, because the futures have: buy: open long positions sell: open short positions closebuy: close long positions closesell: close short positions Four directions (there are two more directions for commodity futures: closebuy_today for closing long positions today and closesell_today for closing short positions today).
For example, if the order module is set as “buy”, there are two meanings of opening long positions and closing short positions, which is ambiguous. Therefore, the “Set the order direction module for futures trading” module is required to set a clear order direction.
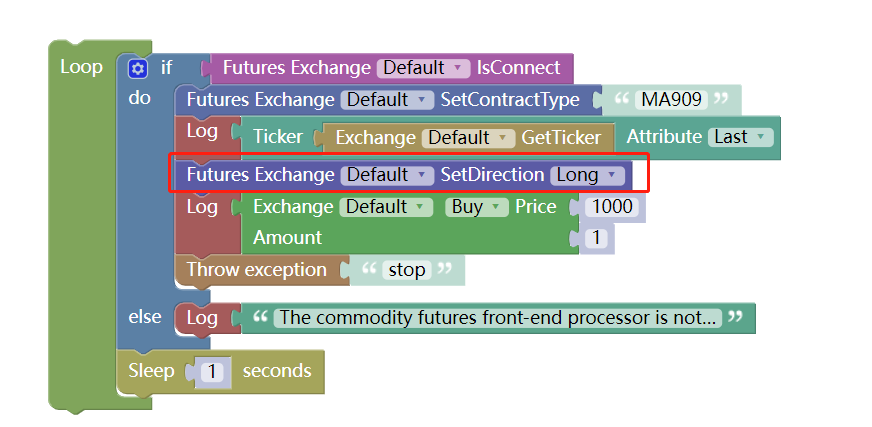
Backtesting display:

Like the JavaScript strategy code:
function main () {
    while (true) {
        if (exchange.IO("status")) {
            exchange.SetContractType("MA909")
            Log(exchange.GetTicker().Last)
            exchange.SetDirection("buy")
            Log(exchange.Buy(1000, 1))
            throw "stop"
        } else {
            Log("The commodity futures front-end processor is not connected")
        }
        Sleep(1000)
    }
}
9. Digital currency futures trading module
The use of digital currency futures is basically the same as that of commodity futures in [8] above - Taking OKEX as an example, the contract code can be: - this_week: this week - next_week: next week - quarter: quarter - swap: perpetual - BitMEX : - XBTUSD - ETHUSD - Set leverage module

It is used to set the leverage of digital currency futures.
#Note: Backtesting is not supported.
Like JavaScript strategy:
function main () {
    exchange.SetMarginLevel(10)
}
Examples of visualization strategies:
https://www.fmz.com/strategy/121404 https://www.fmz.com/strategy/129895 https://www.fmz.com/strategy/123904 https://www.fmz.com/strategy/122318 For more strategies, please refer to: https://www.fmz.com/square
Other articles in this series
- Visualization Module to Build Trading Strategies - In-depth (https://www.fmz.com/digest-topic/9509) Visualization Module to Build Trading Strategy - First Acquaintance (https://www.fmz.com/bbs-topic/9814) The boring programming can be easily completed by building blocks. It’s very interesting to try!
- Balanced Pending Order Strategy (Teaching Strategy)
- Thoughts on asset movement through contract hedging strategy
- Many years later, you will find this article is the most valuable one in your investment career - find out where the returns and risks come from
- Recent FMZ official charging strategy introduction
- Preliminary Exploration of Python Crawler Application on FMZ Platform -- Crawling the Content of Binance Announcement
- Implementation of Dual Thrust trading algorithm by using Mylanguage on FMZ Quant platform
- Introduction FAQ to Quantitative Trading of Digital Currency
- Another TradingView Signal Execution Strategy Scheme
- Use the extended API on FMZ Quant Trading Platform to realize TradingView alert signal trading
- Visualization Module to Build Trading Strategy - Simple Explanation
- Visualization Module to Build Trading Strategy - First Acquaintance
- The Journey of Detours from an Experienced Programmer
- Single Platform Balance Strategy of Python Version
- Cross-period Arbitrage Strategy of Digital Currency Based on Bollinger Band
- Example of Python MACD drawing
- Dynamic Balance Strategy Based on the Digital Currency
- SuperTrend V.1 -- Super Trend Line System
- Some Thoughts on the Logic of Digital Currency Futures Trading
- High frequency backtesting system based on transaction by transaction and defects of K-line backtesting
- 另一种TradingView信号执行策略方案