Erkundung des FMZ: Neue Anwendung der Statusleiste-Tasten (Teil 1)
Schriftsteller:FMZ~Lydia, Erstellt: 2024-07-26 16:45:02, aktualisiert: 2024-07-29 14:54:42
Mit einem großen Update der FMZ Quant Trading Platform API-Schnittstelle wurden die Strategie-Schnittstellenparameter, interaktive Steuerelemente und andere Funktionen der Plattform angepasst und viele neue Funktionen hinzugefügt.
Jeder Strategieentwickler hofft, eine benutzerfreundliche, leistungsstarke und einfach gestaltete Benutzeroberfläche zu entwickeln. Um diesen Standard zu erreichen, spart FMZ.COM keine Mühe, die Plattformfunktionen zu aktualisieren und die Benutzererfahrung zu verbessern.
Als nächstes wollen wir die Anwendung in einem Szenario mit mehreren Strategien betrachten.
Multi-Variety-Strategie-Szenario
Egal, ob es sich um eine vollautomatische Multi-Variety-Arbitrage-Strategie oder eine halbmanuelle Multi-Variety-Timing-Strategie handelt, es werden einige funktionale interaktive Buttons auf der Strategie-UI-Schnittstelle vorhanden sein, wie z. B. Gewinn, Stop-Loss, vollständige Liquidation, geplante Anvertragung usw. für ein bestimmtes Produkt.
Dann lassen Sie uns die neuen Funktionen der Statusleiste-Taste mit einem einfachsten Nutzungsszenario erforschen.
Der Wert der Vermögenswerte, die für die Berechnung der Vermögenswerte verwendet werden, wird auf der Grundlage der in Anhang I der Verordnung (EU) Nr. 575/2013 festgelegten Vermögenswerte berechnet.
Während die Strategie automatischen Handel ausführt, hoffen wir, für jedes Produkt in der Statusleiste der Strategieoberfläche eine offene Positionstaste zu entwerfen.
- Art des Auftrags: Limit-Order/Marktorder.
- Die Bestellmenge der Bestellung: Menge.
- Der Preis des Auftrags: Preis.
- Handelsrichtung: Kauf (Long), Verkauf (Short).
Vor diesem Upgrade löste der Statusleiste-Button nur eine Button-Interaktionsmeldung aus. Es gab keine Möglichkeit, eine Reihe von Steuerelementen zu binden, um komplexe Nachrichten festzulegen. Dieses Upgrade auf Interaktion löst das Problem. Werfen wir einen Blick auf das Code-Design. Die detaillierten Kommentare, die dem Code hinzugefügt wurden, machen es einfach zu verstehen, wie eine solche Funktion erstellt wird.
Entwurfsbeispiele:
// Set the types of operations BTC_USDT.swap is the type format defined by the FMZ platform, indicating the U-standard perpetual contract of BTC
var symbols = ["BTC_USDT.swap", "ETH_USDT.swap", "LTC_USDT.swap", "BNB_USDT.swap", "SOL_USDT.swap"]

// Construct a button based on a button template
function createBtn(tmp, group) {
    var btn = JSON.parse(JSON.stringify(tmp))
    _.each(group, function(eleByGroup) {
        btn["group"].unshift(eleByGroup)
    })

    return btn
}

function main() {
    LogReset(1)

    var arrManager = []
    _.each(symbols, function(symbol) {
        arrManager.push({
            "symbol": symbol,
        })
    })

    // Btn
    var tmpBtnOpen = {
        "type": "button",
        "cmd": "open",
        "name": "Open a position and place an order",
        "group": [{
            "type": "selected",
            "name": "tradeType",
            "label": "OrderType",
            "description": "Market order, limit order",
            "default": 0,
            "group": "Trading setup",
            "settings": {
                "options": ["Market order", "Limit order"],
                "required": true,
            }
        }, {
            "type": "selected",
            "name": "direction",
            "label": "Trading direction",
            "description": "Buy, sell",
            "default": "buy",
            "group": "Trading setup",
            "settings": {
                "render": "segment",
                "required": true,
                "options": [{"name": "buy", "value": "buy"}, {"name": "sell", "value": "sell"}],
            }
        }, {
            "type": "number",
            "name": "price",
            "label": "price",
            "description": "The price of the order",
            "group": "Trading setup",
            "filter": "tradeType==1",
            "settings": {
                "required": true,
            }
        }, {
            "type": "number",
            "name": "amount",
            "label": "Order quantity",
            "description": "Order quantity",
            "group": "Trading setup",
            "settings": {
                "required": true,
            }
        }],
    }

    while (true) {
        var tbl = {"type": "table", "title": "dashboard", "cols": ["symbol", "actionOpen"], "rows": []}
        _.each(arrManager, function(m) {
            var btnOpen = createBtn(tmpBtnOpen, [{"type": "string", "name": "symbol", "label": "trading instruments", "default": m["symbol"], "settings": {"required": true}}])
            tbl["rows"].push([m["symbol"], btnOpen])
        })

        var cmd = GetCommand()
        if (cmd) {
            Log("Receive interaction:", cmd)

            // Parsing interaction messages: open:{"symbol":"LTC_USDT.swap","tradeType":0,"direction":"buy","amount":111}
            // According to the first colon: the previous instruction determines which button template triggers the message
            var arrCmd = cmd.split(":", 2)
            if (arrCmd[0] == "open") {
                var msg = JSON.parse(cmd.slice(5))
                Log("Trading instruments:", msg["symbol"], ", Trading direction:", msg["direction"], ", Order type:", msg["tradeType"] == 0 ? "Market order" : "Limit order", msg["tradeType"] == 0 ? ", Order price: current market price" : ", Order price:" + msg["price"], ", Quantity of order:", msg["amount"])
            }
        }

        // Output status bar information
        LogStatus(_D(), "\n", "`" + JSON.stringify(tbl) + "`")
        Sleep(1000)
    }
}
Lassen Sie uns zunächst den Lauf-Effekt betrachten und dann das Design der Tastensteuerung im Detail erklären.

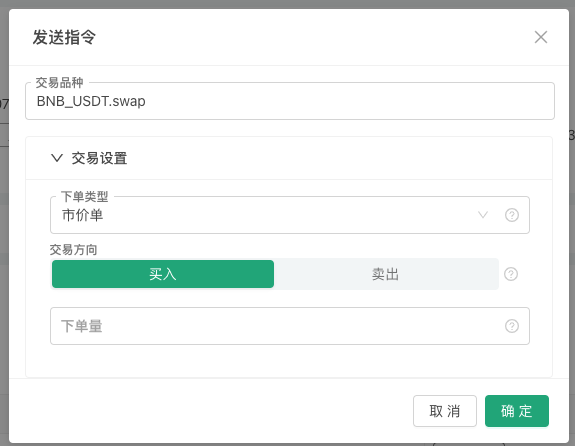
Klicken Sie auf eine Schaltfläche und ein Popup-Fenster wird angezeigt, um die spezifischen Bestellinformationen zu konfigurieren:

Nachdem wir die von uns entworfenen Informationen zur Öffnungsposition ausgefüllt haben, können wir sehen, dass die Strategie die Nachricht in der Spalte Logs erhalten hat, und im Code haben wir die Nachricht analysiert und die verschiedenen Einstellungen der Reihenfolge ausgeführt.
Zuerst definieren wir eine Schaltfläche, die ein JSON-Objekt ist, und weisen sie der Variablen tmpBtnOpen zu.
    {
        "type": "button",       // The type of status bar output control. Currently only buttons are supported.
        "cmd": "open",          // The message prefix received by the GetCommand function in the strategy when the button is triggered, such as this example: open:{"symbol":"LTC_USDT.swap","tradeType":0,"direction":"buy","amount":111}
        "name": "Open a position and place an order",      // Strategy interface, the content displayed on the button on the status bar, refer to the above picture
        "group": [{             // When the button is triggered, the controls in the pop-up box are configured and set. The group field value of this layer is an array, and the controls in the pop-up box are arranged from top to bottom according to the order of this array.
            "type": "selected",               // The first control type is: selected, drop-down box
            "name": "tradeType",              // When the status bar button is triggered, the message contains the settings of the control, and tradeType is the key name of the value currently entered in the drop-down box control. If the first option "Market Order" is selected, the message received by the GetCommand function contains the key-value pair information of "tradeType":0.
            "label": "orderType",               // When the button is triggered, the title of the current control in the pop-up box
            "description": "Market order, limit order",    // The description information of the current control will be displayed when the mouse is placed on the "small question mark" icon on the right side of the control.
            "default": 0,                     // The default value of the current control. For example, if the current control is a drop-down box, if no selection is made, the default value is the first option in the drop-down box. Usually, the default value of a drop-down box refers to the index of the drop-down box option, that is, the first one is 0, then 1, and so on. If the options of the drop-down box are in key-value format, the default value refers to value.
            "group": "Trading setup",               // If there are many controls in the pop-up box, they can be grouped. This field can set the grouping information.
            "settings": {                     // The specific settings of this drop-down box
                "options": ["Market order", "Limit order"],   // Options is a setting related to the drop-down box. It is used to set the options in the drop-down box. The value of this field is an array, which arranges the options in the drop-down box in sequence.
                "required": true,                // Required indicates whether it is set as mandatory (required) content.
            }
        }, {
            "type": "selected",         // This is also a Selected type
            "name": "direction",
            "label": "Trading direction",
            "description": "Buy, sell",
            "default": "buy",
            "group": "Trading setup",
            "settings": {
                "render": "segment",   // Unlike the default drop-down box control, the drop-down box can be replaced with a "segment selector" through the render field, such as the "buy/sell" control in the figure above.
                "required": true,
                "options": [{"name": "buy", "value": "buy"}, {"name": "sell", "value": "sell"}],   // Use key-value to set options
            }
        }, {
            "type": "number",           // Numeric input box type control
            "name": "price",
            "label": "price",
            "description": "The price of the order",
            "group": "Trading setup",
            "filter": "tradeType==1",   // The filter can be used to determine whether to display the current control. When tradeType==1, it means it is a market order, so there is no need to set the price for this control, so it is not displayed.
            "settings": {
                "required": true,       // Required when the control is activated (required)
            }
        }, {
            "type": "number",
            "name": "amount",
            "label": "Order quantity",
            "description": "Order quantity",
            "group": "Trading setup",
            "settings": {
                "required": true,
            }
        }],
    }
Gruppe Da dies nur ein Beispiel ist, kann es mehr Anforderungen an die tatsächliche Gestaltung und Verwendung geben, nicht nur an die bei der Eröffnung einer Position festgelegte Bestellrichtung, den Preis, die Menge und den Bestelltyp. Es kann auch die Gestaltung von Ausstiegsregeln wie Take-Profit- und Stop-Loss-Plan-Orders geben. Daher unterstützt die neue Version der Benutzeroberfläche das Gruppenfeld, das bequem ist, um eine Gruppe von Steuerelementen im Pop-up-Box zusammen zu gruppieren, um angezeigt zu werden, wie die Falteinstellung von
Trading Settings im obigen Screenshot. notwendig Das im Gruppenfeld in der Tastenstruktur eingestellte Steuerelement fügt das erforderliche Einstellfeld hinzu, um festzulegen, ob es erforderlich ist. Wenn es auf erforderlich eingestellt ist, aber während der Verwendung nicht ausgefüllt (gewählt) wird, können Sie nicht auf die OK-Taste klicken, um die interaktive Information zu senden, und eine rote Aufforderungsmeldung wird angezeigt.
Filter Das Filterfeld wird hinzugefügt, um die Filterabhängigkeit festzulegen. Zum Beispiel, in dem obigen Beispiel, wenn der Marktorder-Typ ausgewählt ist, ist der Bestellpreis nicht notwendig. Sie können das Steuerelement mit Typ
number und Namen price verstecken. Wiedergabe Für diese Grundtypen von Steuerelementen (Typenfeld-Einstellungen): Zahl, Zeichenfolge, ausgewählt, Boolean. Hinzugefügtem Feldrendern, um das Rendering von Steuerelementen festzulegen, hat jedes Steuerelement mehrere eigene Rendering-Komponenten. In dem obigen Beispiel ist es beispielsweise angemessen, das ausgewählte Dropdown-Box-Kontroll als
Segment-Selektor zu rendern, da das Dropdown-Box zweimal geklickt werden muss (zum ersten Mal, um das Dropdown-Box zu erweitern, zum zweiten Mal, um eine Option auszuwählen).
Abschließend mögen sich die aufmerksamen Leser fragen: Ich sehe nicht die Steuerungsinformationen im Popup-Box, in dem Sie im obigen Screenshot
Handelssymbol geschrieben haben, und dieses Handelssymbol gehört nicht zur Gruppe Handelseinrichtung (d. h.: "group": "Trading setup"Diese Einstellung wird umgesetzt).Hier ist eine Demonstration eines Designs, das die Tasten in der Statusleiste an andere Informationen in der Statusleiste bindet.
createBtnFunktion wird verwendet, um die endgültige Knopfstruktur nach der Vorlage zu konstruierentmpBtnOpen, und andere Informationen werden während der Konstruktion in die Knopfstruktur geschrieben.// When constructing a button, bind the name of the current row and other information, add a control to the button's pop-up box, and place it first var btnOpen = createBtn(tmpBtnOpen, [{"type": "string", "name": "symbol", "label": "Trading symbols", "default": m["symbol"], "settings": {"required": true}}])Der letzte Effekt ist, dass, wenn Sie auf den Knopf mit der Linie klicken
symbolvonBNB_USDT.swapin der Statusleiste der Strategieoberfläche wird das EingabefeldHandelssymbol im Popup-Feld mit BNB_USDT.swapautomatically.
Dieser Artikel stellt nur einen kleinen Teil der Anwendung der neuen Version von UI vor. Angesichts der Tatsache, dass die Gesamtlänge, werden wir weiterhin die Gestaltung anderer Nachfrage-Szenarien im nächsten Artikel diskutieren.
Danke für Ihre Unterstützung!
- FMZ-Finanzierungsraten Akquisition und Überwachung Strategien
- Eine Strategievorlage ermöglicht Ihnen, WebSocket Market nahtlos zu nutzen
- Eine Strategievorlage, mit der Sie die WebSocket-Branche nahtlos nutzen können
- Inventor Quantitative Trading Plattform General Protocol Zugriffsanleitung
- Wie man nach dem FMZ-Upgrade schnell eine universelle Multi-Währungs-Handelsstrategie aufbaut
- Wie man nach dem FMZ-Upgrade schnell eine allgemeine Multi-Währungs-Handelsstrategie aufbaut
- DCA-Handel: eine weit verbreitete quantitative Strategie
- DCA-Transaktionen: Quantifizierungsstrategien, die weit verbreitet sind
- Erforschung von FMZ: Praxis des Kommunikationsprotokolls zwischen Live-Handelsstrategien
- FMZ: Transaktionsstrategien und Praxis von Plattenspeicher-Kommunikationsprotokoll
- Entdecken Sie FMZ: Die neue Anwendung für den Status-Button
- Einführung in den Quellcode der Digital Currency Pair Trading Strategy und die neueste API der FMZ-Plattform
- Die neue API der FMZ-Plattform und der Quellcode für die Kryptowährungspaarungsstrategie
- Ausführliche Erläuterung der Strategie für den Handel mit digitalen Währungspaaren
- FMZ Quant & OKX: Wie beherrschen gewöhnliche Menschen den quantitativen Handel?
- Die Kryptowährungs-Paarungsstrategie wird weiter erläutert
- Detaillierte Erläuterung der FMZ Quant API-Upgrade: Verbesserung der Strategieentwurferfahrung
- Detaillierte Erläuterung neuer Funktionen von Strategie-Schnittstellenparametern und interaktiven Steuerungen
- FMZ Quantify & OKX: Wie kann ein normaler Mensch Quantify-Transactions spielen?
- Erfinder Quantitative Handelsplattform-API-Upgrade: Erhöhung der strategischen Design-Erfahrung