Menjelajahi FMZ: Aplikasi Baru dari Tombol Bar Status (Bagian 1)
Penulis:FMZ~Lydia, Dibuat: 2024-07-26 16:45:02, Diperbarui: 2024-07-29 14:54:42
Dengan pembaruan utama antarmuka API Platform Perdagangan Kuantum FMZ, parameter antarmuka strategi platform, kontrol interaktif dan fungsi lainnya telah disesuaikan, dan banyak fungsi baru telah ditambahkan. Artikel sebelumnya memperkenalkan konten yang diperbarui dari parameter antarmuka dan kontrol interaktif secara rinci. Artikel ini terus mengeksplorasi aplikasi tombol bilah status FMZ.COM yang baru diperkenalkan.
Setiap pengembang strategi berharap untuk membangun antarmuka UI yang mudah digunakan, kuat dan sederhana dalam desain. Untuk mencapai standar ini, FMZ.COM tidak mengorbankan upaya untuk meningkatkan fungsi platform dan meningkatkan pengalaman pengguna. Merancang kontrol interaktif langsung di bilah status halaman strategi adalah peningkatan berdasarkan permintaan ini.
Selanjutnya, mari kita lihat aplikasinya dalam skenario strategi multi-varietas.
Skenario Strategi Multi-Variety
Apakah itu strategi arbitrage multi-varietas otomatis atau strategi multi-varietas waktu semi-manual, akan ada beberapa tombol interaktif fungsional pada antarmuka UI strategi, seperti mengambil keuntungan, stop loss, likuidasi penuh, penugasan yang direncanakan, dll untuk produk tertentu.
Kemudian mari kita mengeksplorasi fitur-fitur baru dari tombol status bar dengan skenario penggunaan yang paling sederhana.
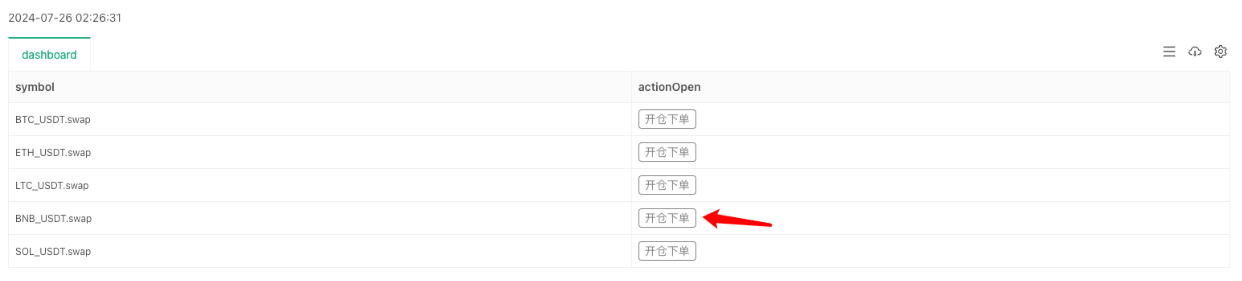
BTC_USDT Perpetual Contract, ETH_USDT Perpetual Contract, LTC_USDT Perpetual Contract, BNB_USDT Perpetual Contract, SOL_USDT Perpetual Contract
Sementara strategi menjalankan perdagangan otomatis, kami berharap untuk merancang tombol posisi terbuka untuk setiap produk di bilah status antarmuka strategi.
- Jenis order: Limit order/Order pasar.
- Jumlah pesanan: jumlah.
- Harga pesanan: Harga.
- Arah perdagangan: beli (panjang), jual (pendek).
Sebelum upgrade ini, tombol status bar hanya memicu pesan interaksi tombol. Tidak ada cara untuk mengikat serangkaian kontrol untuk mengatur pesan yang kompleks. Upgrade ke interaksi ini memecahkan masalah. Mari kita lihat desain kode. Komentar rinci yang ditambahkan ke kode membuatnya mudah untuk memahami cara membangun fungsi seperti itu.
Contoh desain:
// Set the types of operations BTC_USDT.swap is the type format defined by the FMZ platform, indicating the U-standard perpetual contract of BTC
var symbols = ["BTC_USDT.swap", "ETH_USDT.swap", "LTC_USDT.swap", "BNB_USDT.swap", "SOL_USDT.swap"]

// Construct a button based on a button template
function createBtn(tmp, group) {
    var btn = JSON.parse(JSON.stringify(tmp))
    _.each(group, function(eleByGroup) {
        btn["group"].unshift(eleByGroup)
    })

    return btn
}

function main() {
    LogReset(1)

    var arrManager = []
    _.each(symbols, function(symbol) {
        arrManager.push({
            "symbol": symbol,
        })
    })

    // Btn
    var tmpBtnOpen = {
        "type": "button",
        "cmd": "open",
        "name": "Open a position and place an order",
        "group": [{
            "type": "selected",
            "name": "tradeType",
            "label": "OrderType",
            "description": "Market order, limit order",
            "default": 0,
            "group": "Trading setup",
            "settings": {
                "options": ["Market order", "Limit order"],
                "required": true,
            }
        }, {
            "type": "selected",
            "name": "direction",
            "label": "Trading direction",
            "description": "Buy, sell",
            "default": "buy",
            "group": "Trading setup",
            "settings": {
                "render": "segment",
                "required": true,
                "options": [{"name": "buy", "value": "buy"}, {"name": "sell", "value": "sell"}],
            }
        }, {
            "type": "number",
            "name": "price",
            "label": "price",
            "description": "The price of the order",
            "group": "Trading setup",
            "filter": "tradeType==1",
            "settings": {
                "required": true,
            }
        }, {
            "type": "number",
            "name": "amount",
            "label": "Order quantity",
            "description": "Order quantity",
            "group": "Trading setup",
            "settings": {
                "required": true,
            }
        }],
    }

    while (true) {
        var tbl = {"type": "table", "title": "dashboard", "cols": ["symbol", "actionOpen"], "rows": []}
        _.each(arrManager, function(m) {
            var btnOpen = createBtn(tmpBtnOpen, [{"type": "string", "name": "symbol", "label": "trading instruments", "default": m["symbol"], "settings": {"required": true}}])
            tbl["rows"].push([m["symbol"], btnOpen])
        })

        var cmd = GetCommand()
        if (cmd) {
            Log("Receive interaction:", cmd)

            // Parsing interaction messages: open:{"symbol":"LTC_USDT.swap","tradeType":0,"direction":"buy","amount":111}
            // According to the first colon: the previous instruction determines which button template triggers the message
            var arrCmd = cmd.split(":", 2)
            if (arrCmd[0] == "open") {
                var msg = JSON.parse(cmd.slice(5))
                Log("Trading instruments:", msg["symbol"], ", Trading direction:", msg["direction"], ", Order type:", msg["tradeType"] == 0 ? "Market order" : "Limit order", msg["tradeType"] == 0 ? ", Order price: current market price" : ", Order price:" + msg["price"], ", Quantity of order:", msg["amount"])
            }
        }

        // Output status bar information
        LogStatus(_D(), "\n", "`" + JSON.stringify(tbl) + "`")
        Sleep(1000)
    }
}
Mari kita lihat efek berjalan terlebih dahulu, dan kemudian menjelaskan desain kontrol tombol secara rinci.
Klik tombol dan jendela pop-up akan muncul untuk mengkonfigurasi informasi pesanan tertentu:
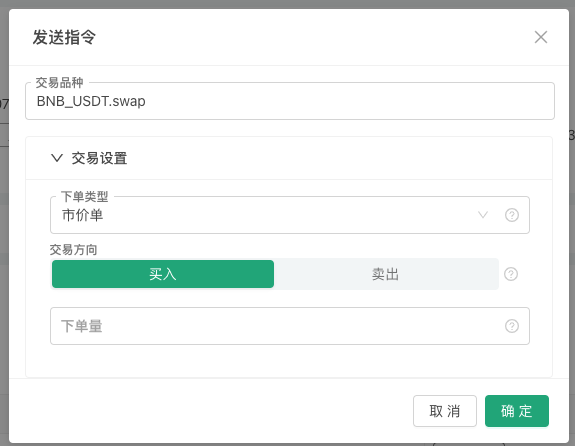
Setelah mengisi informasi posisi pembukaan yang kami rancang, kita dapat melihat bahwa strategi menerima pesan di kolom Log, dan dalam kode kami menganalisis pesan dan output berbagai pengaturan urutan.
Pertama, kita mendefinisikan template tombol, yang merupakan objek JSON, dan menugaskannya ke variabel tmpBtnOpen.
    {
        "type": "button",       // The type of status bar output control. Currently only buttons are supported.
        "cmd": "open",          // The message prefix received by the GetCommand function in the strategy when the button is triggered, such as this example: open:{"symbol":"LTC_USDT.swap","tradeType":0,"direction":"buy","amount":111}
        "name": "Open a position and place an order",      // Strategy interface, the content displayed on the button on the status bar, refer to the above picture
        "group": [{             // When the button is triggered, the controls in the pop-up box are configured and set. The group field value of this layer is an array, and the controls in the pop-up box are arranged from top to bottom according to the order of this array.
            "type": "selected",               // The first control type is: selected, drop-down box
            "name": "tradeType",              // When the status bar button is triggered, the message contains the settings of the control, and tradeType is the key name of the value currently entered in the drop-down box control. If the first option "Market Order" is selected, the message received by the GetCommand function contains the key-value pair information of "tradeType":0.
            "label": "orderType",               // When the button is triggered, the title of the current control in the pop-up box
            "description": "Market order, limit order",    // The description information of the current control will be displayed when the mouse is placed on the "small question mark" icon on the right side of the control.
            "default": 0,                     // The default value of the current control. For example, if the current control is a drop-down box, if no selection is made, the default value is the first option in the drop-down box. Usually, the default value of a drop-down box refers to the index of the drop-down box option, that is, the first one is 0, then 1, and so on. If the options of the drop-down box are in key-value format, the default value refers to value.
            "group": "Trading setup",               // If there are many controls in the pop-up box, they can be grouped. This field can set the grouping information.
            "settings": {                     // The specific settings of this drop-down box
                "options": ["Market order", "Limit order"],   // Options is a setting related to the drop-down box. It is used to set the options in the drop-down box. The value of this field is an array, which arranges the options in the drop-down box in sequence.
                "required": true,                // Required indicates whether it is set as mandatory (required) content.
            }
        }, {
            "type": "selected",         // This is also a Selected type
            "name": "direction",
            "label": "Trading direction",
            "description": "Buy, sell",
            "default": "buy",
            "group": "Trading setup",
            "settings": {
                "render": "segment",   // Unlike the default drop-down box control, the drop-down box can be replaced with a "segment selector" through the render field, such as the "buy/sell" control in the figure above.
                "required": true,
                "options": [{"name": "buy", "value": "buy"}, {"name": "sell", "value": "sell"}],   // Use key-value to set options
            }
        }, {
            "type": "number",           // Numeric input box type control
            "name": "price",
            "label": "price",
            "description": "The price of the order",
            "group": "Trading setup",
            "filter": "tradeType==1",   // The filter can be used to determine whether to display the current control. When tradeType==1, it means it is a market order, so there is no need to set the price for this control, so it is not displayed.
            "settings": {
                "required": true,       // Required when the control is activated (required)
            }
        }, {
            "type": "number",
            "name": "amount",
            "label": "Order quantity",
            "description": "Order quantity",
            "group": "Trading setup",
            "settings": {
                "required": true,
            }
        }],
    }
kelompok Karena ini hanya contoh, mungkin ada lebih banyak persyaratan dalam desain dan penggunaan yang sebenarnya, tidak terbatas pada arah order, harga, kuantitas, dan jenis order yang ditetapkan saat membuka posisi. Mungkin juga ada desain aturan keluar seperti take-profit dan order rencana stop-loss. Oleh karena itu, versi baru UI mendukung bidang kelompok, yang nyaman untuk mengelompokkan sekelompok kontrol di kotak pop-up bersama-sama untuk ditampilkan, seperti pengaturan lipat
Trading Settings dalam tangkapan layar di atas. dibutuhkan Kontrol yang ditetapkan di bidang kelompok dalam struktur tombol menambahkan bidang pengaturan yang diperlukan untuk menetapkan apakah diperlukan. Jika diatur sebagai diperlukan tetapi tidak diisi (dipilih) selama penggunaan, Anda tidak dapat mengklik tombol OK untuk mengirim informasi interaktif, dan pesan prompt merah ditampilkan.
filter Bidang filter ditambahkan untuk mengatur ketergantungan filter. Misalnya, dalam contoh di atas, jika jenis pesanan pasar dipilih, harga pesanan tidak diperlukan. Anda dapat menyembunyikan kontrol dengan mengetik
number dan nama price . membuat Untuk jenis dasar kontrol ini (setelan bidang tipe): nomor, string, dipilih, boolean. Pencitraan bidang ditambahkan untuk mengatur pencitraan kontrol, setiap kontrol memiliki beberapa komponen rendering sendiri. Misalnya, dalam contoh di atas, lebih tepat untuk membuat kontrol kotak drop-down yang dipilih sebagai
selector segmen , karena kotak drop-down perlu diklik dua kali (kali pertama untuk memperluas kotak drop-down, kali kedua untuk memilih opsi). Menggunakan komponen selektor segmen, Anda hanya perlu mengklik sekali untuk memilih opsi yang diperlukan.
Akhirnya, pembaca yang berhati-hati mungkin bertanya, saya tidak melihat informasi kontrol di kotak pop-up di mana Anda menulis
Trading symbol dalam tangkapan layar di atas, dan Trading symbol ini tidak termasuk dalam Trading setup kelompok (yaitu: "group": "Trading setup"pengaturan ini diterapkan).Berikut adalah demonstrasi desain yang mengikat tombol dalam tabel bilah status ke informasi lain di bilah status.
createBtnfungsi digunakan untuk membangun struktur tombol akhir sesuai dengan templattmpBtnOpen, dan informasi lainnya ditulis ke dalam struktur tombol selama konstruksi.// When constructing a button, bind the name of the current row and other information, add a control to the button's pop-up box, and place it first var btnOpen = createBtn(tmpBtnOpen, [{"type": "string", "name": "symbol", "label": "Trading symbols", "default": m["symbol"], "settings": {"required": true}}])Jadi efek akhir adalah bahwa ketika Anda mengklik tombol dengan garis
symboldariBNB_USDT.swapdi bilah status antarmuka strategi, kotak inputTrading symbol di kotak pop-up akan diisi dengan BNB_USDT.swapautomatically.
Artikel ini hanya memperkenalkan sebagian kecil dari aplikasi dari versi baru UI. Mengingat fakta bahwa panjang keseluruhan, kita akan terus membahas desain skenario permintaan lainnya dalam artikel berikutnya.
Terima kasih atas dukungannya!
- Strategi untuk mendapatkan dan memantau tingkat dana FMZ
- Template Strategi Memungkinkan Anda Menggunakan WebSocket Market Seamlessly
- Sebuah template kebijakan yang memungkinkan Anda untuk menggunakan WebSocket secara mulus
- Inventor Quantitative Trading Platforms General Protocol Access Guide (Penggunaan Protokol Umum untuk Pemasaran Kuantitatif)
- Bagaimana Membangun Strategi Perdagangan Multi-Valuta Universal dengan Cepat Setelah Peningkatan FMZ
- Bagaimana cara membangun strategi perdagangan multi mata uang universal dengan cepat setelah upgrade FMZ?
- Perdagangan DCA: Strategi Kuantitatif yang Banyak Digunakan
- Transaksi DCA: Kebijakan Kuantitatif yang Umum
- Menjelajahi FMZ: Praktik Protokol Komunikasi Antara Strategi Perdagangan Langsung
- Eksplorasi FMZ: Strategi Perdagangan, Praktik Protokol Komunikasi Antar-Disk
- Menjelajahi FMZ: Aplikasi Baru untuk Tombol Status
- Pengantar ke Kode Sumber Strategi Perdagangan Pasangan Mata Uang Digital dan API Terbaru dari Platform FMZ
- Sumberdaya Strategi Perdagangan Pasangan Mata Uang Digital dan Pengantar API Terbaru Platform FMZ
- Penjelasan Rinci Strategi Perdagangan Pasangan Mata Uang Digital
- FMZ Quant & OKX: Bagaimana Orang Biasa Menguasai Perdagangan Kuantitatif?
- Strategi perdagangan pasangan mata uang digital
- Penjelasan Rinci FMZ Quant API Upgrade: Meningkatkan Pengalaman Desain Strategi
- Penjelasan Rinci dari Fitur Baru dari Parameter Antarmuka Strategi dan Kontrol Interaktif
- FMZ Quantify & OKX: Bagaimana Orang Biasa Bermain Transaksi Kuantitatif?
- Inventor Quantitative Trading Platform API Upgrade: Meningkatkan Pengalaman Desain Strategi