FMZを探索する:ステータスバーボタンの新しい応用 (1部)
作者: リン・ハーンFMZ~リディア, 作成: 2024-07-26 16:45:02, 更新: 2024-07-29 14:54:42
FMZ Quant Trading Platform APIインターフェースの主要な更新により,プラットフォームの戦略インターフェースパラメータ,インタラクティブコントロールおよびその他の機能が調整され,多くの新しい機能が追加されました.前記記事はインターフェースパラメータおよびインタラクティブコントロールの更新されたコンテンツを詳細に紹介しました.本記事は,FMZ.COMの新たに導入されたステータスバーボットの適用を継続しています.
すべての戦略開発者は,使いやすい,強力でシンプルな UI インターフェースを構築することを望んでいる.この標準を達成するために,FMZ.COMはプラットフォームの機能をアップグレードし,ユーザー体験を改善する努力を惜しまない.戦略ページのステータスバーに直接インタラクティブなコントロールをデザインすることは,この需要に基づいてアップグレードする.
次に,多種多様な戦略のシナリオにおけるその応用について見ていきましょう.
多種戦略シナリオ
完全に自動的な多株間仲介戦略であれ,半手動的な多株間タイミング戦略であれ,特定の製品に対して,利益の引き上げ,ストップ損失,完全清算,計画委託など,戦略UIインターフェイスにいくつかの機能的なインタラクティブなボタンがあります.
ストラテジーは複数の種類の取引をします.
BTC_USDT永久契約,ETH_USDT永久契約,LTC_USDT永久契約,BNB_USDT永久契約,SOL_USDT永久契約
戦略は自動取引を実行している間,戦略インターフェースのステータスバーで各製品に対してオープンポジションボタンを作成することを希望しています.しかし,このオープンポジションボタンには,以下のような一連の詳細な設定が必要です.
- オーダーの種類:制限オーダー/市場オーダー
- 注文の数量:数量
- 注文の価格 価格
- 取引方向:買い (ロング),売 (ショート).
このアップグレード以前は,ステータスバーボタンはボタンのインタラクションメッセージのみをトリガーした.複雑なメッセージをセットするために一連のコントロールをリンクする方法はありませんでした.このインタラクションへのアップグレードは問題を解決します.コードデザインを見てみましょう.コードに追加された詳細なコメントは,そのような関数を構築する方法を理解することを容易にする.
デザインの例:
// Set the types of operations BTC_USDT.swap is the type format defined by the FMZ platform, indicating the U-standard perpetual contract of BTC
var symbols = ["BTC_USDT.swap", "ETH_USDT.swap", "LTC_USDT.swap", "BNB_USDT.swap", "SOL_USDT.swap"]

// Construct a button based on a button template
function createBtn(tmp, group) {
    var btn = JSON.parse(JSON.stringify(tmp))
    _.each(group, function(eleByGroup) {
        btn["group"].unshift(eleByGroup)
    })

    return btn
}

function main() {
    LogReset(1)

    var arrManager = []
    _.each(symbols, function(symbol) {
        arrManager.push({
            "symbol": symbol,
        })
    })

    // Btn
    var tmpBtnOpen = {
        "type": "button",
        "cmd": "open",
        "name": "Open a position and place an order",
        "group": [{
            "type": "selected",
            "name": "tradeType",
            "label": "OrderType",
            "description": "Market order, limit order",
            "default": 0,
            "group": "Trading setup",
            "settings": {
                "options": ["Market order", "Limit order"],
                "required": true,
            }
        }, {
            "type": "selected",
            "name": "direction",
            "label": "Trading direction",
            "description": "Buy, sell",
            "default": "buy",
            "group": "Trading setup",
            "settings": {
                "render": "segment",
                "required": true,
                "options": [{"name": "buy", "value": "buy"}, {"name": "sell", "value": "sell"}],
            }
        }, {
            "type": "number",
            "name": "price",
            "label": "price",
            "description": "The price of the order",
            "group": "Trading setup",
            "filter": "tradeType==1",
            "settings": {
                "required": true,
            }
        }, {
            "type": "number",
            "name": "amount",
            "label": "Order quantity",
            "description": "Order quantity",
            "group": "Trading setup",
            "settings": {
                "required": true,
            }
        }],
    }

    while (true) {
        var tbl = {"type": "table", "title": "dashboard", "cols": ["symbol", "actionOpen"], "rows": []}
        _.each(arrManager, function(m) {
            var btnOpen = createBtn(tmpBtnOpen, [{"type": "string", "name": "symbol", "label": "trading instruments", "default": m["symbol"], "settings": {"required": true}}])
            tbl["rows"].push([m["symbol"], btnOpen])
        })

        var cmd = GetCommand()
        if (cmd) {
            Log("Receive interaction:", cmd)

            // Parsing interaction messages: open:{"symbol":"LTC_USDT.swap","tradeType":0,"direction":"buy","amount":111}
            // According to the first colon: the previous instruction determines which button template triggers the message
            var arrCmd = cmd.split(":", 2)
            if (arrCmd[0] == "open") {
                var msg = JSON.parse(cmd.slice(5))
                Log("Trading instruments:", msg["symbol"], ", Trading direction:", msg["direction"], ", Order type:", msg["tradeType"] == 0 ? "Market order" : "Limit order", msg["tradeType"] == 0 ? ", Order price: current market price" : ", Order price:" + msg["price"], ", Quantity of order:", msg["amount"])
            }
        }

        // Output status bar information
        LogStatus(_D(), "\n", "`" + JSON.stringify(tbl) + "`")
        Sleep(1000)
    }
}
まず実行効果を見て,ボタンの制御の設計を詳細に説明しましょう. 戦略コードは図のように実行されます:
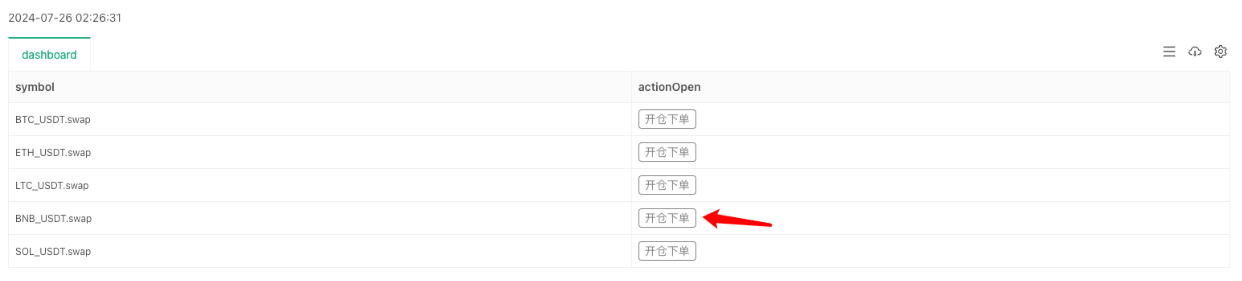
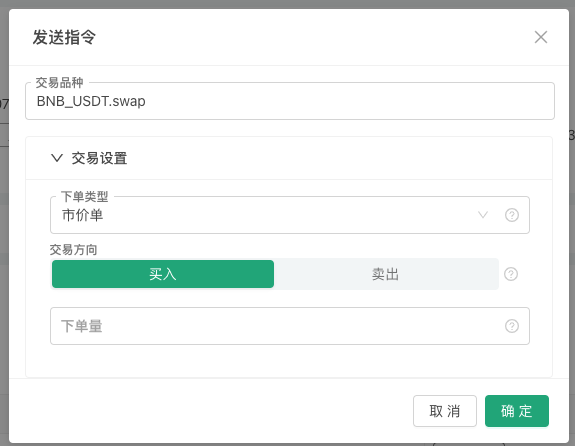
ボタンをクリックすると,特定の注文情報を設定するポップアップウィンドウが表示されます:
このボタンの構造を見てみましょう. このボタンは,次のように構成されています. このボタンは,次のように構成されています.
まず,JSONオブジェクトであるボタンテンプレートを定義し,tmpBtnOpen変数に割り当てます.
    {
        "type": "button",       // The type of status bar output control. Currently only buttons are supported.
        "cmd": "open",          // The message prefix received by the GetCommand function in the strategy when the button is triggered, such as this example: open:{"symbol":"LTC_USDT.swap","tradeType":0,"direction":"buy","amount":111}
        "name": "Open a position and place an order",      // Strategy interface, the content displayed on the button on the status bar, refer to the above picture
        "group": [{             // When the button is triggered, the controls in the pop-up box are configured and set. The group field value of this layer is an array, and the controls in the pop-up box are arranged from top to bottom according to the order of this array.
            "type": "selected",               // The first control type is: selected, drop-down box
            "name": "tradeType",              // When the status bar button is triggered, the message contains the settings of the control, and tradeType is the key name of the value currently entered in the drop-down box control. If the first option "Market Order" is selected, the message received by the GetCommand function contains the key-value pair information of "tradeType":0.
            "label": "orderType",               // When the button is triggered, the title of the current control in the pop-up box
            "description": "Market order, limit order",    // The description information of the current control will be displayed when the mouse is placed on the "small question mark" icon on the right side of the control.
            "default": 0,                     // The default value of the current control. For example, if the current control is a drop-down box, if no selection is made, the default value is the first option in the drop-down box. Usually, the default value of a drop-down box refers to the index of the drop-down box option, that is, the first one is 0, then 1, and so on. If the options of the drop-down box are in key-value format, the default value refers to value.
            "group": "Trading setup",               // If there are many controls in the pop-up box, they can be grouped. This field can set the grouping information.
            "settings": {                     // The specific settings of this drop-down box
                "options": ["Market order", "Limit order"],   // Options is a setting related to the drop-down box. It is used to set the options in the drop-down box. The value of this field is an array, which arranges the options in the drop-down box in sequence.
                "required": true,                // Required indicates whether it is set as mandatory (required) content.
            }
        }, {
            "type": "selected",         // This is also a Selected type
            "name": "direction",
            "label": "Trading direction",
            "description": "Buy, sell",
            "default": "buy",
            "group": "Trading setup",
            "settings": {
                "render": "segment",   // Unlike the default drop-down box control, the drop-down box can be replaced with a "segment selector" through the render field, such as the "buy/sell" control in the figure above.
                "required": true,
                "options": [{"name": "buy", "value": "buy"}, {"name": "sell", "value": "sell"}],   // Use key-value to set options
            }
        }, {
            "type": "number",           // Numeric input box type control
            "name": "price",
            "label": "price",
            "description": "The price of the order",
            "group": "Trading setup",
            "filter": "tradeType==1",   // The filter can be used to determine whether to display the current control. When tradeType==1, it means it is a market order, so there is no need to set the price for this control, so it is not displayed.
            "settings": {
                "required": true,       // Required when the control is activated (required)
            }
        }, {
            "type": "number",
            "name": "amount",
            "label": "Order quantity",
            "description": "Order quantity",
            "group": "Trading setup",
            "settings": {
                "required": true,
            }
        }],
    }
グループ これは例に過ぎないため,ポジション開設時に設定されるオーダー方向,価格,量,オーダータイプに限定されない実際の設計および使用には,より多くの要件がある可能性があります.また,利益とストップロスのプランのオーダーなどの退出規則の設計もあります.したがって,UIの新しいバージョンはグループフィールドをサポートし,上記のスクリーンショットにおける
取引設定 の折りたたたみ設定のような,ポップアップボックス内のコントロールのグループを一緒に表示するために便利です. 必要 ボタン構造のグループフィールドに設定されたコントロールは,必要かどうか設定するために必要な設定フィールドを追加します. 設定が required に設定されているが,使用中に記入されていない場合は,インタラクティブな情報を送信するためにOK ボタンをクリックすることはできません.赤色プロンプトメッセージが表示されます.
フィルター フィルタフィールドはフィルター依存度を設定するために追加されます.例えば,上記の例では,市場オーダータイプが選択されている場合,オーダー価格は必要ありません. 制御をタイプして隠すことができます.
表現する これらの基本的な種類のコントロール (タイプフィールド設定):数,文字列,選択,ブーリアン.制御レンダリングをセットするためにフィールドレンダリングを追加すると,各コントロールには独自の複数のレンダリングコンポーネントがあります.例えば,上記の例では,選択されたドロップダウンボックスコントロールを"セグメントセレクター
"としてレンダリングすることがより適切です.ドロップダウンボックスは2回クリックする必要がありますから (ドロップダウンボックスを拡張するには1回,オプションを選択するには2回).セグメントセレクターコンポーネントを使用すると,必要なオプションを選択するには1回だけクリックする必要があります.
最後に,注意深い読者は,上記のスクリーンショットに"取引のシンボル"と記入したポップアップボックスに制御情報を表示していません. この"取引のシンボル"は"取引の設定"グループに属しません (つまり:
"group": "Trading setup"この設定が実行されている場合)ステータスバーのボタンをステータスバーの他の情報にリンクするデザインのデモです
createBtnテンプレートに従って最終ボタン構造を構築するために使用されます.tmpBtnOpen建設中にボタンの構造に書き込まれます// When constructing a button, bind the name of the current row and other information, add a control to the button's pop-up box, and place it first var btnOpen = createBtn(tmpBtnOpen, [{"type": "string", "name": "symbol", "label": "Trading symbols", "default": m["symbol"], "settings": {"required": true}}])線がここにあるボタンをクリックすると
symbolについてBNB_USDT.swap戦略インターフェイスのステータスバーでは,ポップアップボックスにある"取引のシンボル"の入力ボックスにBNB_USDT.swapautomatically.
この記事では,UIの新しいバージョンのアプリケーションのほんの一部しか紹介していません.全体的な長さを考えると,次の記事で他の需要シナリオの設計について議論していきます.
応援ありがとうございました!
- FMZの資金調達・監視戦略
- WebSocket Market をシームレスに利用できるようにする戦略テンプレート
- ウェブソケットをシームレスに使える ポリシーテンプレート
- 発明者定量化取引プラットフォームの通用プロトコルへのアクセスガイド
- FMZのアップグレード後に迅速にユニバーサルマルチ通貨取引戦略を構築する方法
- FMZのアップグレード後,一般的な多通貨取引戦略を迅速に構築する方法
- DCA トレーディング:広く使われている数値戦略
- DCA取引:広く普及する量化戦略
- FMZを調査する: ライブ取引戦略間の通信プロトコルの実践
- FMZを探索: 取引戦略 リアルディスク間の通信プロトコルの実践
- FMZ:ステータスボタンの全新アプリ (1)
- デジタル通貨ペア取引戦略のソースコードとFMZプラットフォームの最新のAPIへの紹介
- 仮想通貨ペア取引戦略ソースコードとFMZプラットフォーム最新APIの紹介
- デジタル通貨ペア取引戦略の詳細な説明
- FMZ Quant & OKX: 普通の人たちはどうやって量的な取引をマスターするのですか? 答えはすべてここにあります!
- デジタル通貨ペア取引戦略の詳細
- FMZ Quant API アップグレードの詳細な説明: 戦略設計の経験を改善する
- 戦略インターフェースパラメータとインタラクティブな制御の新機能の詳細な説明
- FMZ 量化&OKX:普通の人たちはどのように量化取引を演じますか?
- 発明者による量化取引プラットフォームAPIアップグレード:戦略設計体験を向上させる