"ट्रेडिंग व्यू" संकेतक का उपयोग करके एफएमजेड रोबोट के साथ इंटरफेस करना
 0
0
 1090
1090

पृष्ठभूमि परिचय
ट्रेडिंग व्यू एक अच्छा बाजार उद्धरण ड्राइंग उपकरण है।
..pineस्क्रिप्ट भी एक शक्तिशाली अस्तित्व है!
बैकटेस्टिंग, अलार्म, और विभिन्न डॉकिंग एक बहुत ही पूर्ण वित्तीय उपकरण है।
लेकिन दो मुद्दे हैं जो हमें परेशान कर रहे हैं...
- एक महंगी सदस्यता प्रणाली है
- दूसरा यह है कि बहुत कम ऐसे एक्सचेंज हैं जहां सिग्नल सीधे ट्रेड किए जा सकते हैं, ऐसा लगता है कि दो या तीन हैं।
आज हमारा लेख आपको एक्सचेंज डॉकिंग की समस्या को हल करने के लिए ले जाएगा।
कार्यान्वयन
समग्र विचार इस प्रकार है:
टीवी ((ट्रेडिंग व्यू)pineस्क्रिप्ट -> संकेत अलार्मwebhook-> स्थानीयwebhook serverअनुरोध अग्रेषण -> FMZ बॉट ऑपरेट करने के लिए अनुरोध प्राप्त करता है
चलो कदम-दर-चरण चलते हैं।
ट्रेडिंगव्यू वेबसाइट पर जाएं:
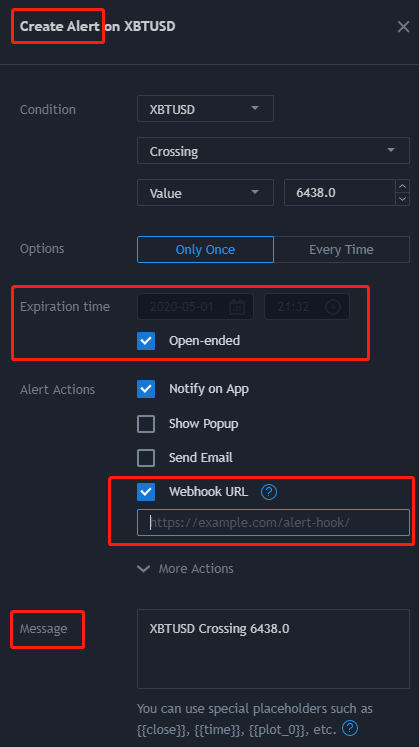
अगला, हम पहले एक बनानेAlert, विवरण के लिए नीचे दिए गए चित्र को देखें

चित्र में कुछ पहलुओं पर ध्यान देने की जरूरत है, जब उत्पन्नAlert.
वैधता अवधि,webhookपता, औरmessageसामग्री को अच्छी तरह से बनाया जाना चाहिए।
समाप्ति तिथि, यह एक नज़र में पता चल जाएगा, और यह समाप्त होने पर अमान्य हो जाएगा...
```Message``` here, it is best we have a clear explanation, in order to let the ```bot``` distinguish from ```Alert``` messages.

I generally set it like this: XXX strategy, order quantity and trading direction

So far, the TradingView part is basically done!

Next, let's get the local ```webhook``` service job done!

This kind of work, Google it will show you lots of results. this article will skip this part, you can do it by yourself.

here is a simple framework for python:
GitHub:https://github.com/shawn-sterling/gitlab-webhook-receiver
Safe, worry-free and convenient, but there are also issues.
This little frame, it will!! Suicide!! Please pay attention to this issue!
So, I wrote another script on the server, When "die" or "offline" appears in the log, I will restart it. later on, i still feel not safe, so i set it restart regularly. Find an unimportant time every hour... Give it a restart, it has been safely running for two months now and there is no more signal losses.
In addition, TradingView only recognizes the port 80, so don't mess up the service port.
So far, We have done the ```Message``` from ```Alert``` part. Next, how do we get Bot?
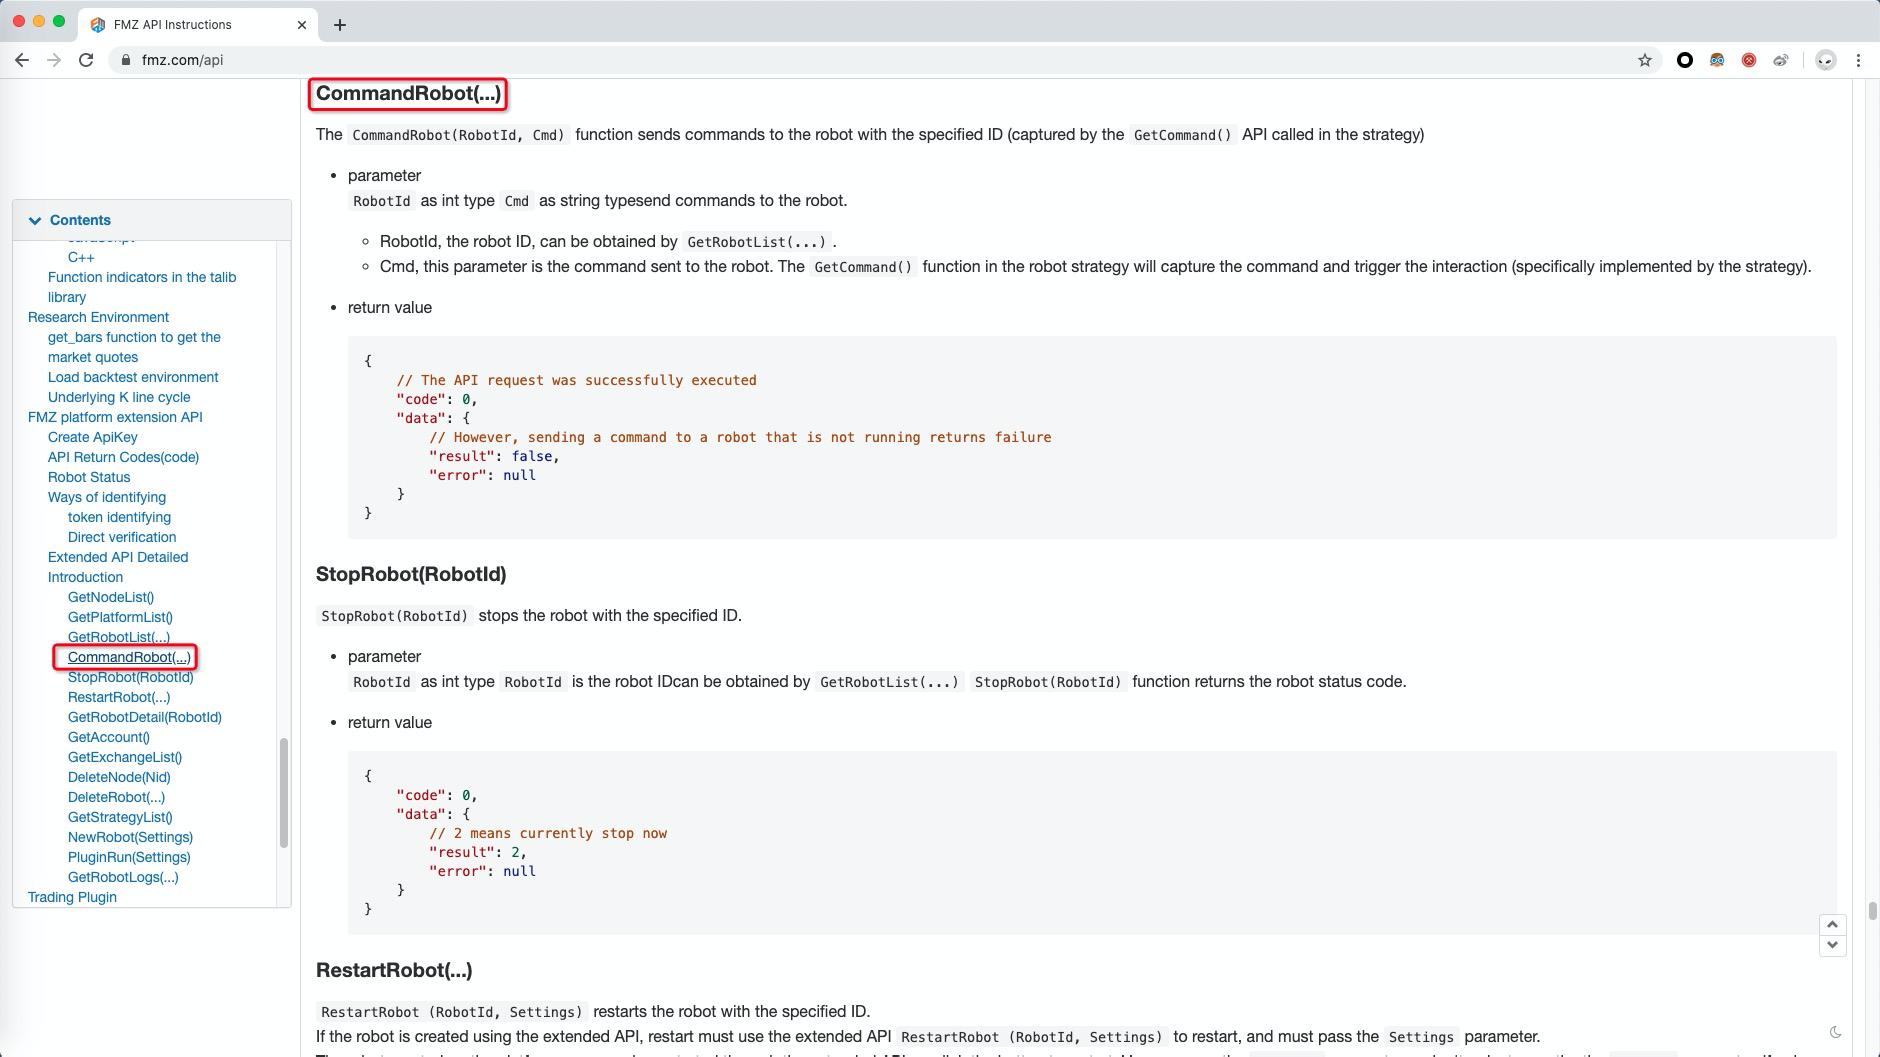
I don't know if you have paid attention to the interface API document of FMZ at the bottom:

We can pass some commands to our little Bot through API!
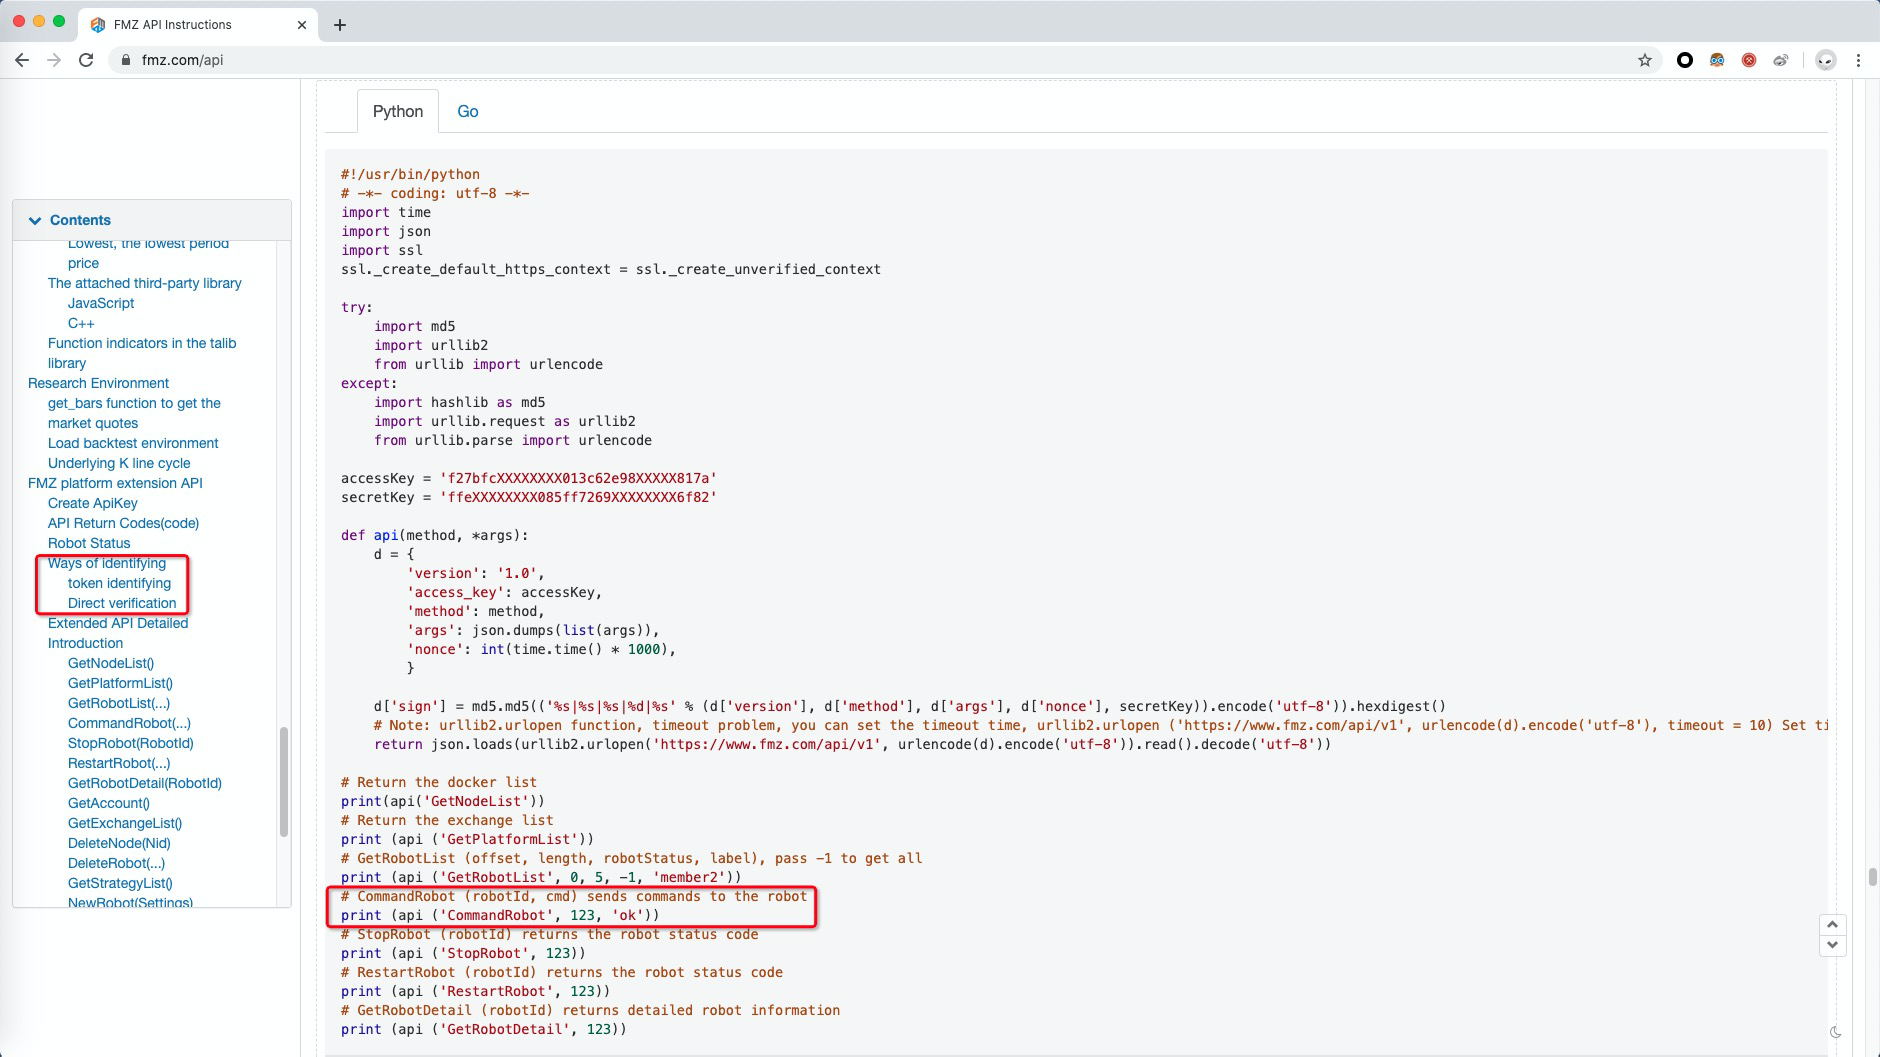
The specific request example is here, the red box is the request we need.

Here also needs some preparation work.
FMZ API (avatar->account settings->API interface),
A Bot that has been started (we want to get its ID, so we create a new ID first), the number in the URL of a general robot is the ID.

Next, we transform the webhook service so that after receiving the message, it will be automatically forwarded to the FMZ Bot.
Finally, don’t forget to fill in the completed ```webhook``` address in the TradingView Alert(format: http://xx.xx.xx.xx:80)
The following is the ```service``` code I changed, you can use it as a reference:
#!/usr/bin/python -tt
-- कोडः यूटीएफ-8 --
से BaseHTTPServer आयात BaseHTTPRequestHandler, HTTPServer json आयात करें आयात लॉगिंग आयात लॉगिंग.हैंडलर्स आयात आयात करना आयात करना आयात उपप्रक्रिया आयात का समय आयात एसएसएल ssl._create_default_https_context = ssl._create_unverified_context
कोशिश करो: आयात md5 आयात urllib2 urllib आयात urlencode से सिवाय: md5 के रूप में hashlib आयात करें urllib.request को urllib2 के रूप में आयात करें urllib.parse आयात urlencode से
############################################################
आपको शायद नीचे दी गई बातों में से कुछ को बदलना होगा
इस स्क्रिप्ट के लिए लॉग फ़ाइल
log_file =
बॉट एपीआई लाइसेंस
accessKey =
HTTP विन्यास
log_max_size = 25165824 # 24 एमबी log_level = लॉगिंग.INFO #log_level = लॉगिंग.DEBUG # डीबीयूजी काफी बहुवचन है
listen_port = 80
आपको चीजों को बदलना बंद कर देना चाहिए जब तक कि आप नहीं जानते कि आप क्या कर रहे हैं
##############################################################################
log = logging.getLogger ((
वर्ग webhookReceiver ((BaseHTTPRequestHandler):
def run_it(self, cmd):
    """
        runs a command
    """
    p = subprocess.Popen(cmd.split(), stdout=subprocess.PIPE,
                         stderr=subprocess.STDOUT)
    log.debug('running:%s' % cmd)
    p.wait()
    if p.returncode != 0:
        log.critical("Non zero exit code:%s executing: %s" % (p.returncode,
                                                              cmd))
    return p.stdout

def bot_conmand(self, method, *args):
    """
        send conmand request to bot api
    """
    d = {
        'version': '1.0',
        'access_key': accessKey,
        'method': method,
        'args': json.dumps(list(args)),
        'nonce': int(time.time() * 1000),
        }
    d['sign'] = md5.md5(('%s|%s|%s|%d|%s' % (d['version'], d['method'], d['args'], d['nonce'], secretKey)).encode('utf-8')).hexdigest()
    return json.loads(urllib2.urlopen('https://www.fmz.com/api/v1', urlencode(d).encode('utf-8')).read().decode('utf-8'))

def do_POST(self):
    """
        receives post, handles it
    """
    log.debug('got post')
    message = 'OK'
    self.rfile._sock.settimeout(5)
    data_string = self.rfile.read(int(self.headers['Content-Length']))
    log.info(data_string)
    self.send_response(200)
    self.send_header("Content-type", "text")
    self.send_header("Content-length", str(len(message)))
    self.end_headers()
    self.wfile.write(message)
    log.debug('TV connection should be closed now.')
    #log.info(self.bot_conmand('GetRobotList', -1, -1, -1)) # GetRobotList(offset, length, robotStatus int)Pass -1 to get all
    log.info(self.bot_conmand('CommandRobot', 169788, data_string))  # CommandRobot(robotId int64, cmd string)Send commands to the robot

def log_message(self, formate, *args):
    """
        disable printing to stdout/stderr for every post
    """
    return
मुख्य परिभाषाः
यदिनाम == ‘मुख्य
# Implementation within FMZ platform trading strategy

All the above described the communication implementation, our Bot trading strategy also needs to be processed accordingly, in order for us to fix our receiving signal process.

For example, the Alert Message designed at the beginning, You can play it according to your preferences and specific needs.

The code is as follows, get the information, filter them, do the operation, and end.
फ़ंक्शन get_Command() { //इंटरैक्शन के लिए जिम्मेदार फ़ंक्शन, समय में इंटरैक्टिव रूप से प्रासंगिक मानों को अपडेट करता है, उपयोगकर्ता खुद से विस्तार कर सकते हैं
var way = शून्य; //route
var cmd = GetCommand(); // इंटरैक्टिव कमांड एपीआई प्राप्त करें
var cmd_arr = cmd.split ((
 if (cmd) {
     // Define the route
     if (cmd.indexOf("BUY,1") != -1) {
         way = 1;
     }
     if (cmd.indexOf("SELL,1") != -1) {
         way = 2;
     }
     if (cmd.indexOf("BUY,2") != -1) {
         way = 3;
     }
     if (cmd.indexOf("SELL,2") != -1) {
        way = 4;
     }
     // Branch selection operation
     switch (way) {
         case 1:
             xxx
             break;
         case 2:
             xxx
             break;
         case 3:
             xxx
             break;
         case 4:
             xxx
             break;
         default:
             break;
     }
 }
} “`
यह लेख समाप्त हो गया है, आशा है कि यह आपकी मदद कर सकता है!
- डीईएक्स एक्सचेंजों का मात्रात्मक अभ्यास (2) -- हाइपरलिक्विड यूजर गाइड
- DEX एक्सचेंज क्वांटिफाइंग प्रैक्टिस ((2) -- हाइपरलिक्विड उपयोग गाइड
- डीईएक्स एक्सचेंजों का मात्रात्मक अभ्यास (1) -- dYdX v4 उपयोगकर्ता गाइड
- क्रिप्टोकरेंसी में लीड-लैग आर्बिट्रेज का परिचय (3)
- DEX एक्सचेंज क्वांटिफाइड प्रैक्टिस ((1)-- dYdX v4 उपयोग गाइड
- डिजिटल मुद्रा में लीड-लैग सूट का परिचय (3)
- क्रिप्टोकरेंसी में लीड-लैग आर्बिट्रेज का परिचय (2)
- डिजिटल मुद्राओं में लीड-लैग सूट का परिचय (2)
- एफएमजेड प्लेटफॉर्म के बाहरी सिग्नल रिसेप्शन पर चर्चाः रणनीति में अंतर्निहित एचटीपी सेवा के साथ सिग्नल प्राप्त करने के लिए एक पूर्ण समाधान
- एफएमजेड प्लेटफॉर्म के लिए बाहरी सिग्नल प्राप्त करने का अन्वेषणः रणनीति अंतर्निहित एचटीटीपी सेवा के लिए सिग्नल प्राप्त करने के लिए पूर्ण समाधान
- क्रिप्टोकरेंसी में लीड-लैग आर्बिट्रेज का परिचय (1)
- कमोडिटी फ्यूचर्स वॉल्यूम फुटप्रिंट चार्ट का विश्लेषण और निष्पादन
- एफएमईएक्स क्रमबद्ध अनलॉक अधिकतम न्यूनतम मात्रा अनुकूलन
- चिपचिपा इंटरफेस को बुलाकर रोबोट संदेश भेजने में सक्षम
- एफएमईएक्स लेन-देन को अनलॉक करने के लिए सबसे कम मात्रा में अनुकूलन
- सरल अस्थिरता ईएमवी रणनीति
- हाथ से हाथ मिलाकर आप एक पायथन नीति पैकेज लागत प्रभावी रूप से फ़ाइल
- विचलन दर BIAS व्यापार रणनीति
- "पाइफोलियो" उपकरण का उपयोग करके बैकटेस्ट पूंजी वक्र का मूल्यांकन
- FMZ क्वांटिफाइड माइ भाषा - इंटरफ़ेस ग्राफ
- कमोडिटी फ्यूचर्स इंटरटेम्पोरल बोलिंगर हेज रणनीति का पायथन संस्करण (केवल अध्ययन उद्देश्य)
- FMZ क्वांटिफाइड मय भाषा (My) - मय भाषा लेनदेन वर्ग सूची पैरामीटर
- कमोडिटी "फ्यूचर्स और स्पॉट" मध्यस्थता चार्ट FMZ मौलिक आंकड़ों के आधार पर
- प्रत्येक लेनदेन और के-लाइन बैकटेस्ट के दोषों के आधार पर उच्च आवृत्ति बैकटेस्ट प्रणाली
- कमोडिटी फ्यूचर्स की अंतराल-समय की हेजिंग रणनीति का पायथन संस्करण
- क्रिप्टोकरेंसी फ्यूचर्स ट्रेडिंग के तर्क पर कुछ विचार
- अल्फा101 व्याकरण विकास पर आधारित उन्नत विश्लेषण उपकरण
- आप बाजार कलेक्टर बैकटेस्ट कस्टम डेटा स्रोत का उन्नयन करने के लिए सिखाएँ
- पेन-बाय-पेन लेनदेन पर आधारित उच्च आवृत्ति पुनरावृत्ति प्रणाली और के-लाइन पुनरावृत्ति के दोष
- एफएमजेड सिमुलेशन स्तर बैकटेस्ट तंत्र की व्याख्या
- लिनक्स वीपीएस पर एफएमजेड डॉकर स्थापित करने और उन्नयन करने का सबसे अच्छा तरीका